Editor’s Note: Don’t miss our new free on-demand training course about how to create data pipeline applications using Apache Spark – learn more here.
Decision trees are widely used for the machine learning tasks of classification and regression. In this blog post, I’ll help you get started using Apache Spark’s MLlib machine learning decision trees for classification.
Overview of ML Algorithms
In general, machine learning may be broken down into two classes of algorithms: supervised and unsupervised.
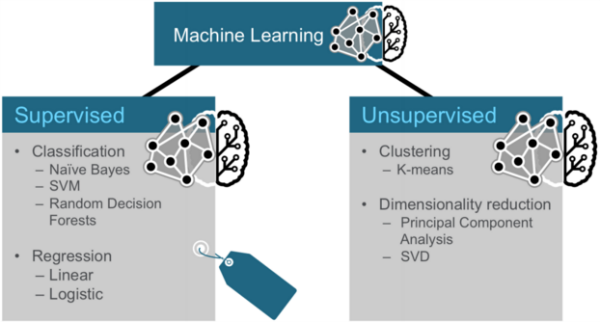
Supervised algorithms use labeled data in which both the input and output are provided to the algorithm. Unsupervised algorithms do not have the outputs in advance. These algorithms are left to make sense of the data without labels.
Three Categories of Techniques for Machine Learning
Three common categories of machine learning techniques are Classification, Clustering and Collaborative Filtering.
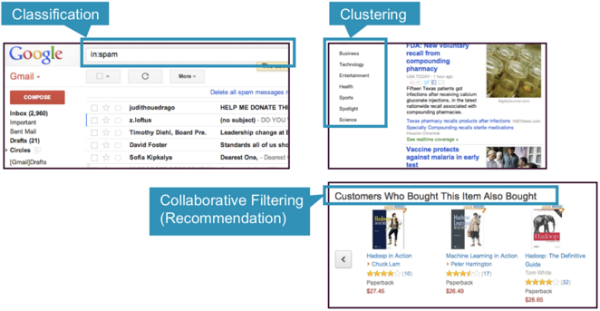
- Classification: Gmail uses a machine learning technique called classification to designate if an email is spam or not, based on the data of an email: the sender, recipients, subject, and message body. Classification takes a set of data with known labels and learns how to label new records based on that information.
- Clustering: Google News uses a technique called clustering to group news articles into different categories, based on title and content. Clustering algorithms discover groupings that occur in collections of data.
- Collaborative Filtering: Amazon uses a machine learning technique called collaborative filtering (commonly referred to as recommendation), to determine which products users will like based on their history and similarity to other users.
Classification
Classification is a family of supervised machine learning algorithms that designate input as belonging to one of several pre-defined classes. Some common use cases for classification include:
- credit card fraud detection
- email spam detection
Classification data is labeled, for example, as spam/non-spam or fraud/non-fraud. Machine learning assigns a label or class to new data.
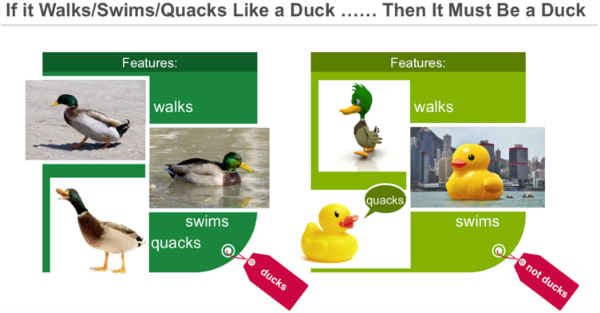
You classify something based on pre-determined features. Features are the “if questions” that you ask. The label is the answer to those questions. In this example, if it walks, swims, and quacks like a duck, then the label is “duck.”
Clustering
In clustering, an algorithm groups objects into categories by analyzing similarities between input examples. Clustering uses include:
- Search results grouping
- Grouping of customers
- Anomaly detection
- Text categorization

Clustering uses unsupervised algorithms, which do not have the outputs in advance.
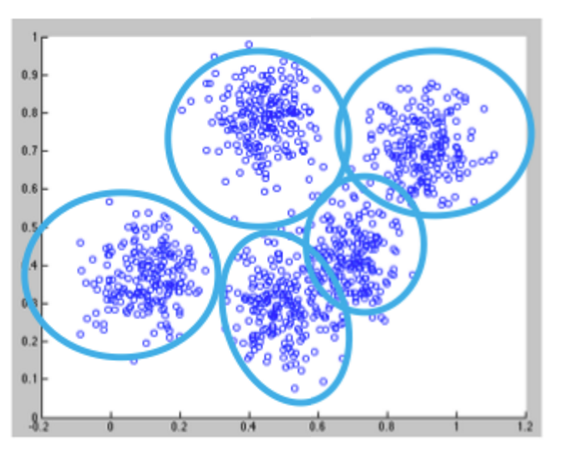
Clustering using the K-means algorithm begins by initializing all the coordinates to centroids. With every pass of the algorithm, each point is assigned to its nearest centroid based on some distance metric, usually Euclidean distance. The centroids are then updated to be the “centers” of all the points assigned to it in that pass. This repeats until there is a minimum change in the centers.
Collaborative Filtering
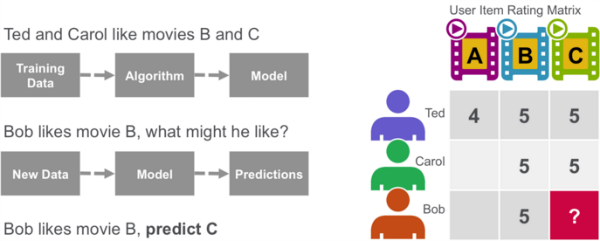
Collaborative filtering algorithms recommend items (this is the filtering part) based on preference information from many users (this is the collaborative part). The collaborative filtering approach is based on similarity; people who liked similar items in the past will like similar items in the future. The goal of a collaborative filtering algorithm is to take preferences data from users, and to create a model that can be used for recommendations or predictions. Ted likes movies A, B, and C. Carol likes movies B and C. We take this data and run it through an algorithm to build a model. Then when we have new data such as Bob likes movie B, we use the model to predict that C is a possible recommendation for Bob.
Decision Trees
Decision trees create a model that predicts the class or label based on several input features. Decision trees work by evaluating an expression containing a feature at every node and selecting a branch to the next node based on the answer. A decision tree for predicting survival on the Titanic is shown below. The feature questions are the nodes, and the answers “yes” or “no” are the branches in the tree to the child nodes.
- Q1: is sex male?
- yes
- Q2: is age > 9.5?
- No
- Is sibsp >2.5?
- No
- died
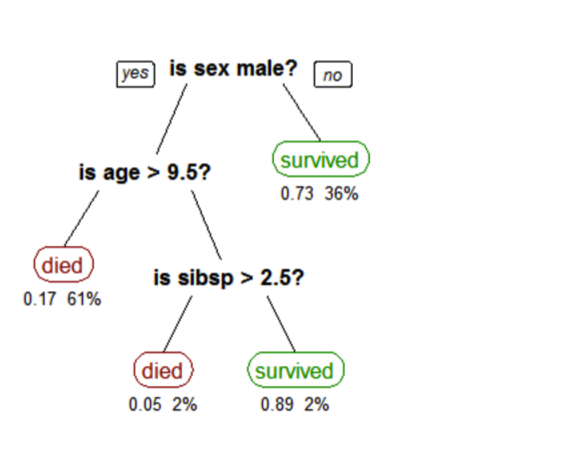
A tree showing survival of passengers on the Titanic (“sibsp” is the number of spouses or siblings aboard). The figures under the leaves show the probability of survival and the percentage of observations in the leaf.
Analyze Flight Delays with Spark Machine Learning Scenario
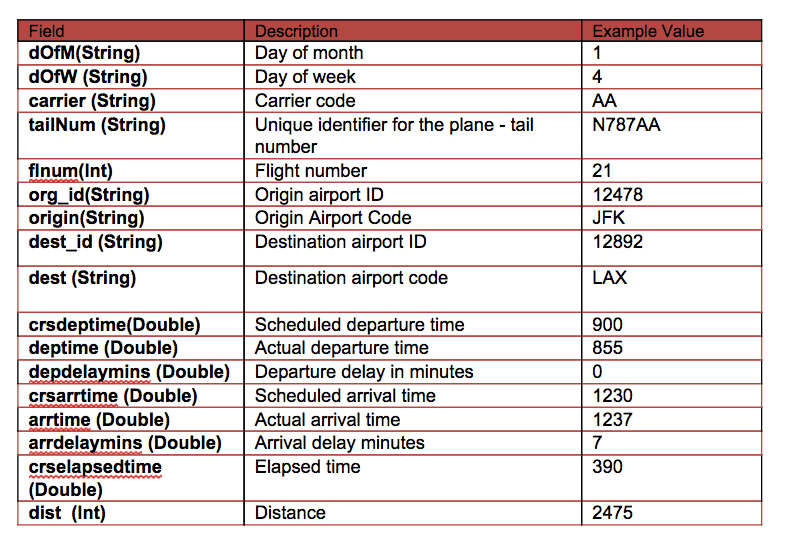
Our data is from http://www.transtats.bts.gov/DL_SelectFields.asp?Table_ID=236&DB_Short_Name=On-Time. We are using flight information for January 2014. For each flight, we have the following information:
In this scenario, we will build a tree to predict the label / classification of delayed or not based on the following features:
- Label → delayed and not delayed – delayed if delay > 40 minutes
- Features → {day_of_month, weekday, crsdeptime, crsarrtime, carrier, crselapsedtime, origin, dest, delayed}

Software
This tutorial will run on the MapR Sandbox, which includes Spark.
- You can download the code and data to run these examples from here: https://github.com/caroljmcdonald/sparkmldecisiontree
- The examples in this post can be run in the Spark shell, after launching with the spark-shell command.
- You can also run the code as a standalone application as described in the tutorial on Getting Started with Spark on MapR Sandbox.
Log into the MapR Sandbox, as explained in Getting Started with Spark on MapR Sandbox, using userid user01, password mapr. Copy the sample data file to your sandbox home directory /user/user01 using scp. Start the spark shell with:
$ spark-shell
Load and Parse the Data from a csv File
First, we will import the machine learning packages. (In the code boxes, comments are in Green and output is in Blue)
import org.apache.spark._
import org.apache.spark.rdd.RDD
// Import classes for MLLib
import org.apache.spark.mllib.regression.LabeledPoint
import org.apache.spark.mllib.linalg.Vectors
import org.apache.spark.mllib.tree.DecisionTree
import org.apache.spark.mllib.tree.model.DecisionTreeModel
import org.apache.spark.mllib.util.MLUtils
In our example, each flight is an item, and we use a Scala case class to define the Flight schema corresponding to a line in the csv data file.
// define the Flight Schema
case class Flight(dofM: String, dofW: String, carrier: String, tailnum: String, flnum: Int, org_id: String, origin: String, dest_id: String, dest: String, crsdeptime: Double, deptime: Double, depdelaymins: Double, crsarrtime: Double, arrtime: Double, arrdelay: Double, crselapsedtime: Double, dist: Int)
The function below parses a line from the data file into the Flight class.
// function to parse input into Flight class
def parseFlight(str: String): Flight = {
val line = str.split(",")
Flight(line(0), line(1), line(2), line(3), line(4).toInt, line(5), line(6), line(7), line(8), line(9).toDouble, line(10).toDouble, line(11).toDouble, line(12).toDouble, line(13).toDouble, line(14).toDouble, line(15).toDouble, line(16).toInt)
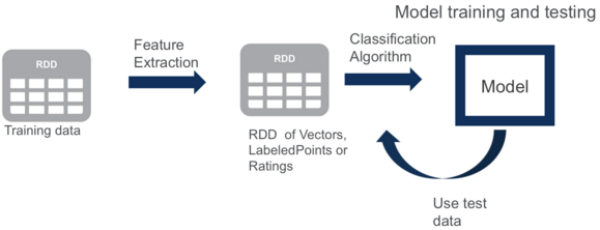
}We use the flight data for January 2014 as the dataset. Below we load the data from the csv file into a Resilient Distributed Dataset (RDD). RDDs can have transformations and actions, the first() action returns the first element in the RDD.
// load the data into a  RDD
val textRDD = sc.textFile("/user/user01/data/rita2014jan.csv")
// MapPartitionsRDD[1] at textFile

// parse the RDD of csv lines into an RDD of flight classes
val flightsRDD = textRDD.map(parseFlight).cache()
flightsRDD.first()

//Array(Flight(1,3,AA,N338AA,1,12478,JFK,12892,LAX,900.0,914.0,14.0,1225.0,1238.0,13.0,385.0,2475),
Extract Features
To build a classifier model, first extract the features that most contribute to the classification. We are defining two classes or labels – Yes (delayed) and No (not delayed). A flight is considered to be delayed if it is more than 40 minutes late.
The features for each item consists of the fields shown below:
- Label → delayed and not delayed – delayed if delay > 40 minutes
- Features → {day_of_month, weekday, crsdeptime, crsarrtime, carrier, crselapsedtime, origin, dest, delayed}
Below we transform the non-numeric features into numeric values. For example, the carrier AA is the number 6. The originating airport ATL is 273.
// create  airports RDD with ID and Name
var carrierMap: Map[String, Int] = Map()
var index: Int = 0
flightsRDD.map(flight => flight.carrier).distinct.collect.foreach(x => { carrierMap += (x -> index); index += 1 })
carrierMap.toString
//res2: String = Map(DL -> 5, F9 -> 10, US -> 9, OO -> 2, B6 -> 0, AA -> 6, EV -> 12, FL -> 1, UA -> 4, MQ -> 8, WN -> 13, AS -> 3, VX -> 7, HA -> 11)

// Defining a default vertex called nowhere
var originMap: Map[String, Int] = Map()
var index1: Int = 0
flightsRDD.map(flight => flight.origin).distinct.collect.foreach(x => { originMap += (x -> index1); index1 += 1 })
originMap.toString
//res4: String = Map(JFK -> 214,  LAX -> 294,  ATL -> 273,MIA -> 175 ...

  // Map airport ID to the 3-letter code to use for printlns
var destMap: Map[String, Int] = Map()
var index2: Int = 0
flightsRDD.map(flight => flight.dest).distinct.collect.foreach(x => { destMap += (x -> index2); index2 += 1 })
Define Features Array
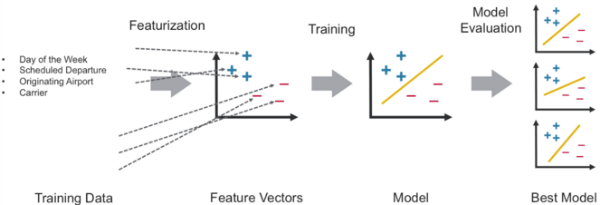
The features are transformed and put into Feature Vectors, which are vectors of numbers representing the value for each feature.
Next, we create an RDD containing feature arrays consisting of the label and the features in numeric format. An example is shown in this table:

//- Defining the features array
val mlprep = flightsRDD.map(flight => {
  val monthday = flight.dofM.toInt - 1 // category
  val weekday = flight.dofW.toInt - 1 // category
  val crsdeptime1 = flight.crsdeptime.toInt
  val crsarrtime1 = flight.crsarrtime.toInt
  val carrier1 = carrierMap(flight.carrier) // category
  val crselapsedtime1 = flight.crselapsedtime.toDouble
  val origin1 = originMap(flight.origin) // category
  val dest1 = destMap(flight.dest) // category
  val delayed = if (flight.depdelaymins.toDouble > 40) 1.0 else 0.0
  Array(delayed.toDouble, monthday.toDouble, weekday.toDouble, crsdeptime1.toDouble, crsarrtime1.toDouble, carrier1.toDouble, crselapsedtime1.toDouble, origin1.toDouble, dest1.toDouble)
})
mlprep.take(1)
//res6: Array[Array[Double]] = Array(Array(0.0, 0.0, 2.0, 900.0, 1225.0, 6.0, 385.0, 214.0, 294.0))
Create Labeled Points
From the RDD containing feature arrays, we create an RDD containing arrays of LabeledPoints. A labeled point is a class that represents the feature vector and label of a data point.
//Making LabeledPoint of features - this is the training data for the model
val mldata = mlprep.map(x => LabeledPoint(x(0), Vectors.dense(x(1), x(2), x(3), x(4), x(5), x(6), x(7), x(8))))
mldata.take(1)
//res7: Array[org.apache.spark.mllib.regression.LabeledPoint] = Array((0.0,[0.0,2.0,900.0,1225.0,6.0,385.0,214.0,294.0]))
Next the data is split to get a good percentage of delayed and not delayed flights. Then it is split into a training data set and a test data set
// mldata0 is %85 not delayed flights
val mldata0 = mldata.filter(x => x.label == 0).randomSplit(Array(0.85, 0.15))(1)
// mldata1 is %100 delayed flights
val mldata1 = mldata.filter(x => x.label != 0)
// mldata2 is delayed and not delayed
val mldata2 = mldata0 ++ mldata1

//  split mldata2 into training and test data
val splits = mldata2.randomSplit(Array(0.7, 0.3))
val (trainingData, testData) = (splits(0), splits(1))

testData.take(1)
//res21: Array[org.apache.spark.mllib.regression.LabeledPoint] = Array((0.0,[18.0,6.0,900.0,1225.0,6.0,385.0,214.0,294.0]))
Train the Model
Next, we prepare the values for the parameters that are required for the Decision Tree:
categoricalFeaturesInfowhich specifies which features are categorical and how many categorical values each of those features can take. The first item here represents the day of the month and can take the values from 0 through to 31. The second one represents day of the week and can take the values from 1 though 7. The carrier value can go from 4 to the number of distinct carriers and so on.maxDepth:Maximum depth of a tree.maxBins:Number of bins used when discretizing continuous features.impurity:Impurity measure of the homogeneity of the labels at the node.
The model is trained by making associations between the input features and the labeled output associated with those features. We train the model using the DecisionTree.trainClassifier method which returns a DecisionTreeModel.
// set ranges for 0=dofM 1=dofW 4=carrier 6=origin 7=dest
var categoricalFeaturesInfo = Map[Int, Int]()
categoricalFeaturesInfo += (0 -> 31)
categoricalFeaturesInfo += (1 -> 7)
categoricalFeaturesInfo += (4 -> carrierMap.size)
categoricalFeaturesInfo += (6 -> originMap.size)
categoricalFeaturesInfo += (7 -> destMap.size)
val numClasses = 2
// Defning values for the other parameters
val impurity = "gini"
val maxDepth = 9
val maxBins = 7000
// call DecisionTree trainClassifier with the trainingData , which returns the model
val model = DecisionTree.trainClassifier(trainingData, numClasses, categoricalFeaturesInfo,
impurity, maxDepth, maxBins)
// print out the decision tree
model.toDebugString
// 0=dofM 4=carrier 3=crsarrtime1 6=origin
res20: String =
DecisionTreeModel classifier of depth 9 with 919 nodes
If (feature 0 in {11.0,12.0,13.0,14.0,15.0,16.0,17.0,18.0,19.0,20.0,21.0,22.0,23.0,24.0,25.0,26.0,27.0,30.0})
If (feature 4 in {0.0,1.0,2.0,3.0,4.0,5.0,6.0,7.0,8.0,9.0,10.0,11.0,13.0})
If (feature 3 <= 1603.0)
If (feature 0 in {11.0,12.0,13.0,14.0,15.0,16.0,17.0,18.0,19.0})
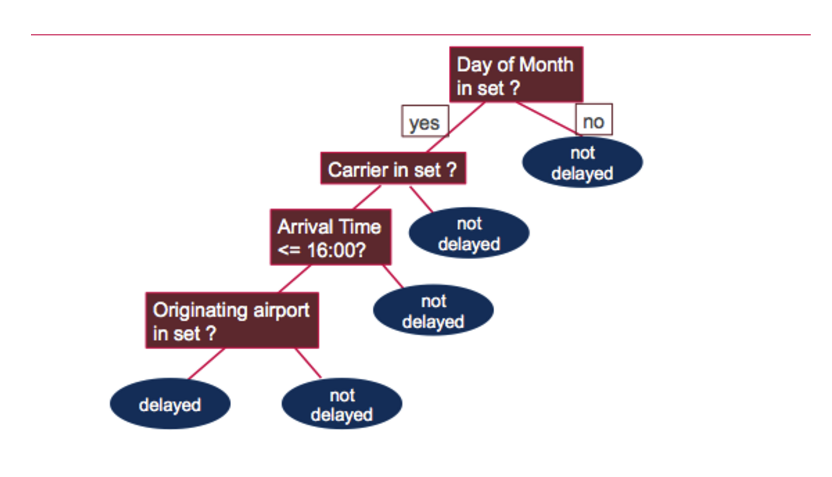
If (feature 6 in {0.0,1.0,2.0,3.0,4.0,5.0,6.0,7.0,8.0,10.0,11.0,12.0,13.0...Model.toDebugString prints out the decision tree, which asks the following questions to determine if the flight was delayed or not:
Test the Model
Next we use the test data to get predictions.Then we compare the predictions of a flight delay to the actual flight delay value, the label. The wrong prediction ratio is the count of wrong predictions / the count of test data values, which is 31%.
// Evaluate model on test instances and compute test error
val labelAndPreds = testData.map { point =>
  val prediction = model.predict(point.features)
  (point.label, prediction)
}
labelAndPreds.take(3)

res33: Array[(Double, Double)] = Array((0.0,0.0), (0.0,0.0), (0.0,0.0))


val wrongPrediction =(labelAndPreds.filter{
  case (label, prediction) => ( label !=prediction)
  })

wrongPrediction.count()
res35: Long = 11040

val ratioWrong=wrongPrediction.count().toDouble/testData.count()
ratioWrong: Double = 0.3157443157443157
Want to learn more?
In this blog post, we showed you how to get started using Apache Spark’s MLlib machine learning decision trees for classification. If you have any further questions about this tutorial, please ask them in the comments section below.
| Reference: | Apache Spark Machine Learning Tutorial from our JCG partner Carol McDonald at the Mapr blog. |

so basicly it is if else with huge data :)
a decision tree uses probabilities , In data mining, decision trees can be described also as the combination of mathematical and computational techniques to aid the description, categorisation and generalisation of a given set of data. https://en.wikipedia.org/wiki/Decision_tree_learning There are many specific decision-tree algorithms. Notable ones include: ID3 (Iterative Dichotomiser 3) C4.5 (successor of ID3) CART (Classification And Regression Tree) CHAID (CHi-squared Automatic Interaction Detector). Performs multi-level splits when computing classification trees.[11] MARS: extends decision trees to handle numerical data better. Conditional Inference Trees. Statistics-based approach that uses non-parametric tests as splitting criteria, corrected for multiple testing to avoid overfitting. This… Read more »