This Internet of things project explores one important aspect in IoT: how to connect Arduino to IoT cloud platforms using ethernet shield. This aspect is important because it is possible to store data in the cloud and then analyze it. Once the data, like sensor values, is on the cloud is possible to access it using smart phones and control remotely the Arduino board.
This project is build by two different parts:
- the first part describes how to collect data from sensors connected to Arduino board and send this information to a cloud platform that stores it.
- the second part describes how to access to this information using an Android smart phone.
For this purpose, the data is generated by a DHT11 sensor, that reads temperature and humidity. As cloud IoT platform to store data, we will use Ubidots platform. The sensor is connected to Arduino board that uses a Ethernet shield to connect to the network. In this project, the ethernet shield is Wiznet 5500.
Project Overview
The project overview is shown below:
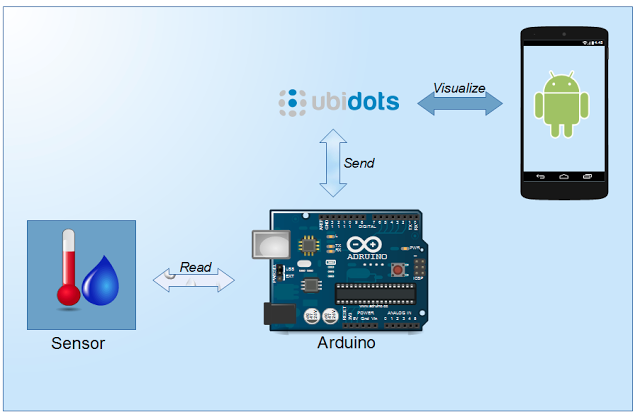
As soon as the temperature and humidity sensor starts reading values, it sends them through Arduino board to the cloud platform. The project uses Ubidots to store data in the cloud. This platform is easy to use and can be easily integrated with Arduino. Moreover, it has a built-in dashboard features, so that it is possible to creates interesting dashboard to show, using charts, the values sent from the board.
Building IoT project
The first step is setup the Arduino sketch and the wire connections. The DHT11 sensor is very easy to use and can be integrated easily and fast with Arduino, moreover there is a library that helps developing the system.
The picture below shows the schematic of this project:
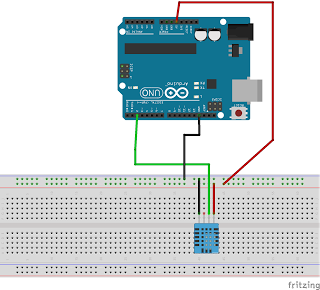
In this sketch, DHT11 sensor is connected to Arduino board, that, in turn, uses the Ethernet shield to connect to the network to send data.
As first step, we check if everything is connected correctly trying to read the value of the temperature and the humidity.
The snippet below shows the Arduino sketch to test the sensor:
#include "DHT.h"
#include <spi.h>

#define DHTPIN 2
#define DHTTYPE DHT11

DHT dht(DHTPIN, DHTTYPE);

void setup() {
  Serial.begin(9600);
  dht.begin();
}

void loop() {
  delay(50000);

  float h = dht.readHumidity();
  // Read temperature as Celsius (the default)
  float t = dht.readTemperature();

  Serial.print("Humidity: ");
  Serial.print(h);
  Serial.print(" %\t");
  Serial.print("Temperature: ");
  Serial.print(t);
  Serial.println(" *C ");
}
One thing to remember is importing DHT11 library in your Arduino IDE. Running the example you should get the temperature and the humidity.
If everything works correctly, it is time to make things a little more complex adding Ubidots support. The purpose of this Internet of things project is sending data to the cloud and store it, so we have to implement the agent that takes care to send the data.
Ubidots provides an example that can be useful. In Arduino, we have to develop an HTTP client that calls a JSON service passing the data we want to store in the cloud.
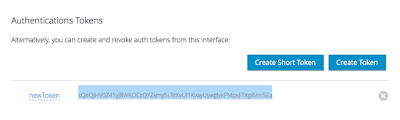
Refering to the Ubidots documentation, it is necessary to create an authentication token that the client has to send. Please read below to know more how to create the token.
In this IoT project, the Arduino HTTP client sends two variable at the same time: temperature and humidity, so the URL to call is:
http://things.ubidots.com/api/v1.6/collections/values
while the data in JSON format to send is:
[{"variable": "varId", "value":val, "timestamp":timestamp}, {"variable": "vardId1", "value":val1, "timestamp":timestamp1}]Here the Arduino sketch for HTTP client:
#include "DHT.h"
#include <spi.h>
#include <ethernet.h>


#define DHTPIN 2
#define DHTTYPE DHT11

// Ubidots Data
String tempVarId = "5656116076254219f78cad12";
String humVarId = "565611777625421b5e91a1ef";
String token = "aIk7lh3ipJGRdgAWOwJwDlPFwCdQu6uoLWZcGsMelXVAF62ycFsanB9Yywdk";

DHT dht(DHTPIN, DHTTYPE);
byte mac[] = {  0xDE, 0xAD, 0xBE, 0xEF, 0xFE, 0xED };

char server[]="things.ubidots.com";

EthernetClient client;
IPAddress ip(192, 168, 1, 40); // Arduino IP Add
IPAddress myDns(8,8,8,8);
IPAddress myGateway(192,168,1,1);

void setup() {
  Serial.begin(9600);
  Serial.print("Here");
  dht.begin();
  // start the Ethernet connection:
  if (Ethernet.begin(mac) == 0) {
    Serial.println("Failed to configure Ethernet using DHCP");
    // try to congifure using IP address instead of DHCP:
   Ethernet.begin(mac,ip,myDns,myGateway);
  }
}

void loop() {


  // Reading temperature or humidity takes about 250 milliseconds!
  // Sensor readings may also be up to 2 seconds 'old' (its a very slow sensor)
  float h = dht.readHumidity();
  // Read temperature as Celsius (the default)
  float t = dht.readTemperature();

  Serial.print("Humidity: ");
  Serial.print(h);
  Serial.print(" %\t");
  Serial.print("Temperature: ");
  Serial.print(t);
  Serial.println(" *C ");
  save_value(t, h);
  delay(5000);
}

void save_value(float tempValue, float humValue)
{
  Serial.println("Sending data...");
  // if you get a connection, report back via serial:
  int num = 0;
  delay(2000);

  // Post single value to single var
  // String varString = "{\"value\":"+ String(tempValue) + "}";
  String varString = "[{\"variable\": \"" + tempVarId + "\", \"value\":" + String(tempValue) + "}";
  varString += ",{\"variable\": \"" + humVarId + "\", \"value\":" + String(humValue) + "}]";
  num = varString.length();

  Serial.println("Connecting...");

  if (client.connect(server,80))
  {
       //client.println("POST /api/v1.6/variables/"+tempVarId+"/values HTTP/1.1");
       //Serial.println("POST /api/v1.6/variables/"+tempVarId+"/values HTTP/1.1");
       client.println("POST /api/v1.6/collections/values HTTP/1.1");
       Serial.println("POST /api/v1.6/collections/values HTTP/1.1");

       client.println("Content-Type: application/json");
       Serial.println("Content-Type: application/json");
       client.println("Content-Length: "+String(num));
       Serial.println("Content-Length: "+String(num));
       client.println("X-Auth-Token: "+token);
       Serial.println("X-Auth-Token: "+token);
       client.println("Host: things.ubidots.com\n");
       Serial.println("Host: things.ubidots.com\n");
       client.print(varString);
       Serial.print(varString+"\n");

  }
  else
  {
    // if you didn't get a connection to the server:
    Serial.println("connection failed");
  }

boolean sta = client.connected();
    Serial.println("Connection ["+String(sta)+"]");
  if (!client.connected())
  {
    Serial.println();
    Serial.println("disconnecting.");
    client.stop();
  }

  Serial.println("Reading..");
  while (client.available())
  {
    char c = client.read();
    Serial.print(c);
  }
  client.flush();
  client.stop();

}
Notice at line 65 and 66 we build the JSON data to pass to the service using the variable ids (please refer below to know how to get the id) and at line 83 we send in the header the authentication token.
The Arduino HTTP client for Ubidots is almost read, it is time to configure the project in Ubidots.
Now, it is necessary to configure the project on Ubidots so that the Arduino client can send data. This can be done using Ubidots web interface.
It is necessary to create two variables:
- one that holds temperature values
- one that holds humidity values.
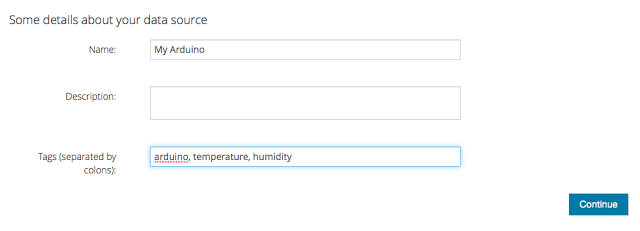
Before we have to create a Ubidots project:
Once the project is configured, we can define our variables:

We do the same steps for humidity variable and then we have our dashboard:
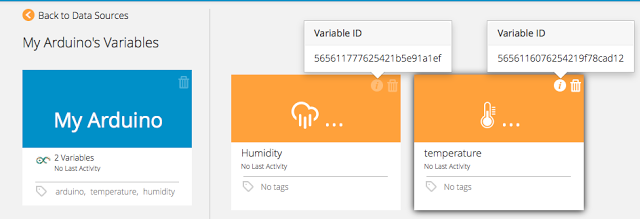
As you can see, these two variable have two ids that we used previously when we created the JSON request.
The IDs of these variable are used in the Arduino sketch:
...
// Ubidots Data
String tempVarId = "5656116076254219f78cad12";
String humVarId = "565611777625421b5e91a1ef";
...
The last step is creating the token:
Once the variables are configured we can use them to send data.
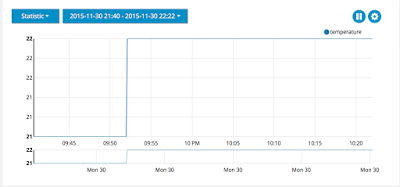
Running the sketch, Arduino starts sending data to Ubidots. One feature provided by Ubidots is the capability to create dashboard in an easy way. For example, for the temperature we can create a simple dashboard to show data sent by Arduino and DHT11:

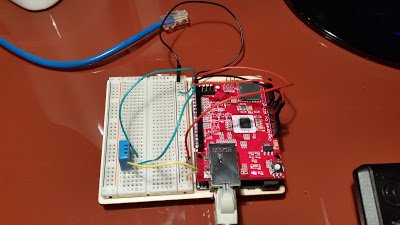
Below the real Arduino board connected to DHT11 with Ethernet shield.
In this first part of Internet of things project, you learned how to connect Arduino to the cloud using Ubidots and Ethernet shield. Arduino read DHT11 data values and sends them to Ubidots.
In the next post, you will know how to read these values from Android Smartphone and how to create charts on smartphones.
| Reference: | Internet Of Things Project: Connect Arduino To Ubidots And Android – Part 1 from our JCG partner Francesco Azzola at the Surviving w/ Android blog. |
