Android design support library introduced some important new widget that help developer to create consistent UI following material design guidelines.
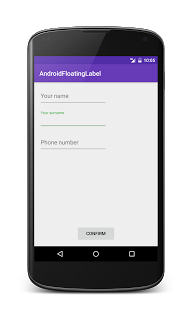
One of the new component shipped by Android design support library is TextInputLayout that is used to animate EditText labels. To do the job, TextInputLayout uses an EditText attribute, called hint.To show how to use TextInputLayout and EditText, we will create an android app like the one shown below:

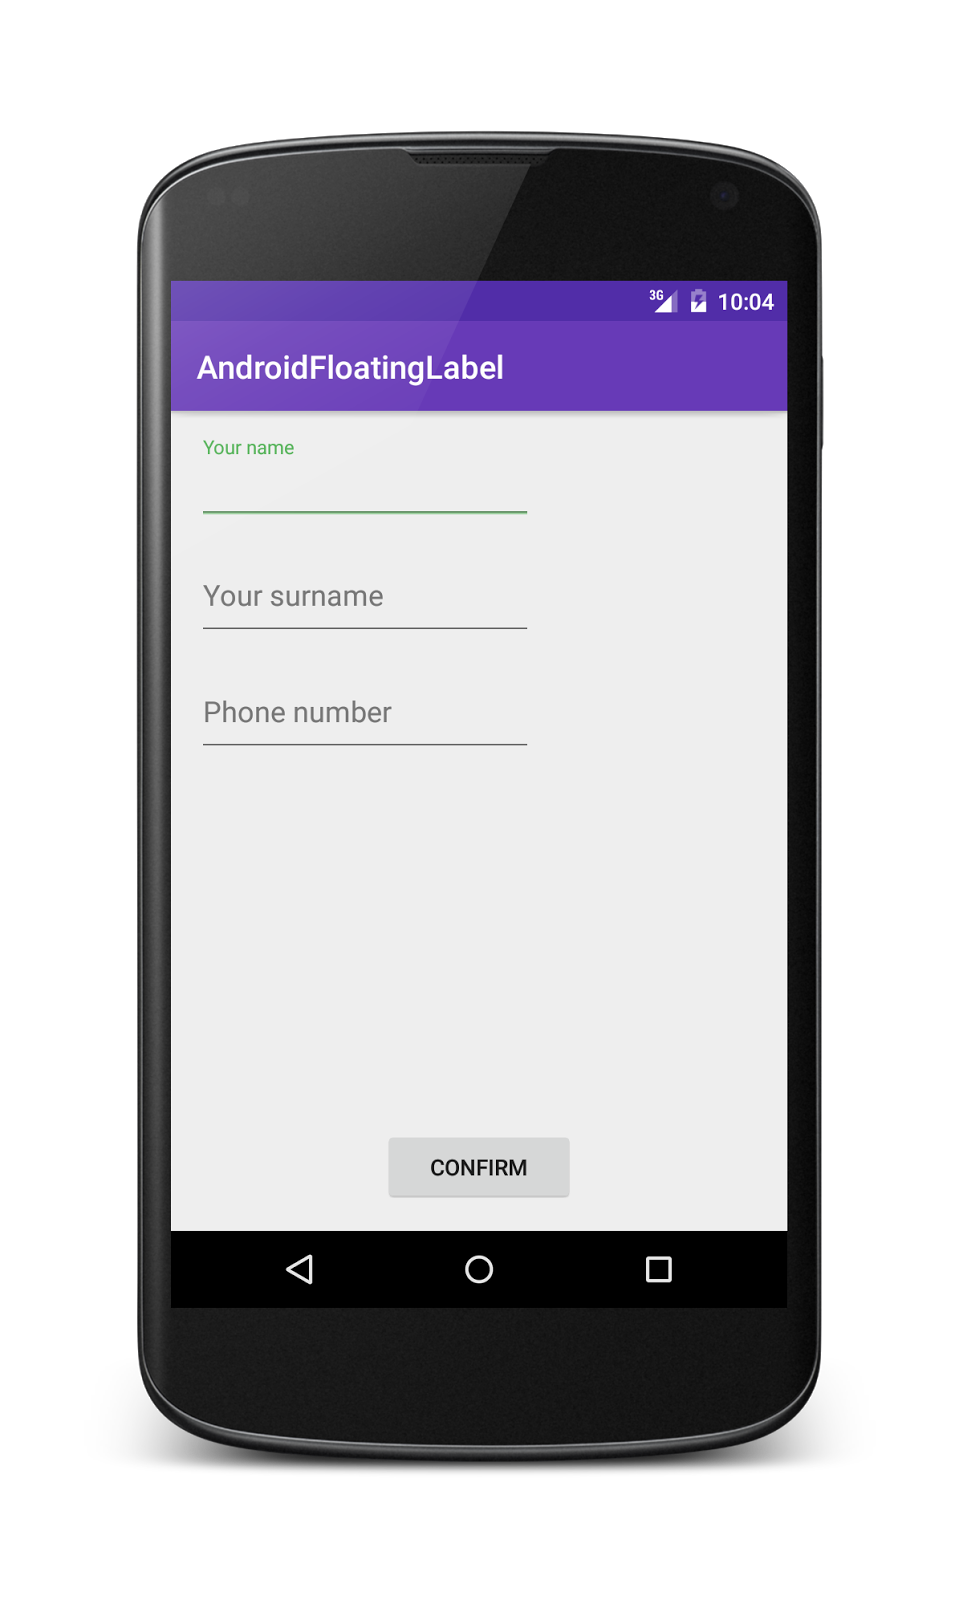
Using TextInputLayout, and wrapping EditText inside TextInputLayout, it is possible to control this hint so that it disappears as soon as the user starts writing the text and “moves” to the label position:
Another important feature is the error handling. With TextInputLayout it is possible to show error messages near to the EditText.
How to use TextInputLayout and EditText
As said before, TextInputLayout wraps the EditText so that it controls the EditText behaviour. Let us suppose we have three different EditText and three TextInputLayout. Focusing the attention to the first one of this EditText, this one has to be wrapped by TextInputLayout so that we can have the floating label.
<?xml version="1.0" encoding="utf-8"?>
<RelativeLayout xmlns:android="http://schemas.android.com/apk/res/android"
    xmlns:tools="http://schemas.android.com/tools"
    xmlns:app="http://schemas.android.com/apk/res-auto" android:layout_width="match_parent"
    android:layout_height="match_parent" android:paddingLeft="@dimen/activity_horizontal_margin"
    android:paddingRight="@dimen/activity_horizontal_margin"
    android:paddingTop="@dimen/activity_vertical_margin"
    android:paddingBottom="@dimen/activity_vertical_margin"
    app:layout_behavior="@string/appbar_scrolling_view_behavior"
    tools:showIn="@layout/activity_main" tools:context=".MainActivity">

    <android.support.design.widget.TextInputLayout
    android:layout_width="wrap_content"
    android:layout_height="wrap_content" android:id="@+id/til1">

     <EditText
        android:layout_width="wrap_content"
        android:layout_height="wrap_content"
        android:id="@+id/edtName"
        android:ems="10"
        android:hint="@string/hintName"/>
    </android.support.design.widget.TextInputLayout>

    <android.support.design.widget.TextInputLayout
        android:layout_width="wrap_content"
        android:layout_height="wrap_content"
        android:id="@+id/til2"
        android:layout_below="@id/til1"
        android:layout_marginTop="20dp">

        <EditText
            android:layout_width="wrap_content"
            android:layout_height="wrap_content"
            android:id="@+id/edtSurname"
            android:ems="10"
            android:hint="@string/hintSurname"/>
    </android.support.design.widget.TextInputLayout>

    <android.support.design.widget.TextInputLayout
        android:layout_width="wrap_content"
        android:layout_height="wrap_content"
        android:id="@+id/til3"
        android:layout_below="@id/til2"
        android:layout_marginTop="20dp">

        <EditText
            android:layout_width="wrap_content"
            android:layout_height="wrap_content"
            android:id="@+id/edtPhone"
            android:ems="10"
            android:hint="@string/hintPhone"
            android:inputType="phone"/>
    </android.support.design.widget.TextInputLayout>


    <Button
            android:layout_width="120dp"
            android:layout_height="wrap_content"
            android:id="@+id/btn"
            android:text="@string/btnConfirm"
            android:layout_alignParentBottom="true"
            android:layout_centerHorizontal="true"
            android:elevation="2dp"
            />

</RelativeLayout>
android:hint is the floating label that is managed the TextInputLayout. With this layout and a simple activity, it is possible to obtain the app shown above.
Android Form Validation
Another interesting use of the TextInputLayout is in the form validation. As told before, this component handles error messages so that they appear near the EditText.
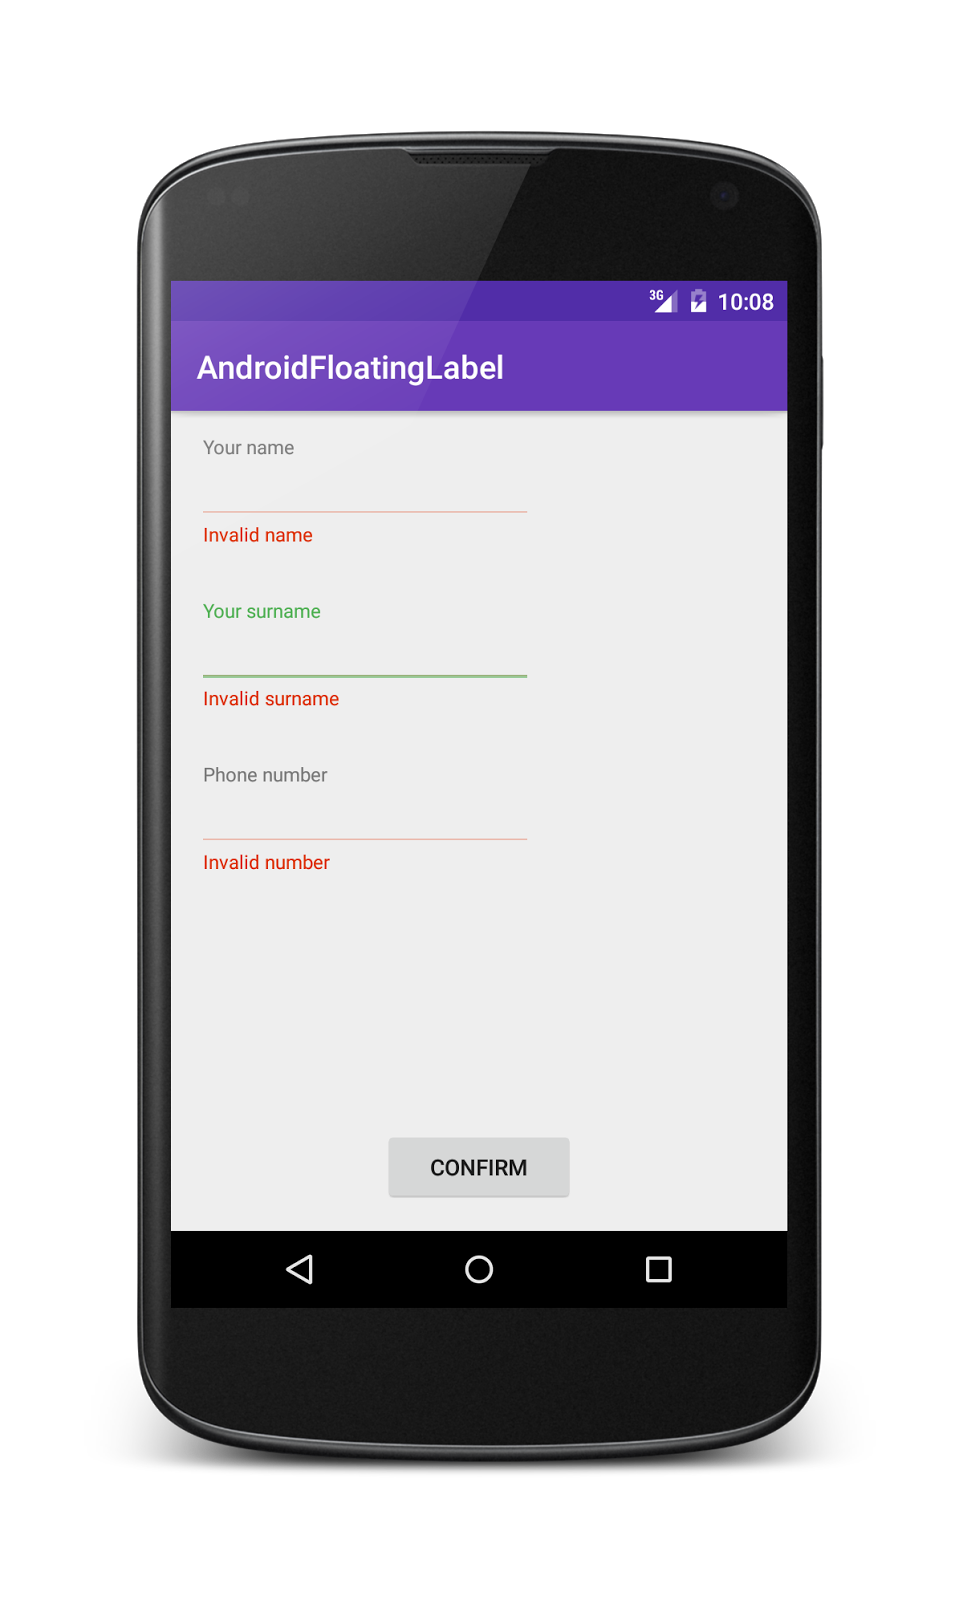
This feature is very useful when the app have to validate some data inserted by user. To show how to use TextInputLayout to handle EditText error we can suppose to have a simple form with a submit button as shown in the picture below.
When user pushes the button the app validate the result and if something goes wrong, the app shows the error message near the EditText that caused it.
To handle the errors, TextInputLayout provides two methods: setError that accepts a string that contains the message and setErrorEnabled that accepts a boolean to enable or disable the error functionality. The first method is used to show an erorr message, the second to remove the message.
The Activity that handles the UI contains validation method, like the one shown below:
edtName = (EditText) findViewById(R.id.edtName);
     edtSurname = (EditText) findViewById(R.id.edtSurname);
     edtPhone = (EditText) findViewById(R.id.edtPhone);
     nameLayout = (TextInputLayout) findViewById(R.id.til1);
     surnameLayout = (TextInputLayout) findViewById(R.id.til2);
     phoneLayout = (TextInputLayout) findViewById(R.id.til3);

     Button btn = (Button) findViewById(R.id.btn);
     btn.setOnClickListener(new View.OnClickListener() {
         @Override
         public void onClick(View v) {
             if ( validateData() ) {
                   //
             }
          }
     });
In the validate method:
private boolean validateData() {
        boolean result = true;

        String name = edtName.getText().toString();
        if (name == null || name.length() < 3) {
            // We set the error message
            nameLayout.setError(getString(R.string.invalidName));
            result = false;
        }
        else
            // We remove error messages
           nameLayout.setErrorEnabled(false);

        String surname = edtSurname.getText().toString();
        if (surname == null || surname.length() < 3) {
            // We set the error message
            surnameLayout.setError(getString(R.string.invalidSurname));
            result = false;
        }
        else
            // We remove error messages
            surnameLayout.setErrorEnabled(false);


        String phone = edtPhone.getText().toString();
        if (phone == null || phone.equals("")) {
            phoneLayout.setError(getString(R.string.invalidNumber));
            result = false;
        }
        else if (phone.equals("0")) {
            phoneLayout.setError(getString(R.string.invalidNumberZero));
            result = false;
        }

        return result;
    }
In this post, you have learnt how to create a material UI using TextInputLayout to animate EditText and how to handle error using the combination of TextInputLayout and EditText.
| Reference: | Android design support library: TextInputLayout – floating label from our JCG partner Francesco Azzola at the Surviving w/ Android blog. |
