This article is part of our Academy Course titled Spring Integration for EAI.
In this course, you are introduced to Enterprise Application Integration patterns and how Spring Integration addresses them. Next, you delve into the fundamentals of Spring Integration, like channels, transformers and adapters. Check it out here!
Table Of Contents
1. Introduction
In this second tutorial, you will learn the basic concepts that form the core of Spring Integration. After these concepts are explained, we will review the different components that are shipped with the project. This revision is based upon the 3.0.1 release. Considering that the 4.0.0 release will be released soon, you may find some new components that are not explained in this tutorial. Anyway, you will gain enough knowledge of the framework to understand the behavior of future components.
To conclude this tutorial, you will learn how different types of communication (asynchronous and synchronous) are supported by Spring Integration, and how this decision can affect your design. One special case is error handling, which is explained in the last section.
This tutorial is composed by the following sections:
- Introduction
- What is Spring Integration?
- Core concepts of Spring Integration messaging system
- Components
- Synchronous and asynchronous communication
- Error handling
2. What is Spring Integration?
As explained in the previous section, Spring Integration is based on the concepts explained in the Enterprise Integration Patterns book. It is a lightweight messaging solution that will add integration capabilities to your Spring application. As a messaging strategy, it provides a way of sharing information quickly and with a high level of decoupling between involved components or applications. You will learn how to accomplish this while Spring handles any low-level infrastructure concern. This will allow you to focus on your business logic.
Currently, Spring Integration configuration is mainly xml based, although some annotations are starting to be included. Examples shown in this tutorial will also be xml based, though I will show its respective annotation when possible.
Having explained that, a question arises: what can you do with Spring Integration? The framework basically allows you to do the following:
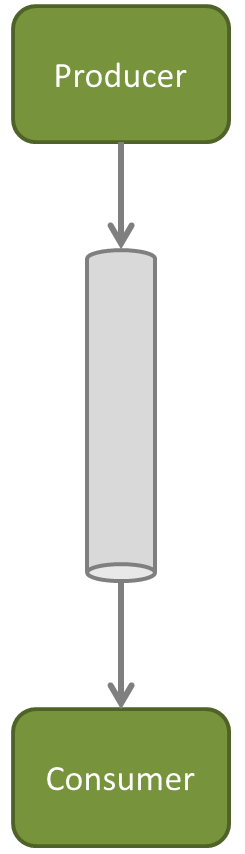
- It allows communication between components within your application, based on in-memory messaging. This allows these application components to be loosely coupled with each other, sharing data through message channels.

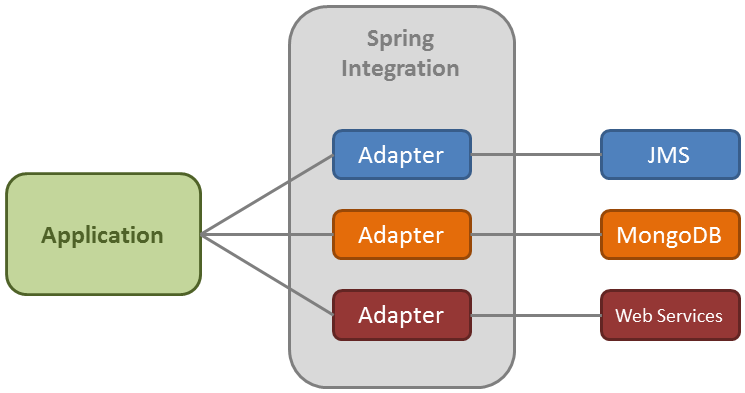
Figure 1 - It allows communication with external systems. You just need to send the information; Spring Integration will handle sending it to the specified external system and bring back a response if necessary. Of course, this works the other way round; Spring Integration will handle incoming calls from the external system to your application. This will be explained later in this tutorial.

Figure 2

Spring Integration targets the best practices of the Spring framework like programming with interfaces or composition over inheritance technique. Its main benefits are:
- Loose coupling among components.
- Event oriented architecture.
- The integration logic (handled by the framework) is separated from the business logic.
During the next section, you will learn what the three basic concepts are in which this messaging system is based.
3. Core concepts of Spring Integration messaging system
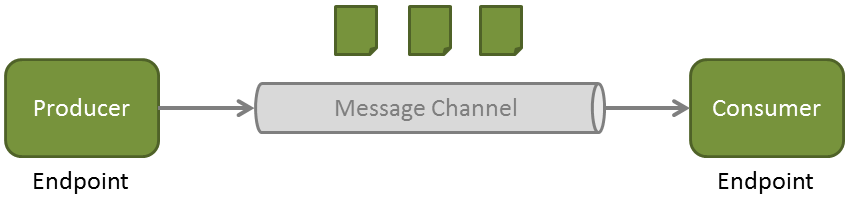
The basic concepts of a message-driven architecture are: message, message channel and message endpoint.
The API is pretty simple:
- A message is sent to an endpoint
- Endpoints are connected among them through MessageChannels
- An endpoint can receive messages from a MessageChannel
3.1 Message
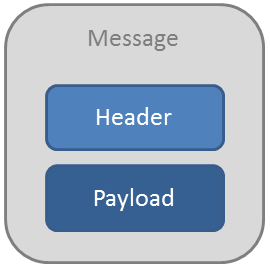
A message contains the information that will be shared among the different components of the application, or sent to an external system. But, what is a message? A message is structured as follows:
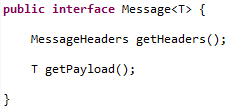
As you can see in the following snippet, a message is an interface with GenericMessage as its main implementation (also provided by the framework):
- Header: Contains meta-information about the message. If you check MessageHeaders class, you will see that it’s just a wrapper of a Map, but with its insertion operations marked as unsupported. The framework marks them like this because a message is considered to be immutable. Once the message has been created, you cannot modify it. You can add your own headers in the form of key-value pair, but they are mainly used to pass transport information. For example, if you want to send an e-mail, it will contain headers like to, subject, from…
- Payload: This is just a normal Java class that will contain the information you want to share. It can be any Java type.
If you want to create a message, you have two choices. The first one involves using a builder class (MessageBuilder).
Message<String> message = MessageBuilder
                .withPayload("my message payload")
                .setHeader("key1", "value1")
                .setHeader("key2", "value2")
                .build();
You have to set the payload and required headers before building it, since once the message is created you won’t be able to do it unless you create a new message.
The other option is by using the implementation provided by the framework:
Map<String, Object> headers = new HashMap<>();
headers.put("key1", "value1");
headers.put("key2", "value2");

Message<String> message = new GenericMessage<String>("my message payload", headers);
3.2 Message Channel
A message channel is a pipe that connects endpoints, and where messages travel through. Producers send messages to a channel and consumers receive them from a channel. With this mechanism, you don’t need any kind of broker.
A message channel can also be used as an interception point or for message monitoring.
Depending on how a message is consumed, message channels are classified as follows:
3.2.1 Point-to-point
There’s only one receiver connected to the message channel. Well, that’s not strictly 100% true. If it is a subscribable channel you can have more than one receiver but only one will handle the message. For now, forget this since this is an advanced topic that will be seen later in this course (dispatcher configuration). This type of channel has several implementations:
- DirectChannel: Implements SubscribableChannel. The message is sent to the subscriber through the same receiver’s thread. This communication is synchronous and the producer block until a response is received. How it works:
- The producer sends the message to the channel.
- The channel sends the message to its subscriber (passive subscriber).
- QueueChannel: Implements PollableChannel. There’s one endpoint connected to the channel, no subscribers. This communication is asynchronous; the receiver will retrieve the message through a different thread. How it works:
- The producer sends the message to the channel.
- The channel queues the message.
- The consumer actively retrieves the message (active receiver).
- ExecutorChannel: Implements
SubscribableChannel. Sending is delegated to a TaskExecutor. This means that the send() method will not block.
- PriorityChannel: Implements
PollableChannel. Similar to the QueueChannel but messages are ordered by priority instead of FIFO.
- RendezvousChannel: Implements
PollableChannel. Similar to the QueueChannel but with zero capacity. The producer will block until the receiver invokes its receive() method.
3.2.2 Publish-subscribe
The channel can have several endpoints subscribed to it. Thus, the message will be handled by different receivers.
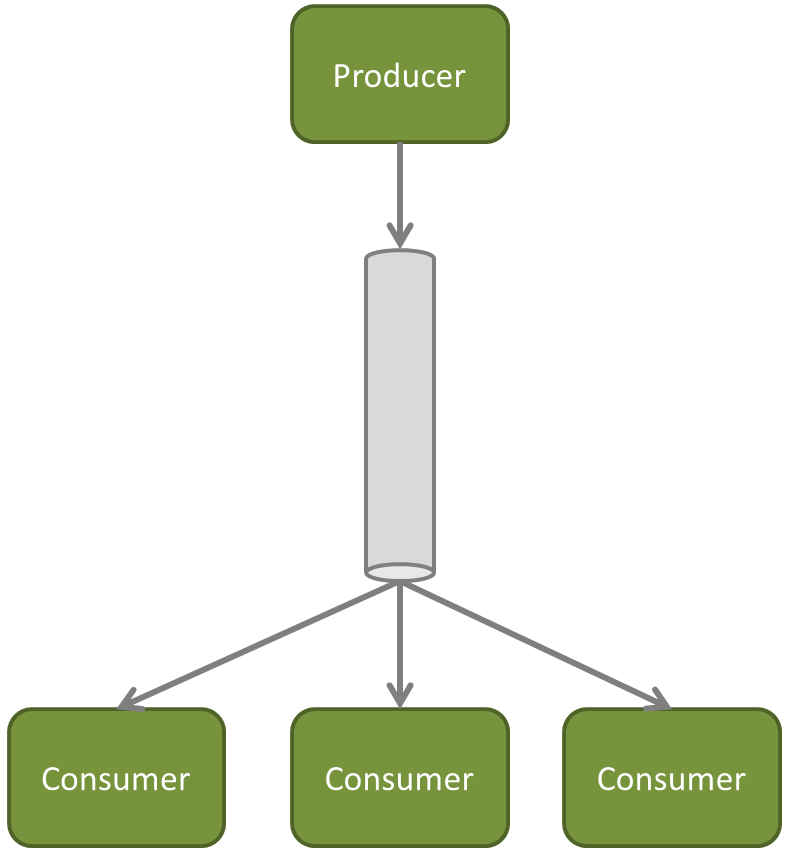
- PublishSubscribeChannel: Implements
SubscribableChannel. Subscribed receivers can be invoked consecutively through the producer’s thread. If we specify a TaskExecutor, receivers will be invoked in parallel through different threads.
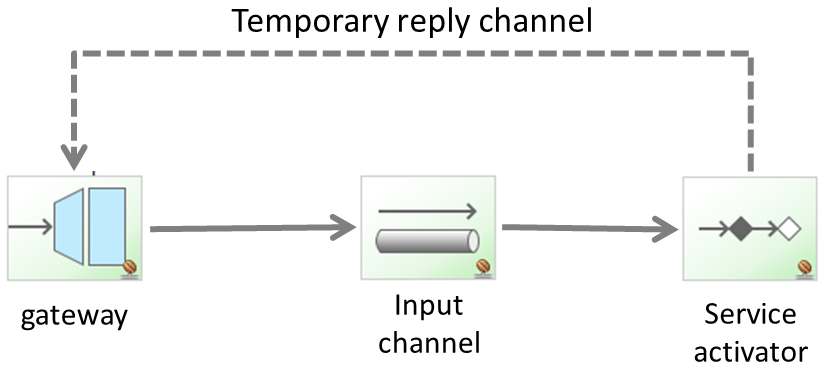
3.2.3 Temporary channels
This is a special type of channel which is created automatically by endpoints that have no output channel explicitly defined. The channel created is a point-to-point anonymous channel. You can see it defined in the message header under the name replyChannel.
These types of channels are automatically deleted once the response is sent. It is recommended that you don’t explicitly define an output channel if you don’t need it. The framework will handle it for you.
3.3 Message Endpoint
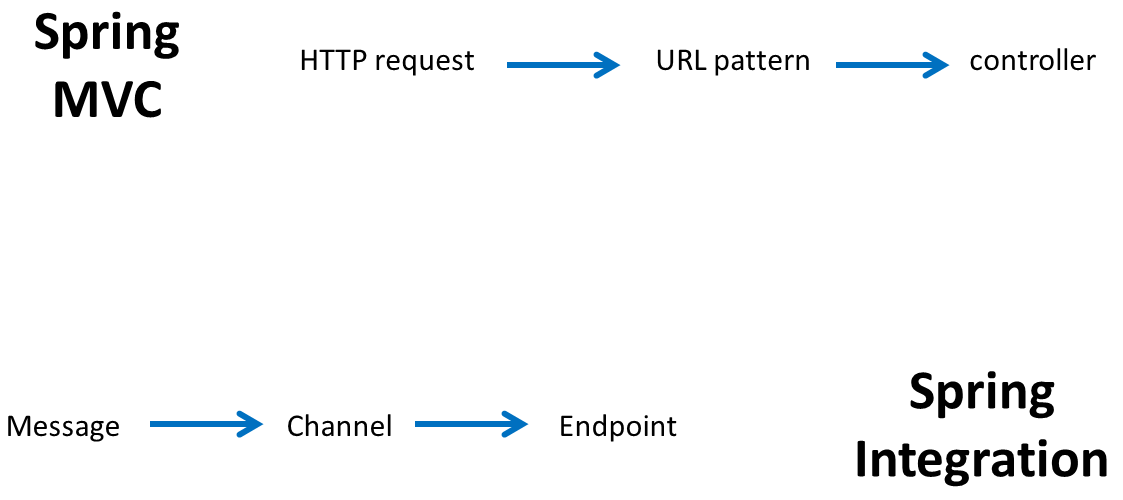
Its target is to connect in a non-invasive manner, the application with the messaging framework. If you are familiar with Spring MVC, the endpoint will deal with messages the same way that an MVC controller deals with an HTTP request. The endpoint will be mapped to a message channel in the same way the MVC controller is mapped to a URL pattern.
Below is a list with a brief description of the available message endpoints:
- Channel adapter: Connects the application to an external system (unidirectional).
- Gateway: Connects the application to an external system (bidirectional).
- Service Activator: Can invoke an operation on a service object.
- Transformer: Converts the content of a message.
- Filter: Determines if a message can continue its way to the output channel.
- Router: Decides to which channel the message will be sent.
- Splitter: Splits the message in several parts.
- Aggregator: Combines several messages into a single one.
The next section of this tutorial explains each one of these endpoints.
4. Components
In this section you are going to learn what the different endpoints are and how you can use them in Spring Integration.
4.1 Channel Adapters
The channel adapter is the endpoint that allows your application to connect with external systems. If you take a look at the reference you will see the provided types like connecting to JMS queues, MongoDB databases, RMI, web services, etc.
There are four types of adapters:
- Inbound channel adapter: Unidirectional. It receives a message from an external system. It then enters to our messaging system through a message channel, where we will handle it.
- Outbound channel adapter: Unidirectional. Our message system creates a message and sends it to an external system.
- Inbound gateway: Bidirectional. A message enters into the application and expects a response. The response will be sent back to the external system.
- Outbound gateway: Bidirectional. The application creates a message and sends it to the external system. The gateway will then wait for a response.
4.2 Transformer
This endpoint is used for payload conversion. It converts the type of the payload to another type. For example, from String to XML document. Just take into account that transforming the payload will result in a new message (remember that the message is immutable!). This type of endpoint increases loose-coupling between producers and consumers, because the consumer doesn’t need to know what is the created type of the producer. The transformer will take care of it and deliver the content type the consumer is waiting for.
Spring Integration provides several implementations of Transformer. Here are some examples:
- HeaderEnricher: It permits to add header values to the message.
- ObjectToMapTransformer: Converts an Object to a Map, converting its attributes to map values.
- ObjectToStringTransformer: Converts an Object to a String. It converts it by calling its toString() operation.
- PayloadSerializingTransformer / PayloadDeserializingTransformer: Converts from Object to a byte array and the other way round.
Let’s take a look at a couple of examples:
Assuming that we have the following model:
public class Order implements Serializable {
    private static final long serialVersionUID = 1L;

    private int id;
    private String description;

    public Order() {}

    public Order(int id, String description) {
        this.id = id;
        this.description = description;
    }

    @Override
    public String toString() {
        return String.valueOf(this.getId());
    }

    //Setters & Getters
}
When this is sent to a message channel named “requestChannel”, the following code snippet will automatically transform the Order instance into a String by calling its toString() method:
<int:object-to-string-transformer input-channel="requestChannel" output-channel="transformedChannel"/>
The resulting String will be sent to the output channel named transformedChannel.
If you need a more customized transformation, you can implement your own transformer, which is a common bean. You will need to specify the referred bean in the transformer element as follows:
<int:transformer ref="myTransformer" method="transform"
  input-channel="requestChannel" output-channel="transformedChannel"/>
The transformer will invoke the “transform” method of a bean named “myTransformer”. This bean is shown below:
@Component("myTransformer")
public class MyTransformer {

    public Order transform(Order requestOrder) {
        return new Order(requestOrder.getId(), requestOrder.getDescription()+"_modified");
    }
}
In this example, the method attribute of the transformer element is not necessary, since the transformer only has one method. If it had several methods, you would need to set the “method” attribute to tell the framework which method to invoke. Or if you prefer annotations, you could specify the method using @Transformer annotation at method level:
@Component("myTransformer")
public class MyTransformer {

    @Transformer
    public Order transform(Order requestOrder) {
        return new Order(requestOrder.getId(), requestOrder.getDescription()+"_modified");
    }

    public Order doOtherThings(Order requestOrder) {
    	//do other things
    }
}
4.3 Filter
A filter is used to decide if a message should continue its way or on the contrary, dropped. To decide what to do, it is based on some criteria.
The following filter implementation will receive Order instances from the input channel and discard those with an invalid description. Valid orders will be sent to the output channel:
<int:filter ref="myFilter" method="filterInvalidOrders" input-channel="requestChannel" output-channel="filteredChannel"/>
A filter method returns a boolean type. If it returns false, the message will be discarded:
@Component("myFilter")
public class MyFilter {

    public boolean filterInvalidOrders(Order order) {
        if (order == null || "invalid order".equals(order.getDescription())) {
            return false;
        }

        return true;
    }
}
As with the transformer, the method attribute will only be necessary if more than one method is defined in the filter bean. To specify the method you want to invoke, use the @Filter annotation:
@Filter
public boolean filterInvalidOrders(Order order) {
Spring Expression Language
If your filter is going to be very simple, you can skip any Java class to implement a filter. You can define a filter by using SpEL. For example, the following code snippet will implement the same filter as above but without java code:
<int:filter expression="!payload.description.equals('invalid order')" input-channel="requestChannel" output-channel="filteredChannel"/>
Discarding messages
With the default configuration, discarded messages are simply silently dropped. We can change that and, if we decide to do this we have two options:
1. We may don’t want to lose any message. In that case we can throw an exception:
<int:filter expression="!payload.description.equals('invalid order')" input-channel="requestChannel" output-channel="filteredChannel"
        throw-exception-on-rejection="true"/>
2. We want to register all dropped messages. We can configure a discard channel:
<int:filter expression="!payload.description.equals('invalid order')" input-channel="requestChannel" output-channel="filteredChannel"
        discard-channel="discardedOrders"/>
4.4 Router
A router allows you to redirect a message to a specific message channel depending on a condition.
As usual, the framework provides some of the most basic implementations. The following example uses a payload type router. It will receive messages from the request channel, and depending of what type the payload is, it will send it to a different output channel:
<int:payload-type-router input-channel="requestChannel">
    <int:mapping type="String" channel="stringChannel"/>
    <int:mapping type="Integer" channel="integerChannel"/>
</int:payload-type-router>
You can check the full list here.
Now let’s go back to our orders example and we are going to implement a router which will redirect messages depending on the order description.
<int:router ref="myRouter" input-channel="requestChannel" default-output-channel="genericOrders"/>
The router implementation contains a method that returns the name of the message channel to where the message will be redirected:
@Component("myRouter")
public class MyRouter {

    public String routeOrder(Order order) {
        String returnChannel = "genericOrders";

        if (order.getDescription().startsWith("US-")) {
            returnChannel = "usOrders";
        }
        else if (order.getDescription().startsWith("EU-")) {
            returnChannel = "europeOrders";
        }

        return returnChannel;
    }
}
If you have several methods, you can use the @Router annotation:
@Router
public String routeOrder(Order order) {
In the same way as with the filter, you could route messages based on a Spring Expression Language.
4.5 Splitter and Aggregator
The splitter’s target is to receive a message and partition it in several parts. These parts are then sent separately so they can be processed independently. This endpoint is usually combined with an aggregator.
The aggregator takes a list of messages and combines them into a single message. It is just the contrary of the splitter.
You will better see this with an example:
We are going to modify the order example so the Splitter receives an order package. This package contains several related orders that the splitter will separate. The splitter takes an order package and returns a list of orders:
<int:splitter input-channel="requestChannel" ref="mySplitter" output-channel="splitChannel"/>
The splitter implementation is very simple:
@Component("mySplitter")
public class MySplitter {

    public List<Order> splitOrderPackage(OrderPackage orderPackage) {
        return orderPackage.getOrders();
    }
}
The splitter returns a list of orders, but it can return any of the following:
- A collection or array of messages.
- A collection or array of Java Objects. Each list element will be included as a message payload.
- A message.
- A Java Object (will be included into the message payload).
Following with the example, there is an aggregator endpoint which is connected to the “splitChannel” channel. This aggregator takes the list and combines its orders to form an order confirmation, adding the quantity of each order:
<int:channel id="splitChannel"/>

<int:aggregator ref="myAggregator" input-channel="splitChannel" output-channel="outputChannel"/>
The aggregator implementation:
@Component("myAggregator")
public class MyAggregator {

    public OrderConfirmation confirmOrders(List<Order> orders) {
        int total = 0;

        for (Order order:orders) {
            total += order.getQuantity();
        }

        OrderConfirmation confirmation = new OrderConfirmation("3");
        confirmation.setQuantity(total);

        return confirmation;
    }
}
4.5.1 Correlation and release strategies
When a message is split by the splitter endpoint, two headers are set:
- MessageHeaders.CORRELATION_ID
- MessageHeaders.SEQUENCE_SIZE
These headers are used by the aggregator endpoint to be able to combine messages correctly. It will hold messages until a set of messages with the same correlation id is ready. And when will it be ready? It will be ready when the sequence size is reached.
Correlation strategy
Allow to group messages. By default, it will group all messages with the same value in CORRELATION_ID header. There are several strategies to choose from.
Release strategy
By default, a group of messages will be considered complete when its size reaches the value specified by the message header SEQUENCE_SIZE.
4.6 Poller
In Spring Integration there are two types of consumers:
- Active consumers
- Passive consumers
Passive components are those subscribed to a subscribable channel. This way, when a message is sent to this type of channel, the channel will invoke its subscribers. The consumer’s method will be invoked passively.
Active components are those connected to a pollable channel. This way, messages will be enqueued into the channel waiting for the consumer to actively retrieve them from the channel.
Pollers are used to specify how the active consumer retrieves these messages. Here are a couple of examples:
Basic poller configuration
It will poll the message channel in a one second interval
<int:service-activator method="processOrder" input-channel="pollableChannel" ref="orderProcessor">
    <int:poller fixed-rate="1000"/>
</int:service-activator>
Poller configured using a Cron expression
It will poll the message channel every 30 minutes
<int:service-activator method="processOrder" input-channel="pollableChannel" ref="orderProcessor">
    <int:poller cron="0 0/30 * * * ?"/>
</int:service-activator>
One thing to take into account is that if a consumer is connected to a pollable channel, it will need a poller. If not, an exception will be raised. If you don’t want to configure a poller for each active consumer, you can define a default poller:
<int:poller id="defaultPoller" fixed-rate="1000" default="true"/>
Don’t forget to set the default and id attributes.

4.7 Messaging bridge
This type of endpoint connects two message channels or two channel adapters. For example, you can connect a SubscribableChannel channel to a PollableChannel channel.
Here is a sample:
<int:channel id="requestChannel"/>

<int:bridge input-channel="requestChannel" output-channel="pollableChannel"/>

<int:channel id="pollableChannel">
    <int:queue capacity="5"/>
</int:channel>

<int:service-activator method="processOrder" input-channel="pollableChannel" ref="orderProcessor"/>

<int:poller id="defaultPoller" fixed-rate="1000" default="true"/>
In this example, the messaging bridge receives a message from the input channel and it publishes it to an output channel. In this case, we have a service activator connected to the output channel. The order processor (service activator) will be polling the message channel in one second intervals.
4.8 Message Handler Chain
The message handler chain is used to simplify the configuration when you have several message handlers connected in a linear way. The following example shows you a messaging configuration that will be simplified with the handler chain:
<int:channel id="requestChannel"/>
<int:channel id="responseChannel"/>

<int:filter ref="myFilter" method="filterInvalidOrders" input-channel="requestChannel" output-channel="filteredChannel"/>

<int:channel id="filteredChannel"/>

<int:transformer ref="myTransformer" method="transform"
    input-channel="filteredChannel" output-channel="transformedChannel"/>

<int:channel id="transformedChannel"/>

<int:service-activator method="processOrder" input-channel="transformedChannel" ref="orderProcessor" output-channel="responseChannel"/>
The message goes through a filter, then it will reach a transformer, and finally the message will be processed by a service activator. Once done, the message will be sent to the output channel “responseChannel”.
Using a message filter chain, the configuration will be as simplified as this:
<int:channel id="requestChannel"/>
<int:channel id="responseChannel"/>

<int:chain input-channel="requestChannel" output-channel="responseChannel">
    <int:filter ref="myFilter" method="filterInvalidOrders"/>
    <int:transformer ref="myTransformer" method="transform"/>
    <int:service-activator ref="orderProcessor" method="processOrder"/>
</int:chain>
5. Synchronous and asynchronous communication
As explained in the first tutorial of this course, communication can be performed synchronously or asynchronously. This section shows how to change this communication.
5.1 Message channels
Depending on how you configure message channels, messages will be retrieved synchronously or asynchronously. There are not many things to change, just the configuration.
For example, imagine we have a point-to-point direct channel like the one below:
<int:channel id="requestChannel"/>
The message sent to this channel will immediately be delivered to the passive consumer (subscriber). If a response is expected, the sender will wait until it is sent to him. In order to change this we just need to add a queue:
<int:channel id="requestChannel">
    <int:queue capacity="5"/>
</int:channel>
That’s it. Now the channel can queue up to five messages. The consumer will actively retrieve the message queued in this channel from a different thread than the sender.
Now, what about publish-subscribe channels? Let’s take a similar example by configuring a synchronous channel:
<int:publish-subscribe-channel id="mySubscribableChannel"/>
In this case we will change its behavior by using a task executor:
<int:publish-subscribe-channel id="mySubscribableChannel" task-executor="myTaskExecutor"/>

<task:executor id="myTaskExecutor" pool-size="5"/>
5.2 Gateways
A gateway is a type of channel adapter which can be used to:
- Provide an entry/exit mechanism to the messaging system. This way, the application can send a message to the messaging system, which will process it through its message endpoints.
- Send a message to an external system and wait for the response (output gateway)
- Receive a message from an external system and send a response after processing it (inbound gateway).
This example uses the first case. The application will send a message through a gateway and wait for the messaging system to process it. Here, we will use a synchronous gateway. Thus, the test application will send the message and block, waiting for the response.
The interface
All invocations to its sendOrder method will be caught by the gateway. See that there’s no implementation of this interface. The gateway will wrap it to intercept those calls.
public interface OrderService {
    @Gateway
    public OrderConfirmation sendOrder(Order order);
}
The configuration
The gateway is linked to the interface in order to intercept its calls and send the message into the messaging system.
<int:gateway default-request-channel="requestChannel"
    service-interface="xpadro.spring.integration.service.OrderService"/>

<int:channel id="requestChannel"/>
The test
The service interface (the gateway) is injected to the application. A call to the "sendOrder" method will send the Order object to the messaging system, wrapped into a message.
@Autowired
private OrderService service;

@Test
public void testSendOrder() {
    OrderConfirmation confirmation = service.sendOrder(new Order(3, "a correct order"));
    Assert.assertNotNull(confirmation);
    Assert.assertEquals("confirmed", confirmation.getId());
}
In this other example, the test class will block until an order confirmation is sent back. Now we are going to configure it to make it asynchronous:
The interface
The only change here is to return a Future
public interface OrderService {
    @Gateway
    public Future<OrderConfirmation> sendFutureOrder(Order order);
}
The test
Now the test must handle a Future object that will be returned from the gateway.
@Autowired
private OrderService service;

@Test
public void testSendCorrectOrder() throws ExecutionException {
    Future<OrderConfirmation> confirmation = service.sendFutureOrder(new Order(3, "a correct order"));
    OrderConfirmation orderConfirmation = confirmation.get();
    Assert.assertNotNull(orderConfirmation);
    Assert.assertEquals("confirmed", orderConfirmation.getId());
}
6. Error handling
This last section of this tutorial is going to explain the differences in error handling depending on which type of communication we have configured, synchronous or asynchronous.
In a synchronous communication, the sender blocks while the message is sent to the messaging system using the same thread. Obviously, if an exception is raised, it will go up reaching the application (our test in the example at the previous section).
But, in asynchronous communication, the consumer retrieves the message from a different thread. If it raises an exception it won’t reach the application. How does Spring Integration handle it? This is where the error channel comes in.
When an exception is raised, it is wrapped into a MessagingException, becoming the payload of a new message. This message is send to:
- An error channel: This channel is defined as a header named “errorChannel” in the original message header.
- A global error channel: If no error channel is defined in the message header, then it is sent to a global error channel. This channel is defined by default by Spring Integration.
Global error channel
This channel is a publish-subscribe channel. This means we can subscribe our own endpoints to this channel and receive any error that is raised. In fact, Spring Integration already subscribes an endpoint: a logging handler. This handler logs the payload of any message sent to the global error channel.
To subscribe another endpoint in order to handle the exception, we just need to configure it as follows:
<int:service-activator input-channel="errorChannel" ref="myExceptionHandler" method="handleInvalidOrder"/>

<bean id="myExceptionHandler" class="xpadro.spring.integration.activator.MyExceptionHandler"/>
The handleInvalidOrder method of our service activator endpoint will receive the messaging exception:
public class MyExceptionHandler {
    @ServiceActivator
    public void handleInvalidOrder(Message<MessageHandlingException> message) {
        //Retrieve the failed order (payload of the source message)
        Order requestedOrder = (Order) message.getPayload().getFailedMessage().getPayload();

        //Handle exception
        ...
    }
}
