This article is based on a DCHQ Whitepaper (September 2015). DCHQ is an Advanced Platform for Automation of Container based Apps on any Cloud.
The hosted platform is perfect for development teams that are quickly growing and looking to automate the deployment, life-cycle management and monitoring of applications to reduce the cost of replicating applications in DEV/TEST environments.
Sign Up for FREE on http://DCHQ.io to get access to out-of-box multi-tier Java application templates along with application lifecycle management functionality like monitoring, container updates, scale in/out and continuous delivery.
Table Of Contents
- 1. Background
- 2. The Challenges with Containers
- 3. DCHQ Solution Overview
- 4. Best Practices for Deploying Containerized Multi-Tier Java Applications on Any Cloud
- 4.1. Building the Application Template for the Docker-based Java 3-Tier Nginx, Clustered Tomcat, and MySQL Application
- 4.2. Provisioning & Auto-Scaling the Underlying Infrastructure on Any Cloud
- 4.3. Deploying the Multi-Tier Java Application on the Rackspace Cluster
- 4.4. Monitoring the CPU, Memory & I/O Utilization of the Running Containers
- 4.5. Scaling out the Tomcat Application Server Cluster
- 4.6. Enabling the Continuous Delivery Workflow with Jenkins to Update the WAR File of the Running Application when a Build is Triggered
- 5. Conclusion
1. Background
Java developers and DevOps professionals have long struggled to automate the deployment of enterprise Java applications. The complex nature of these applications usually meant that application dependencies and external integrations had to be re-configured each time an application was deployed in DEV/TEST environments.
Many solutions advertised the “model once, deploy anywhere” message for application deployments. In reality, however there were always intricacies that made it very difficult to re-use an application template across both an on-premise vSphere virtual environment and an AWS environment, for example.
More recently, however, Docker containers popularized the idea of packaging application components into Linux Containers that can be deployed exactly the same on any Linux host as long as Docker Engine is installed.
Unfortunately containerizing enterprise Java applications is still a challenge mostly because existing application composition frameworks do not address complex dependencies, external integrations or auto-scaling workflows post-provision. Moreover, the ephemeral design of containers meant that developers had to spin up new containers and re-create the complex dependencies & external integrations with every version update.
DCHQ, available in hosted and on-premise versions, addresses all of these challenges and simplifies the containerization of enterprise Java applications through an advance application composition framework that facilitates cross-image environment variable bindings, extensible BASH script plug-ins that can be invoked at request time or post-provision, and application clustering for high availability across multiple hosts or regions with support for auto scaling.
Once an application is provisioned, a user can monitor the CPU, Memory, & I/O Utilization of the running containers, get notifications & alerts, and perform day-2 operations like Scheduled Backups, Container Updates using BASH script plug-ins, and Scale In/Out. Moreover, out-of-box workflows that facilitate Continuous Delivery with Jenkins allow developers to refresh the Java WAR file of a running application without disrupting the existing dependencies & integrations.
In this article, will go over the deployment automation and lifecycle management of a Docker-based 3-tier Java application deployed on clustered Tomcat Servers with Nginx for load balancing and MySQL for the database. We will cover:
- Building the application template that can re-used on any Linux host running anywhere
- Provisioning & auto-scaling the underlying infrastructure on any cloud (with Rackspace being the example in this article)
- Deploying the multi-tier Java application on the Rackspace cluster
- Monitoring the CPU, Memory & I/O Utilization of the Running Containers
- Scaling out the Tomcat Application Server Cluster
- Enabling the Continuous Delivery Workflow with Jenkins to update the WAR file of the running application when a build is triggered
2. The Challenges with Containers
Many Java developers have reacted to the rise of Docker skeptically – not understanding how Docker containers can fit into their application development process. After all, a JVM is a container itself – why would developers need yet another abstraction layer to containerize a container?
The initial excitement around Docker containers for Java applications was driven mostly by:
- Docker’s ability to provide application portability. Developers no longer had to worry about installing the right version of Java or JVM. A Java app would run exactly the same on any Linux host running anywhere.
- Docker’s abstraction layer, which prevented hackers from getting access to the native operating system if a security exploit existed.
As Java developers started exploring Docker, they quickly realized that containerizing enterprise Java applications is still a challenge because:
- It typically involves a significant learning curve in learning yet a new syntax in Dockerfiles
- Existing application composition frameworks do not address complex dependencies or auto-scaling workflows post-provision
- Integrations with existing load balancing or database services are difficult to manage today (especially after the application has been provisioned)
Moreover, the ephemeral design of containers meant that every time a new version of the Java application became available, new containers were spun up from the updated Docker image. While “immutable” containers worked well for stateless applications, enterprise Java applications can sometimes have hundreds of dependencies that may be extremely difficult to re-create with every version update.
Lastly, for Java developers to use Docker, they had to be assured that it could be used in production. As a result, there were many concerns around running production workloads on containers — like:
- High Availability — Running containers on distributed hosts or even different regions to ensure high-availability
- Application Composition for Complex Apps — Being able to model very complex apps with multiple dependencies to facilitate a one-click deploy
- Monitoring & Alerts — Getting the typical alerts & notifications for when resource utilization metrics exceed specified thresholds for running containers
- Auto-Scaling — Automatically scaling your application when resources are constrained or based on a defined schedule (e.g. during business hours)
- Continuous Delivery – Being able to continuously update the production environment with that latest build from a build server like Jenkins
- Container Updates — If certain configuration changes are needed, containers need to be updated using standard, already tested scripts in an automated fashion
- Logging — Being able to access the logs of the running containers for troubleshooting and analysis
- Integration with Existing Services — Integrating with existing load balancers or databases in a seamless fashion
- Auditing — Being able to track all the changes occurring on the running application and who applied those changes
3. DCHQ Solution Overview
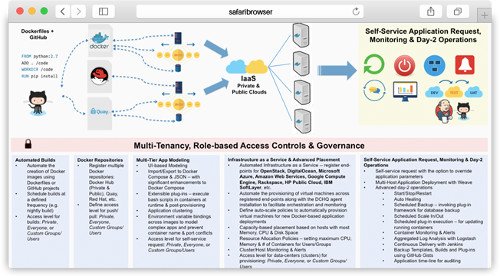
DCHQ addresses all of these challenges and simplifies the containerization of enterprise Java applications through an advance application composition framework that introduces key enhancements to Docker Compose – like:
- Cross-image environment variable bindings
- Extensible BASH script plug-ins that can be invoked at request time or post-provision
- Application clustering for high availability across multiple hosts or regions & auto scaling
Once an application is provisioned, a user can monitor the CPU, Memory, & I/O Utilization of the running containers, get notifications & alerts, and perform day-2 operations like Scheduled Backups, Container Updates using BASH script plug-ins, and Scale In/Out. Moreover, out-of-box workflows that facilitate Continuous Delivery with Jenkins allow developers to refresh the Java WAR file of a running application without disrupting the existing dependencies & integrations.
DCHQ does not just automate the application deployments, but it also integrates with 12 different cloud providers to automate the provisioning and auto-scaling of Weave-enabled clusters consisting of distributed virtual machines. It also supports capacity-based placement and historical monitoring & alerts for hosts & clusters.
All of this under a governance layer that allows users to define granular access controls to clusters, application templates, plug-ins, builds, and Docker repositories (including Docker Hub, Quay, Red Hat Container Registry).
4. Best Practices for Deploying Containerized Multi-Tier Java Applications on Any Cloud
In this article, we will go over the deployment automation and lifecycle management of a Docker-based 3-tier Java application deployed on Clustered Tomcat Servers with Nginx for load balancing and MySQL for the database.
We will cover:
- Building the application template that can re-used on any Linux host running anywhere
- Provisioning & auto-scaling the underlying infrastructure on any cloud (with Rackspace being the example in this article)
- Deploying the multi-tier Java application on the Rackspace cluster
- Monitoring the CPU, Memory & I/O Utilization of the Running Containers
- Scaling out the Tomcat Application Server Cluster
- Enabling the Continuous Delivery Workflow with Jenkins to update the WAR file of the running application when a build is triggered
4.1. Building the Application Template for the Docker-based Java 3-Tier Nginx, Clustered Tomcat, and MySQL Application
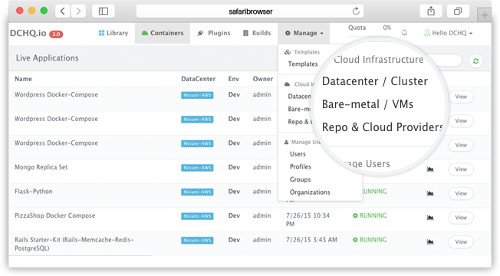
Once logged in to DCHQ (either the hosted DCHQ.io or on-premise version), a user can navigate to Manage > Templates and then click on the + button to create a new Docker Compose template.
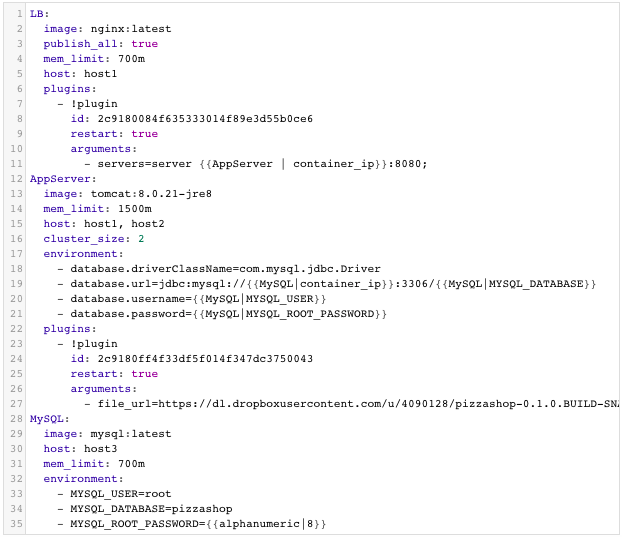
In this out-of-box example, we have a multi-tier application consisting of Nginx (for load balancing), Tomcat (the clustered application server) and MySQL (as the database). You will notice Nginx is invoking a BASH script plug-in to add the container IP’s of the application servers in the default.conf file dynamically (or at request time). Tomcat is also invoking a BASH script plug-in to deploy a Java WAR file from a specified URL In this case, the WAR is hosted on Dropbox: https://dl.dropboxusercontent.com/u/4090128/pizzashop-0.1.0.BUILD-SNAPSHOT.war
You will notice that the cluster_size parameter allows you to specify the number of containers to launch (with the same application dependencies). The host parameter allows you to specify the host you would like to use for container deployments. Here are the values supported for the host parameter:
- host1, host2, host3, etc. – selects a host randomly within a data-center (or cluster) for container deployments
- <IP Address 1, IP Address 2, etc.> — allows a user to specify the actual IP addresses to use for container deployments
- <Hostname 1, Hostname 2, etc.> — allows a user to specify the actual hostnames to use for container deployments
- Wildcards (e.g. “db-*”, or “app-srv-*”) – to specify the wildcards to use within a hostname
Additionally, a user can create cross-image environment variable bindings by making a reference to another image’s environment variable. In this case, we have made several bindings – including database.url=jdbc:mysql://{{MySQL|container_ip}}:3306/{{MySQL|MYSQL_DATABASE}} – in which the database container IP and name are resolved dynamically at request time and are used to configure the database URL in the application servers.
Here is a list of supported environment variable values:
- {{alphanumeric | 8}} – creates a random 8-character alphanumeric string. This is most useful for creating random passwords.
- {{<Image Name> | ip}} – allows you to enter the host IP address of a container as a value for an environment variable. This is most useful for allowing the middleware tier to establish a connection with the database.
- {{<Image Name> | container_ip}} – allows you to enter the internal IP of a container as a value for an environment variable. This is most useful for allowing the middleware tier to establish a secure connection with the database (without exposing the database port).
- {{<Image Name> | port _<Port Number>}} – allows you to enter the Port number of a container as a value for an environment variable. This is most useful for allowing the middleware tier to establish a connection with the database. In this case, the port number specified needs to be the internal port number – i.e. not the external port that is allocated to the container. For example, {{PostgreSQL | port_5432}} will be translated to the actual external port that will allow the middleware tier to establish a connection with the database.
- {{<Image Name> | <Environment Variable Name>}} – allows you to enter the value an image’s environment variable into another image’s environment variable. The use cases here are endless – as most multi-tier applications will have cross-image dependencies.
4.2. Provisioning & Auto-Scaling the Underlying Infrastructure on Any Cloud
Once an application is saved, a user can register a Cloud Provider to automate the provisioning and auto-scaling of clusters on 12 different cloud end-points including OpenStack, CloudStack, Amazon Web Services, Rackspace, Microsoft Azure, DigitalOcean, HP Public Cloud, IBM SoftLayer, Google Compute Engine, and many others.
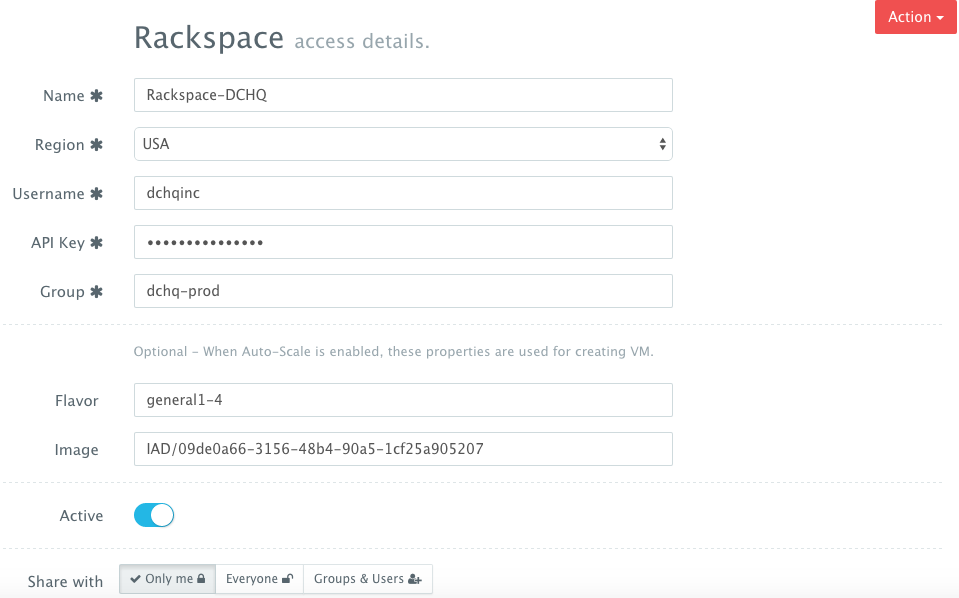
First, a user can register a Cloud Provider for Rackspace (for example) by navigating to Manage > Repo & Cloud Provider and then clicking on the + button to select Rackspace. The Rackspace API Key needs to be provided – which can be retrieved from the Account Settings section of the Rackspace Cloud Control Panel.
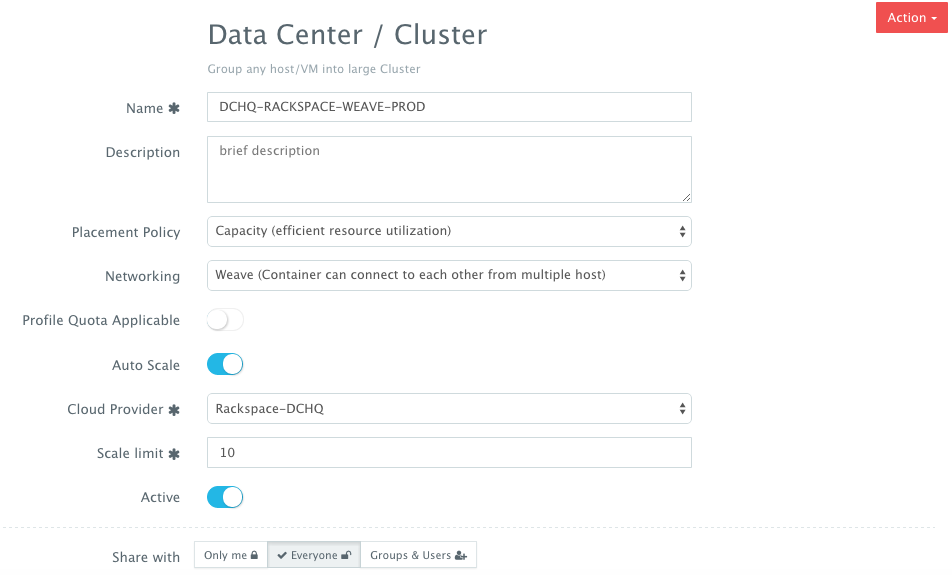
A user can then create a cluster with an auto-scale policy to automatically spin up new Cloud Servers. This can be done by navigating to Manage > Clusters page and then clicking on the + button. You can select a capacity-based placement policy and then Weave as the networking layer in order to facilitate secure, password-protected cross-container communication across multiple hosts within a cluster. The Auto-Scale Policy in this example sets the maximum number of VM’s (or Cloud Servers) to 10.
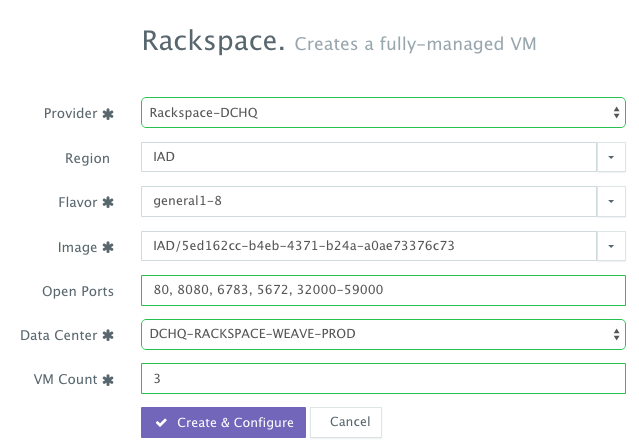
A user can now provision a number of Cloud Servers on the newly created cluster by navigating to Manage > Bare-Metal Server & VM and then clicking on the + button to select Rackspace. Once the Cloud Provider is selected, a user can select the region, size and image needed. Ports can be opened on the new Cloud Servers (e.g. 32000-59000 for Docker, 6783 for Weave, and 5672 for RabbitMQ). A Data Center (or Cluster) is then selected and the number of Cloud Servers can be specified.
4.3. Deploying the Multi-Tier Java Application on the Rackspace Cluster
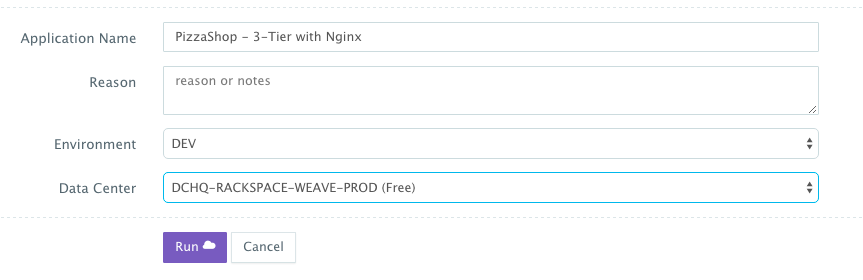
Once the Cloud Servers are provisioned, a user can deploy a multi-tier, Docker-based application on the new Cloud Servers. This can be done by navigating to the Self-Service Library and then clicking on Customize to request a multi-tier application. A user can select an Environment Tag (like DEV or QE) and the Rackspace Cluster created before clicking on Run
4.4. Monitoring the CPU, Memory & I/O Utilization of the Running Containers
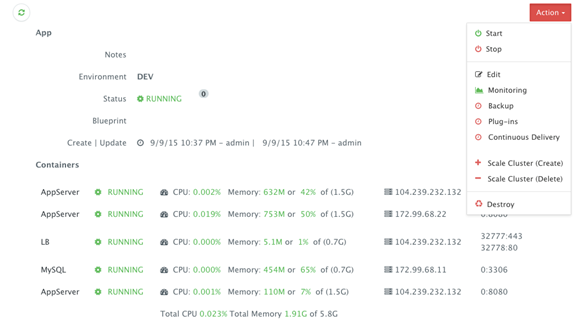
Once the application is up and running, a user can monitor the CPU, Memory, & I/O Utilization of the running containers and perform day-2 operations like Scheduled Backups, Container Updates using BASH plug-ins, Scale In/Out and Continuous Delivery.
A user can perform historical monitoring analysis and correlate issues to container updates or build deployments. This can be done by clicking on the Actions menu of the running application and then on Monitoring. A custom date range can be selected to view CPU, Memory and I/O Utilization historically.

4.5. Scaling out the Tomcat Application Server Cluster
If the running application becomes resource constrained, a user can to scale out the application to meet the increasing load. Moreover, a user can schedule the scale out during business hours and the scale in during weekends for example.
To scale out the cluster of Tomcat servers from 2 to 3, a user can click on the Actions menu of the running application and then select Scale Out. A user can then specify the new size for the cluster and then click on Run Now.
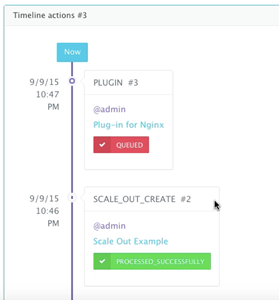
We then used the BASH plug-in to update Nginx’s default.conf file so that it’s aware of the new application server added. The BASH script plug-ins can also be scheduled to accommodate use cases like cleaning up logs or updating configurations at defined frequencies. An application time-line is available to track every change made to the application for auditing and diagnostics.
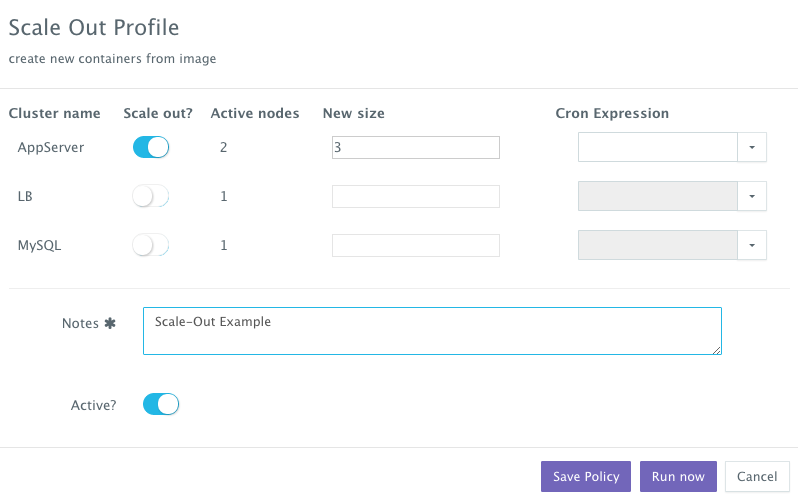
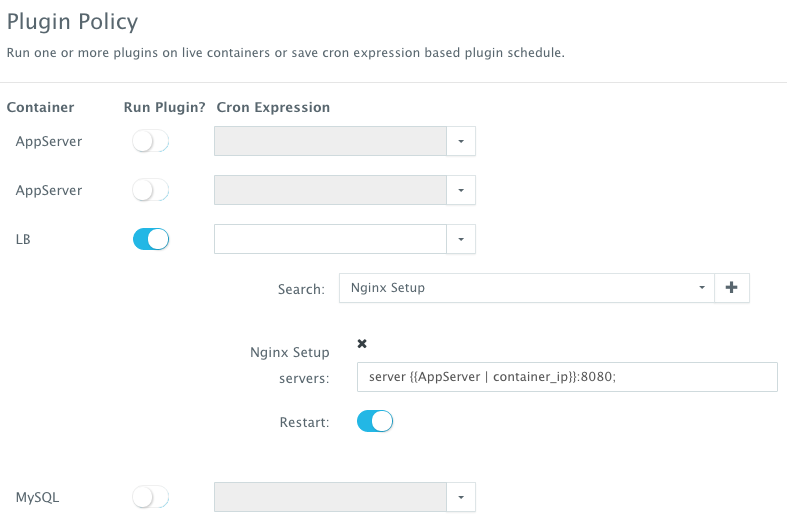
Once the scale out is complete, a user can execute a BASH plug-in to update Nginx’s default.conf file so that it’s aware of the new application server added. The BASH script plug-ins can also be scheduled to accommodate use cases like cleaning up logs or updating configurations at defined frequencies.
To execute a plug-in on a running container, a user can click on the Actions menu of the running application and then select Plug-ins. A user can then select the load balancer (Nginx) container, search for the plug-in that needs to be executed, enable container restart using the toggle button. The default argument for this plug-in will dynamically resolve all the container IP’s of the running Tomcat servers and add them as part of the default.conf file.
An application time-line is available to track every change made to the application for auditing and diagnostics. This can be accessed from the expandable menu at the bottom of the page of a running application.
Alerts and notifications are available for when containers or hosts are down or when the CPU & Memory Utilization of either hosts or containers exceed a defined threshold.

4.6. Enabling the Continuous Delivery Workflow with Jenkins to Update the WAR File of the Running Application when a Build is Triggered
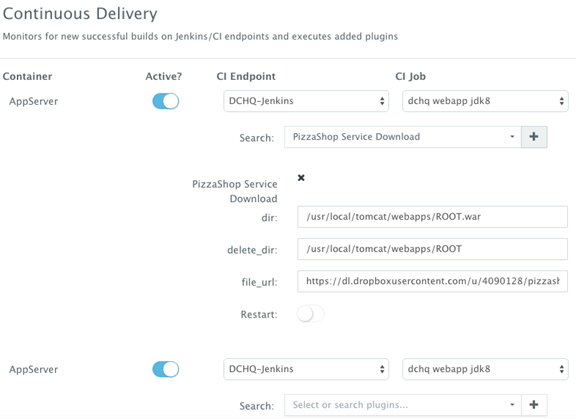
For developers wishing to follow the “immutable” containers model by rebuilding Docker images containing the application code and spinning up new containers with every application update, DCHQ provides an automated build feature that allows developers to automatically create Docker images from Dockerfiles or GitHub projects containing Dockerfiles.
However, many developers may wish to update the running application server containers with the latest Java WAR file instead. For that, DCHQ allows developers to enable a continuous delivery workflow with Jenkins. This can be done by clicking on the Actions menu of the running application and then selecting Continuous Delivery. A user can select a Jenkins instance that has already been registered with DCHQ, the actual Job on Jenkins that will produce the latest WAR file, and then a BASH script plug-in to grab this build and deploy it on a running application server. Once this policy is saved, DCHQ will grab the latest WAR file from Jenkins any time a build is triggered and deploy it on the running application server.
5. Conclusion
Containerizing enterprise Java applications is still a challenge mostly because existing application composition frameworks do not address complex dependencies, external integrations or auto-scaling workflows post-provision. Moreover, the ephemeral design of containers meant that developers had to spin up new containers and re-create the complex dependencies & external integrations with every version update.
DCHQ, available in hosted and on-premise versions, addresses all of these challenges and simplifies the containerization of enterprise Java applications through an advance application composition framework that facilitates cross-image environment variable bindings, extensible BASH script plug-ins that can be invoked at request time or post-provision, and application clustering for high availability across multiple hosts or regions with support for auto scaling.
Sign Up for FREE on http://DCHQ.io to get access to out-of-box multi-tier Java application templates along with application lifecycle management functionality like monitoring, container updates, scale in/out and continuous delivery.
