Spring XD is a powerful tool that is an installable set of Spring Boot services that run either standalone, on top of YARN or on top of EC2. Spring XD also includes an admin UI website and a command line tool for job and stream management. Spring XD is a powerful set of services that work with a variety of datasources.
For ideal usage, it should be running inside an Apache Spark or Hadoop cluster. In the first section we will setup XD to run on a Centos/RHEL machine with the necessary data services. These are for the infrastructure required to run and also for data ingestion. You can integrated your existing RDBMS, MongoDB, Kafka, Apache Spark, Hadoop, REST, RabbitMQ and other services.
You can also install XD on Mac, Windows and other Linux distributions. For basic usage on a developer machine, just download Spring XD from the Spring.IO website and run xd/xd/bin/xd-standalone and that will be sufficient for running data ingestion.
1. Spring XD Setup
First, let’s install Spring XD on your Linux server noting the requirements for running. If you do not have the required services, the XD download includes version of them for you to run.
Reference:
- http://docs.spring.io/spring-xd/docs/current/reference/html/#_redhat_centos_installation
- https://github.com/spring-projects/spring-xd/wiki/Running-Distributed-Mode
- https://github.com/spring-projects/spring-xd/wiki/XD-Distributed-Runtime
Requirements:
- Apache Zookeeper 3.4.6
- Redis
- An RDBMS (MySQL, Postgresql, Apache Derby, etc…)
Enrichers:
- GemFire (highly recommended for in-memory data grid)
- GemFire XD (highly recommended for in-memory database)
- RabbitMQ (highly recommended)
- Apache Yarn
Installing MySQL on Centos/RHEL/Fedora
A relational database is needed to store your job information, while an in-memory RDBMS could be used, for real usage, an RDBMS should be used. If you have a RDBMS that is accessible from your XD cluster you can use that. I prefer an open source database to be used just for XD, you can install MySQL or Postgresql for this.
sudo yum install mysql-server
Install Postgresql (Don’t install on the same machine as GreenPlum)
sudo yum install postgresql-server
Installing Redis
(See RabbitMQ)
ᅠwget -q -O – http://packages.pivotal.io/pub/rpm/rhel6/app-suite/app-suite-installer | sh
ᅠ ᅠ ᅠ ᅠ ᅠ ᅠsudo yum install pivotal-redis
ᅠ ᅠ ᅠ ᅠ ᅠ ᅠsudo service pivotal-redis-6379 start
ᅠ ᅠ ᅠ ᅠ ᅠ ᅠsudo chkconfig —level 35 pivotal-redis-6379 on
Installing RabbitMQ
RabbitMQ is required, even if you have another message queue. A single node will suffice, but it is needed for communication. I highly recommend having a real RMQ cluster as it fits into most streaming needs.
ᅠ
sudo wget -q -O – packages.pivotal.io | sh
sudo wget -q -O – http://packages.pivotal.io/pub/rpm/rhel6/app-suite/app-suite-installer | sh
Depending on permissions, you may have to send that to a file, chmod 700 it and run it via sudo ./installer.sh
ᅠ
sudo yum search pivotal
         pivotal-rabbitmq-server.noarch: The RabbitMQ server

sudo yum install pivotal-rabbitmq-server
sudo rabbitmq-plugins enable rabbitmq_management ᅠ ᅠ
This may conflict with ports if you are running other things on that machine.
ᅠ
sudo /sbin/service rabbitmq-server start
Install Spring-XD
The easiest way to install is using Pivotal’s official releases for RHEL, as they are certified. You do not need to be a customer to use these. There are a number of other ways to download/install XD, but this is the easiest for RHEL as it will configure them as services.
sudo wget -q -O – http://packages.pivotal.io/pub/rpm/rhel6/app-suite/app-suite-installer sh

sudo yum install spring-xd
Recommendation
It is also recommended to deploy XD nodes and DataNode within the same container and use data partitioning. This will speed up data processing and ingestion.
Setting Your Jobs Database
Change the datasource, pick one of the below for easiest setup. The jobs database is where Spring XD Job information and metadata is stored. This is necessary. This will be a very small amount of data.
/opt/pivotal/spring-xd/xd/config
ᅠ#spring:
# ᅠdatasource:
# ᅠ ᅠurl: jdbc:mysql://mysqlserver:3306/xdjobs
# ᅠ ᅠusername: xdjobsschema
# ᅠ ᅠpassword: xdsecurepassword
# ᅠ ᅠdriverClassName: com.mysql.jdbc.Driver
# ᅠ ᅠvalidationQuery: select 1
#Config for use with Postgres - uncomment and edit with relevant values for your environment
#spring:
# ᅠdatasource:
# ᅠ ᅠurl: jdbc:postgresql://postgresqlserver:5432/xdjobs
# ᅠ ᅠusername: xdjobsschema
# ᅠ ᅠpassword: xdsecurepassword
# ᅠ ᅠdriverClassName: org.postgresql.Driver
# ᅠ ᅠvalidationQuery: select 1
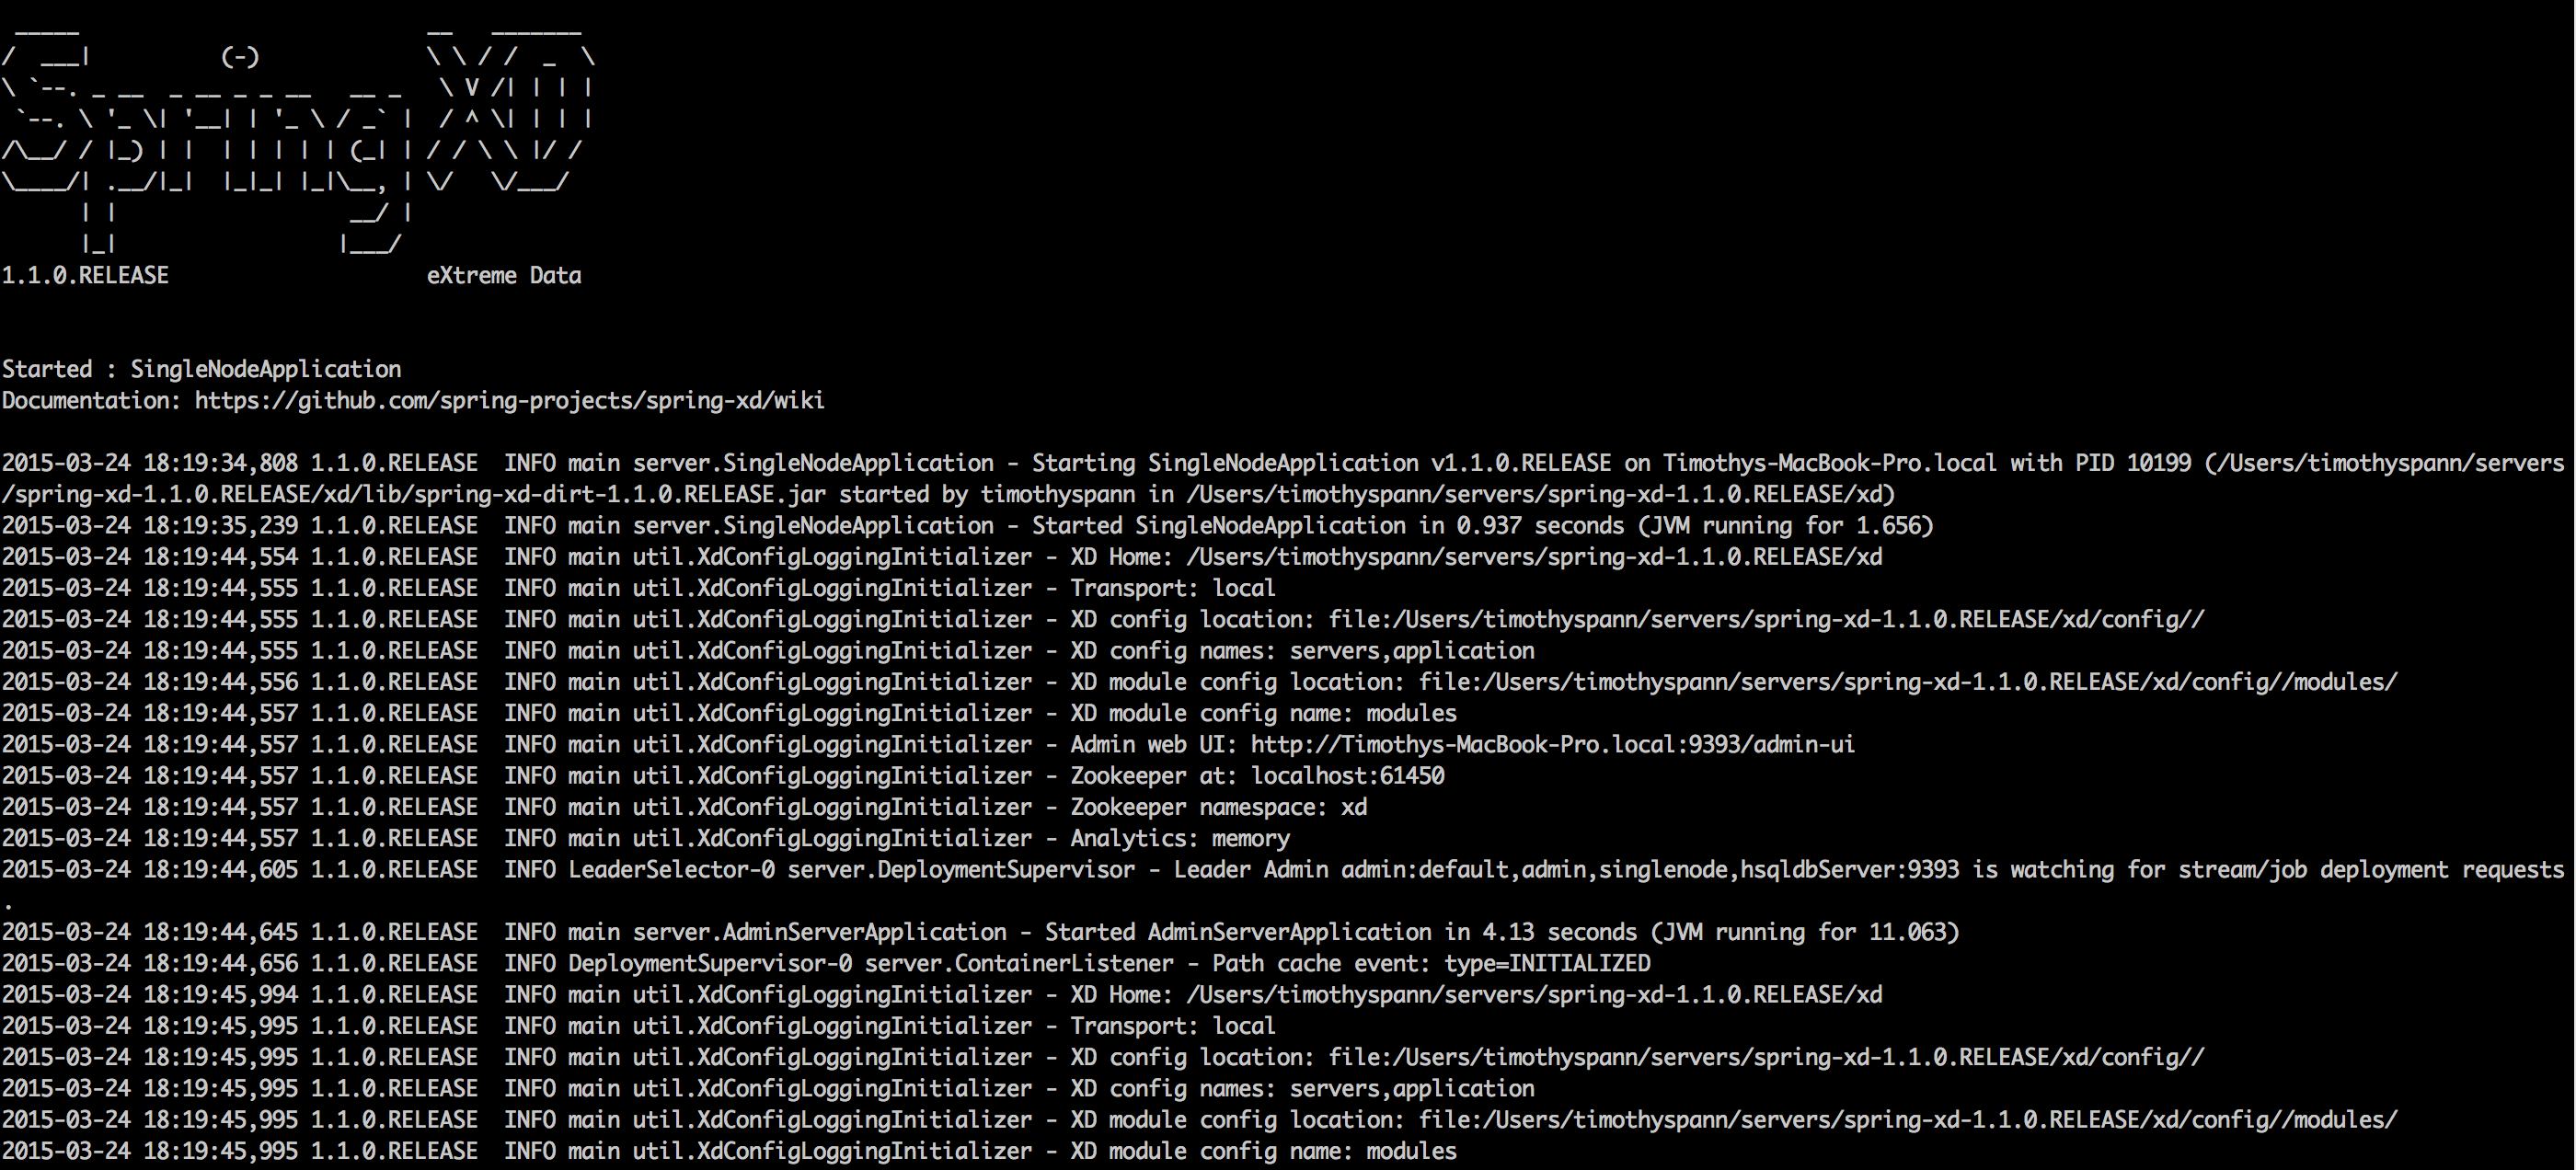
Test that Spring-XD Single Node Works:
cd /opt/pivotal/springxd/xd/bin
./xd-singlenode —hadoopDistro phd20
If you are using a different Hadoop Distribution then Pivotal HD 2.0, you can specify that here or leave that flag off.
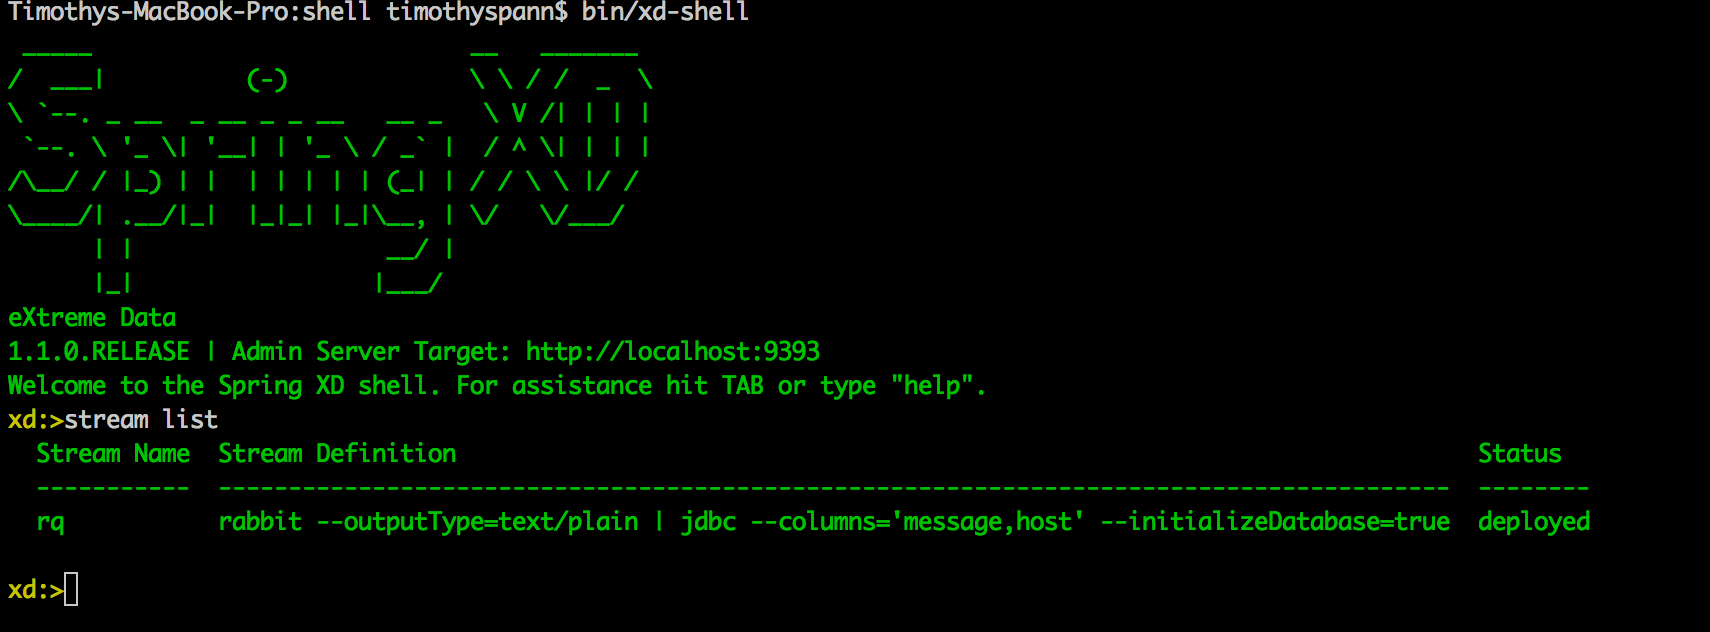
Test that Spring-XD Shell Works
cd /opt/pivotal/springxd/shell/bin
ᅠ ᅠ ./xd-shell—hadoopDistro phd20
The shell has help and shortcuts, just start typing and tab will resolve names and parameters for you.
Set the Environment Variable for Spring XD
export XD_HOME=/opt/pivotal/spring-xd/xd
For Default Access, I use:
/opt/pivotal/spring-xd/shell/bin/xd-shell —hadoopDistro phd20
For Testing Containers and Admin Servers for Distributed Spring XD (DIRT)
sudo service spring-xd-admin start
sudo service spring-xd-container start
For Testing Spring XD
- http://blog.pivotal.io/pivotal/products/spring-xd-for-real-time-analytics
- https://github.com/spring-projects/spring-xd-samples
Some Spring XD Shell Commands for Testing
had config fs —namenode hdfs://pivhdsne:8020
admin config server http://localhost:9393
runtime containers
runtime modules

hadoop fs ls /xd/
stream create ticktock —definition “time | log”
stream deploy ticktock
stream list
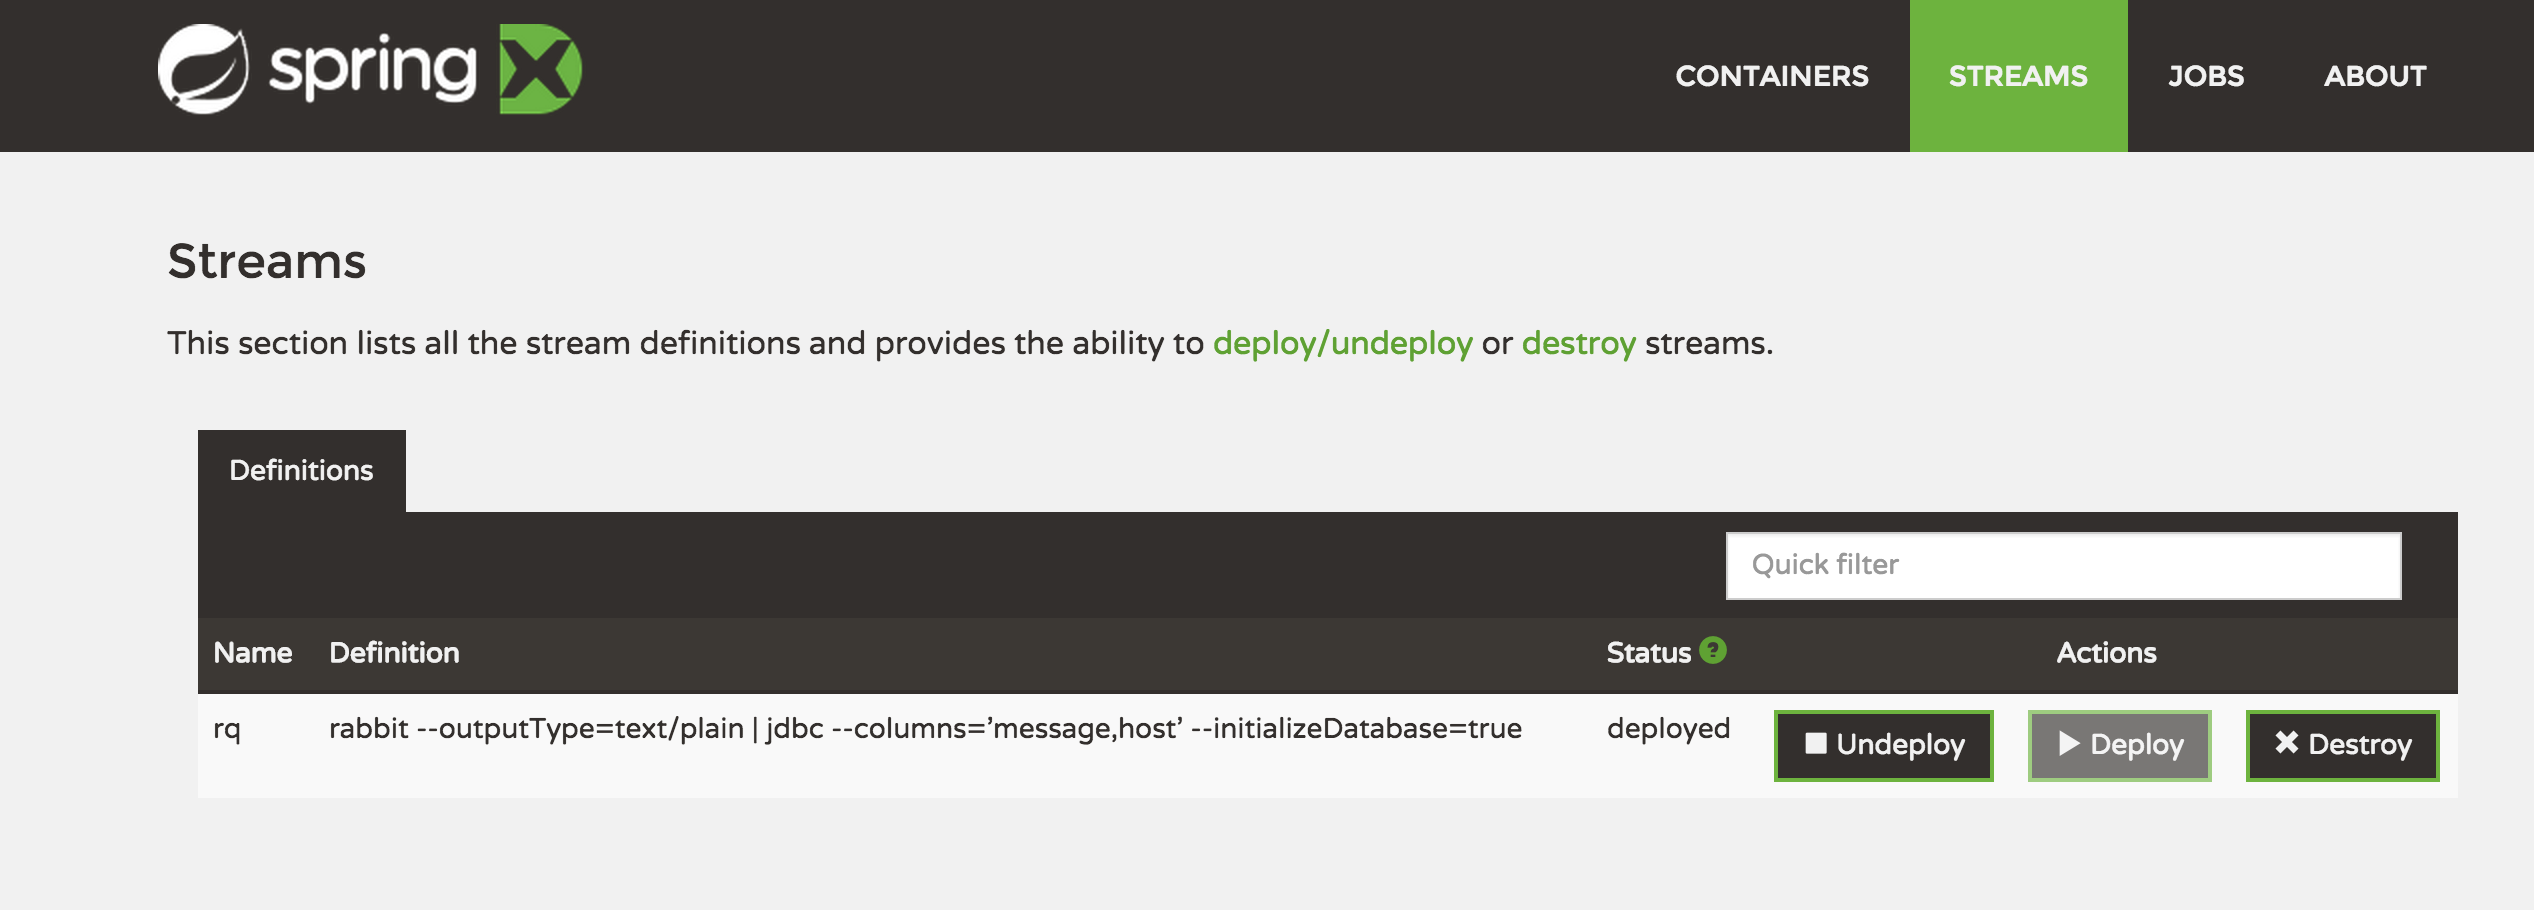
Check the Web UI
2. Spring XD Job and Stream with SQL
Caveat: The complete field lists are abbreviated for sake of space, you have to list all the fields you are working with.
First we create a simple filejdbc Spring Job that loads the raw tilde delimited file into HAWQ. These fields all come in as TEXT fields, which could be okay for some purposes, but not our needs. We also create a XD stream with a custom sink (see the XML, no coding) that runs a SQL command to insert from this table and convert into other HAWQ types (like numbers and time).
We trigger the secondary stream to run via a command line REST POST, but we could have used a timed trigger or many other ways (automated, scripted or manual) to kick that off. You could also just create a custom XD job that did casting of your types and some manipulation or done it with a Groovy script transform. There’s many options in XD.
jobload.xd
job create loadjob --definition "filejdbc --resources=file:/tmp/xd/input/files/*.* --names=time,userid,dataname,dataname2,
dateTimeField, lastName, firstName, city, state, address1, address2 --tableName=raw_data_tbl --initializeDatabase=true
--driverClassName=org.postgresql.Driver --delimiter=~ --dateFormat=yyyy-MM-dd-hh.mm.ss --numberFormat=%d
--username=gpadmin --url=jdbc:postgresql:gpadmin" --deploy
stream create --name streamload --definition "http | hawq-store" --deploy
job launch jobload
clear
job list
stream list
- Job loads file into a Raw HAWQ table with all text columns.
- Stream is triggered by web page hit or command line call
(needs hawq-store). This does inserts into the real table and truncates the temp one.
triggerrun.sh (BASH shell script for testing)
curl -s -H "Content-Type: application/json" -X POST -d "{id:5}" http://localhost:9000added spring-integration-jdbc jar to /opt/pivotal/spring-xd/xd/lib
hawq-store.xml (Spring Integration / XD Configuration)
/opt/pivotal/spring-xd/xd/modules/sink/hawq-store.xml
<?xml version="1.0" encoding="UTF-8"?>
<beans xmlns="http://www.springframework.org/schema/beans"
 xmlns:xsi="http://www.w3.org/2001/XMLSchema-instance" xmlns:int="http://www.springframework.org/schema/integration"
 xmlns:int-jdbc="http://www.springframework.org/schema/integration/jdbc"
 xmlns:jdbc="http://www.springframework.org/schema/jdbc"
 xsi:schemaLocation="http://www.springframework.org/schema/beans
 http://www.springframework.org/schema/beans/spring-beans.xsd
 http://www.springframework.org/schema/integration
 http://www.springframework.org/schema/integration/spring-integration.xsd
 http://www.springframework.org/schema/integration/jdbc
 http://www.springframework.org/schema/integration/jdbc/spring-integration-jdbc.xsd">
<int:channel id="input" />
<int-jdbc:store-outbound-channel-adapter
 channel="input" query="insert into real_data_tbl(time, userid, firstname, ...) select cast(time as datetime),
cast(userid as numeric), firstname, ... from dfpp_networkfillclicks" data-source="dataSource" />
<bean id="dataSource" class="org.springframework.jdbc.datasource.DriverManagerDataSource">
 <property name="driverClassName" value="org.postgresql.Driver"/>
 <property name="url" value="jdbc:postgresql:gpadmin"/>
 <property name="username" value="gpadmin"/>
 <property name="password" value=""/>
</bean>
</beans>
createtable.sql
CREATE TABLEᅠraw_data_tbl
 (
 time text,
 userid text ,
...
  somefieldᅠtext
 )
 WITH (APPENDONLY=true)
 DISTRIBUTED BY (time);
3. Spring XD Scripts for the Shell
My General Setup Script (I save it in setup.xd and load it via ᅠscript –file setup.xd)
had config fs --namenode hdfs://localhost:8020
admin config server http://localhost:9393
hadoop fs ls /
stream list
The Script for Loading a File into GemFireXD via Spring-XD
stream create --name fileload --definition "file --dir=/tmp/xd/input/load --outputType=text/plain | ᅠjdbc --tableName=APP.filetest --columns=id,name" --deploy
4. Spring XD Configuration for GemFire XD
Copy the GemFire XD JDBC Driver to Spring-XD (might need tools.jar as well)
cp /usr/lib/gphd/Pivotal_GemFireXD_10/lib/gemfirexd-client.jar /opt/pivotal/spring-xd/xd/lib/
Modify the Sink’s JDBC properties to point to your Gemfire XD, if you are using the Pivotal HD VM and install Spring-XD with Yum (sudo yum update spring-xd), this is the location:
/opt/pivotal/spring-xd/xd/config/modules/sink/jdbc/jdbc.properties
url = jdbc:gemfirexd://localhost:1527
username = gfxd
password = gfxd
driverClassName = com.pivotal.gemfirexd.jdbc.ClientDriver
For Peer Client Driver you need more files from GemFireXD Lib (the .so binaries), linking is probably a good idea.
5. GemFire XD Setup
gfxd
connect client 'localhost:1527';

create table filetest (id int, name varchar(100)) REPLICATE PERSISTENT;
select id, kind, netservers from sys.members;ᅠ
select * from filetest;
Spring XD Commands
stream list
show your streams
Reference:
- Spring XD Documentation
- Spring XD Wiki
- Install Spring XD on Centos
- GemFire XD Documents
- Spring XD File Ingestion into JDBCᅠ
- Spring XD with Hadoop
6. Ingesting Data From RabbitMQ into a RDBMS via Spring XD
A Simple Stream to Read From a Rabbit Queue Named ‘rq’ and send it to a SQL database with columns “message and host”, creating a new table named ‘rq’.
stream create --name rq --definition "rabbit --outputType=text/plain | jdbc --columns='message,host' --initializeDatabase=true" --deploy
7. Ingesting Data From a REST API into HDFS via Spring XD
stream create --name hdfssave --definition "http | hdfs" –deploy

After creating Spring XD stream, when we check the stream status using stream list comand, the status seems to be failed. Could any one please help us why it is so? Also we cannot see any data that we have posted in this sink.
I have found a solution for the question that i have posted. Try starting the Spring XD single node too. Then you won’t face any stream creation failure. Status will be in deployed (when we try create stream to fetch mysql data for example). But stream creation will be in failed, if we are pointing to gemfire. I am looking into it.