What is Build Binaries Only Once?
One of the fundamental principle of Continuous Delivery is Build Binaries Only Once, or in short BBOO. This means that the binary artifacts should be build once, and only once. These artifacts should then be stored in a repository manager, such as a Nexus Repository. Subsequent deploy, test, and release cycles should never attempt to build this binary again and instead reuse this binary. This ensures that the exact same binary has gone through all different test cycles and delivered to the customer.
Several times binaries are rebuilt during each testing phase using a specific tag of the workspace, and considered the same. But that is still different! This might turn out to be the same but that’s more incidental. Its more likely not same because of different environment configurations. For example, development team might be using JDK 8 on their machine and the test/staging might be using JDK 7. There are a multitude reasons because of which the binary artifacts could differ. So it’s very essential to build binaries only once, store them in a repository, and make them go through different test, staging, and production cycle. This increases the overall confidence level of delivery to the customer.
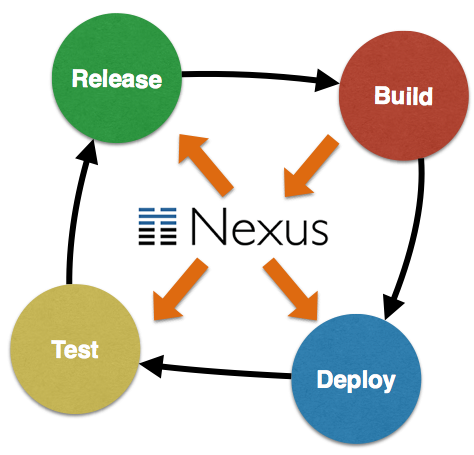
This image shows how the binaries are built once during Build stage and stored on Nexus repository. There after, Deploy, Test, and Release stages are only reading the binary from Nexus.
The fact that dev, test, and staging environments differ is a different issue. And we’ll deal with that in a subsequent blog.
How do you setup Build Binaries Only Once?
For now, lets look at the setup:
- A Java EE 7 application WAR file is built once
- Store in a Nexus repository, or
.m2local repository - Same binary is used for smoke testing
- Same binary is used for running full test suite
The smoke test in our case will be just a single test and full suite has four tests. Hopefully this is not your typical setup in terms of the number of tests, but at least you get to see how to setup everything.
Also only two stages of testing, smoke and full but the concept can be easily extended to add other stages. A subsequent blog will show a full blown deployment pipeline.
Lets get started!
- Check out a trivial Java EE 7 sample application from github.com/javaee-samples/javaee7-simple-sample. This is a typical Java EE application with REST endpoints, CDI beans, JPA entities.
- Setup a local Nexus Repository and deploy a SNAPSHOT of the application to it as:
mvn deploy
By default, Nexus repository is configured on
localhost:8081/nexus. Note down the host/port if you are using a different combination. Also note down the exact version number that is deployed to Nexus. By default, it will be1.0-SNAPSHOT.You can also deploy a RELEASE to this Nexus repository as:
mvn release:clean release:prepare release:perform
Note down whether you deployed SNAPSHOT or RELEASE.
In either case, you can also specify-P releaseMaven profile and sources and javadocs will be attached with the deployment. So if RELEASE is deployed as:mvn release:clean release:prepare release:perform -P release
- Check out the test workspace from github.com/javaee-samples/javaee7-simple-sample-test. Make the following changes in this project:
- Change
nexus-repoproperty to match the host/port of the Nexus repository. If you used the default installation of Nexus and deployed a RELEASE, then nothing needs to be changed.By default, Nexus has one repository for SNAPSHOTs and another for RELEASEs. The workspace is configured to use RELEASE repository. If you deployed a SNAPSHOT, then “releases” innexus-reponeeds to be changed to “snapshots”to point to the appopriate repository. - Change
javaee7-sample-app-versionproperty to match the version of the application deployed to Nexus.
- Change
- Start WildFly and run smoke tests as:
mvn test -P smoketest
This will run all files ending in “SmokeTest”. ShrinkWrap and Arquillian perform the heavy lifting of resolving the WAR file from Nexus and using it for running the tests:
return Maven.configureResolver()
       .withRemoteRepo("local-nexus", System.getProperty("nexus-repo"), "default")
       .resolve("org.javaee7.sample:javaee7-simple-sample:war:"
          + System.getProperty("javaee7-sample-app-version"))
       .withoutTransitivity()
       .asSingle(WebArchive.class);
Running the smoke tests will show the results as:
Running org.javaee7.sample.PersonResourceSmokeTest
Feb 25, 2015 2:00:39 PM org.xnio.Xnio <clinit>
INFO: XNIO version 3.2.0.Beta4
Feb 25, 2015 2:00:39 PM org.xnio.nio.NioXnio <clinit>
INFO: XNIO NIO Implementation Version 3.2.0.Beta4
Feb 25, 2015 2:00:40 PM org.jboss.remoting3.EndpointImpl <clinit>
INFO: JBoss Remoting version (unknown)
Tests run: 1, Failures: 0, Errors: 0, Skipped: 0, Time elapsed: 4.895 sec - in org.javaee7.sample.PersonResourceSmokeTest

Results :

Tests run: 1, Failures: 0, Errors: 0, Skipped: 0
- Run the full tests as:
mvn test -P fulltest
This will run all files included in your test suite and will show the results as:
Running org.javaee7.sample.PersonResourceSmokeTest
Feb 25, 2015 2:35:38 PM org.xnio.Xnio <clinit>
INFO: XNIO version 3.2.0.Beta4
Feb 25, 2015 2:35:38 PM org.xnio.nio.NioXnio <clinit>
INFO: XNIO NIO Implementation Version 3.2.0.Beta4
Feb 25, 2015 2:35:38 PM org.jboss.remoting3.EndpointImpl <clinit>
INFO: JBoss Remoting version (unknown)
Tests run: 1, Failures: 0, Errors: 0, Skipped: 0, Time elapsed: 2.388 sec - in org.javaee7.sample.PersonResourceSmokeTest
Running org.javaee7.sample.PersonResourceTest
Tests run: 3, Failures: 0, Errors: 0, Skipped: 0, Time elapsed: 0.265 sec - in org.javaee7.sample.PersonResourceTest

Results :

Tests run: 4, Failures: 0, Errors: 0, Skipped: 0
In both cases, smoke tests and full tests are using the binary that is deployed to Nexus.
Learn more about your toolset for creating this simple yet powerful setup:
![]()
![]()
![]()
Here are some other blogs coming in this series:
- Use a CI server to deploy to Nexus
- Run tests on WildFly running in a PaaS
- Add static code coverage and code metrics in testing
- Build a deployment pipeline
Enjoy!
| Reference: | Build Binaries Only Once for Continuous Deployment from our JCG partner Arun Gupta at the Miles to go 2.0 … blog. |
