In many posts we talked extensively about ListView and how to handle it: creating custom adapter or handling user interactions.
In this post, I will cover another aspect related to the ListView that was not covered in the past: ListView with multiple row layout. By now we have seen rows having the same layout, anyway it is possible to have rows with different layouts.
We want to have something like the pic shown below:
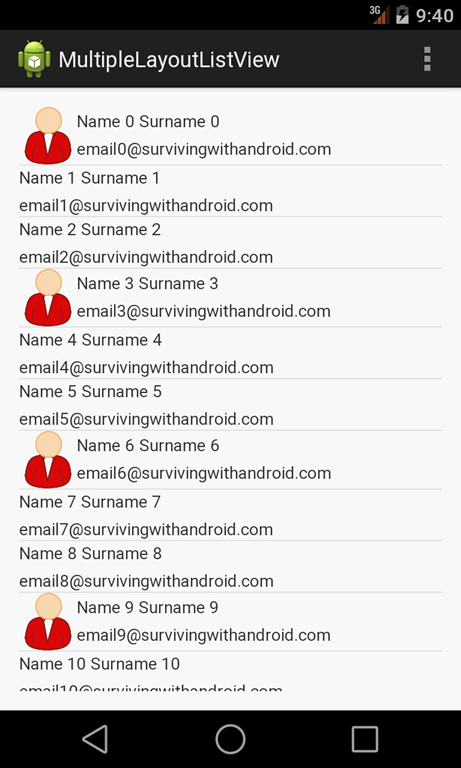
In this app, we show a Contact list that has two different layouts one that uses an image and another one without image. Even if the example is quite simple, it is enough to understand how to use several ListView methods to get this result.
How to have multiple layout
Usually when we want to customize the ListView data we use a custom adapter. We know Android provides some basic adapter ready-to-use (i.e ArrayAdapter, SimpleAdapter and so on) . We know, already, that all these adapters have in a common a father class known as BaseAdapter.
When we want to customize how the ListView display the data, we can use one of the adapter class provided by Android or implement our custom adapter, in this case we will create a custom adapter extending the BaseAdapter.
The BaseAdapter has two methods that are very useful if we want to have multiple row layouts:
- public int getItemViewType(int position)
- public int getViewTypeCount()
The method getViewTypeCount “returns the number of types of Views that will be created by getView(int, View, ViewGroup)“.
In other words this method returns how many different layouts we have in our ListView. The getItemViewType returns the view type of the current row, if you look at the method signature we have the position as parameter. One thing we should notice is that this method must return an integer value between 0 and the getViewTypeCount() – 1.
So if we want to have multiple row layout, we have to override these methods and returns the right values.
Multiple row layout implementation
As first thing, we have to create a custom adapter, that we call ContactAdapter:
public class ContactAdapter extends BaseAdapter {
...
}
and to have two different layouts, we override:
@Override
public int getViewTypeCount() {
    return 2;
}
and then we have to implement the logic to select the type of layout to assign to the row according to the position value:
@Override
public int getItemViewType(int position) {
    return (contactList.get(position).getContactType() == ContactType.CONTACT_WITH_IMAGE) ? 0 : 1;
}
In this method we use getContactType to know which layout to use, as you can see we return 0 or 1.
Now we have to implement two different layout: they are very similar:
<RelativeLayout xmlns:android="http://schemas.android.com/apk/res/android"
    android:layout_width="match_parent" android:layout_height="wrap_content">

    <ImageView
        android:layout_width="48dp"
        android:layout_height="48dp"
        android:id="@+id/img"/>

    <TextView
        android:layout_width="wrap_content"
        android:layout_height="wrap_content"
        android:id="@+id/name"
        android:layout_toRightOf="@id/img"
        android:layout_marginTop="2dp"/>

    <TextView
        android:layout_width="wrap_content"
        android:layout_height="wrap_content"
        android:id="@+id/surname"
        android:layout_toRightOf="@id/name"
        android:layout_marginLeft="4dp"/>

    <TextView
        android:layout_width="wrap_content"
        android:layout_height="wrap_content"
        android:id="@+id/email"
        android:layout_below="@id/name"
        android:layout_alignStart="@id/name"
        android:layout_marginTop="4dp"/>
</RelativeLayout>
and the other one without image is:
<RelativeLayout xmlns:android="http://schemas.android.com/apk/res/android"
    android:layout_width="match_parent" android:layout_height="wrap_content">

    <TextView
        android:layout_width="wrap_content"
        android:layout_height="wrap_content"
        android:id="@+id/name"/>

    <TextView
        android:layout_width="wrap_content"
        android:layout_height="wrap_content"
        android:id="@+id/surname"
        android:layout_toRightOf="@id/name"
        android:layout_marginLeft="4dp"/>

    <TextView
        android:layout_width="wrap_content"
        android:layout_height="wrap_content"
        android:id="@+id/email"
        android:layout_below="@id/name"
        android:layout_alignStart="@id/name"
        android:layout_marginTop="4dp"/>
</RelativeLayout>
Now we have simply to override, in our custom adapter, the getView method:
@Override
public View getView(int position, View convertView, ViewGroup parent) {
    View v = convertView;
    int type = getItemViewType(position);
    if (v == null) {
        // Inflate the layout according to the view type
        LayoutInflater inflater = (LayoutInflater) ctx.getSystemService(Context.LAYOUT_INFLATER_SERVICE);
        if (type == 0) {
            // Inflate the layout with image
            v = inflater.inflate(R.layout.image_contact_layout, parent, false);
        }
        else {
            v = inflater.inflate(R.layout.simple_contact_layout, parent, false);
        }
    }
    //
    Contact c = contactList.get(position);

    TextView surname = (TextView) v.findViewById(R.id.surname);
    TextView name = (TextView) v.findViewById(R.id.name);
    TextView email = (TextView) v.findViewById(R.id.email);

    if (type == 0) {
        ImageView img = (ImageView) v.findViewById(R.id.img);
        img.setImageResource(c.imageId);
    }

    surname.setText(c.surname);
    name.setText(c.name);
    email.setText(c.email);

    return v;
}
Finishing the app
Now we have our custom adapter is very easy to use it and bind it to the ListView. In the main activity that holds the ListView:
@Override
protected void onCreate(Bundle savedInstanceState) {
    super.onCreate(savedInstanceState);
    setContentView(R.layout.activity_my);
    ContactAdapter ca = new ContactAdapter(createContact(20), this);
    ListView lv = (ListView) findViewById(R.id.contact_list);
    lv.setAdapter(ca);
}- Source code available soon.
| Reference: | Android Listview with multiple row layout from our JCG partner Francesco Azzola at the Surviving w/ Android blog. |
