Cluster-wide Java/Scala application deployments with Docker, Chef and Amazon OpsWorks
Docker is great for running isolated containers on a single node. However, most software systems run on multiple nodes, so in addition to Docker, we need some way of specifying which containers should run on which nodes.
The specific problem that I want to solve is the following: I have two Scala daemons, which I want to run on multiple nodes (depending on configuration, each node can run one of the daemons, or both). I want a reasonably fast way to deploy modified binaries across the cluster. I also don’t want to spend too much time setting up the servers. (My Gentoo days are long over.)
The end solution to which I arrived involves Docker, OpsWorks, Chef and Vagrant. But, taking things step by step.
By the way – how would you solve the above problem? Please comment.
Packaging the Java/Scala application
First I need to be able to package and upload the binaries. Here Docker is perfect. I wrote a simple Dockerfile which:
- is based on a trusted ubuntu+java7 image – no need to install java on the servers!
- copies the fat-jars from my disk to the image
- specifies the entrypoint to run Java with the copied jars
The full Dockerfile is available here: https://gist.github.com/adamw/166b82ec04c9c0f67453.
Having such an image, I can push it to the (public or private) Docker registry, where it is available for download by the nodes in the cluster.
If needed, I could also install any other OS-level dependencies that my app would require, and not worry about version conflicts and setting them up on the actual servers.
If you take a look at the Dockerfile, you may notice that there are two jars. This is done to minimise the size of the Docker image that has to be uploaded after each code change. The first jar contains only the dependencies (Scala library, logging libraries, frameworks etc.). The second jar contains compiled application code. When a Docker image is build from a Dockerfile, a series of intermediate images are created, one after each step. For same commands, involving same files, no new images are created, but images are re-used from the Docker cache.
Dependencies change rarely, so usually the dep-jar is unchanged, and hence a cached version is re-used (and the intermediate image is uploaded once). On the other hand, the application code changes always. It is important that the dependencies jar is added to the image first, so that the intermediate image contains the deps, but not the app code (which changes). In the end, usually an upload of only 2-3MB is needed.
There’s one thing to note here, though. When determining if an image can be re-used after an ADD command (which copies a file from the local disk to the image), Docker simply checks the last-modified timestamp of the file. This would cause the dependencies fat-jar to be re-added each time it is rebuilt, even if it’s identical. Hence I created a simple bash script, which copies the fat-jars next to the Dockerfile (from where they are uploaded as part of the Docker context) only if their md5 checksum changed: https://gist.github.com/adamw/ba5d8b79ff553fba83fd.
How to create such two separate jars with SBT? Quite simple. Just use the SBT Assembly plugin and change its settings:
assemblyOption in assembly ~= { _.copy(includeBin = true, includeScala = false, includeDependency = false) }The assemblyPackageDependency goal will then create the dependencies-only jar, and assembly will create the app-only jar.
Setting up servers
With the Docker image containing our app waiting in the cloud (on the Docker hub), it’s now time to setup the servers, where the Docker daemon will run the containers.
For provisioning the servers I chose Chef with Amazon OpsWorks, for a couple of reasons: it is possible to clearly separate and organise the EC2 instances using Stacks and Layers, the servers come with an out-of-the-box integration with Chef, and it is very easy to use custom Chef recipes. Manual instance setup isn’t needed at all!
The steps below are in part a summary, in part an extension of what’s described on ShopIgniter’s blog.
The Chef setup (ran by OpsWorks) is going to be minimal, and only include what’s required to run Docker.
First, we need to create an Ubuntu 12.04-based AMI with an updated kernel (14.04 doesn’t yet work with OpsWorks) – please refer to ShopIgniter’s blog for details.
Secondly, we will be using custom Chef recipes; for that, you need to create a dedicated repository (e.g. on GitHub). The recipes are quite basic and simple: https://gist.github.com/adamw/792f8c22abb09699b6d5.
Summing them up:
docker::setupinstalls Dockerdocker::kill_containerskills & removes all running containersdocker::myapppulls the myapp image from the Docker registry and runs a container with command-line parameters and environmental variables as specified in a per-app section of the Chef-JSON configuration file, for example (here our app takes a single command-line parameter and requires AWS credentials in the environment):
{
  "myapp": {
    "image": "adamw/myapp:latest",
    "cmdline": [ "com.softwaremill.myapp.Main", "10" ],
    "env": {
      "AWS_ACCESS_KEY_ID": “...",
      "AWS_SECRET_ACCESS_KEY": “..."
    }
  }
}
Configuring OpsWorks
To configure OpsWorks, we need to create a Stack, using a custom Chef cookbook, and a custom configuration JSON, for example as the one above (for each app / type of container we want to run, we need a section in the configuration JSON). Secondly, for each application (container) that we want to deploy, we need to create a Layer. As the Layers will only run Docker, we are not using any of the pre-configured Layers, and using a “Custom” one.
The Layer will contain our custom recipes: in the Setup phase, we need to use the docker::setup recipe, and in the Deploy phase, we need to use the docker::kill_containers and docker::myapp recipes.
Now, every time the Deploy phase is run on the layer, Docker will pull the images, and run the specified containers! By creating layers with appropriate recipes, we can start any combination of containers, on any node.
Running the deploy phase
To actually run the Deploy phase with a single click, we need to create a dummy OpsWorks App: just choose “Type: Other” and “Repository type: Other”. Now, each time you want to deploy the application on your servers (run updated Docker containers), just deploy this dummy app on the instances or layers you want.
This can also be done with an API call (as everything on AWS)! So the whole process of building the app, creating the Docker image, pushing it, and running deploy on OpsWorks can be quite easily automated – for example after a successful build.
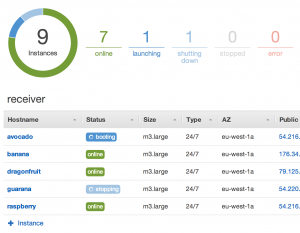
With all pieces in place, we can now add new instances to the Layers, start and stop them, and have a multi-node cluster running our application! To update the app, just push the binaries to the registry.
Testing Chef locally
While the Chef recipes are quite minimal, it is still useful to be able to test them locally. That is easily possible with Vagrant. Using Vagrant, we can easily create a VM with Chef installed, which runs our recipes – and in result, the Docker containers. The Vagrantfile for this particular case is here: https://gist.github.com/adamw/bf6fa803b6b13fd7430b.
The Vagrantfile contains a reference to the Chef recipes we are developing (through chef.cookbooks_path), and has the same configuration JSON as we use in OpsWorks.
After issuing vagrant up, we will have the VM running. After changing the recipes, or uploading a new container, we can easily re-run the Chef recipes by using vagrant provision --provision-with chef_solo.
Summing up
We end up with the following separation of concerns:
- Docker – running applications in isolated containers, with all required dependencies
- Chef – setting up docker, running and linking containers with specified parameters/environment on defined nodes
- OpsWorks – managing instances, triggering deployment
- Vagrant – local testing of the whole setup
While there are certainly things to simplify in the whole process described above (and I hope project Atomic will do just that!), in the end deploying a new version of your modified app across the cluster is easy and pain-free, providing a great development environment.
| Reference: | Cluster-wide Java/Scala application deployments with Docker, Chef and Amazon OpsWorks from our JCG partner Adam Warski at the Blog of Adam Warski blog. |
