This post will show how to automate the release process of a Java Web Application (Student Enrollment Application developed using MYSQL DB with Hibernate ORM in a REST based Jersey2 Spring environment) using Jenkins Continuous Integration – upload the release artifacts to release repository. The job configured using this post must be run only after uploading the snapshot artifacts into the snapshot repository as explained in the earlier post Automating the Deployment and Upload of Snapshot Java Artifacts using Jenkins on Windows. The details of the actual application are explained in the earlier post given by the link Building Java Web Application Using Jersey REST With Spring.
1. Generate SSH Keys for Github (without passphrase)
Jenkins does not support passphrases for SSH Keys and so generate the SSH Key for Gihub account without passphrase. Follow the directions given under Generating SSH Keys, generate a SSH Key without passphrase and upload to Github account.
2. Force Jenkins to run as user with SSH Key
On Windows, Jenkins uses the SSH Key of the user it is running as, which is located under C:\Users<username>.ssh. Hence, Jenkins must be run as the user with ‘username’.
Type ‘services.msc’ in a command prompt to open up Services Management. Right click on the Jenkins service and select Properties.
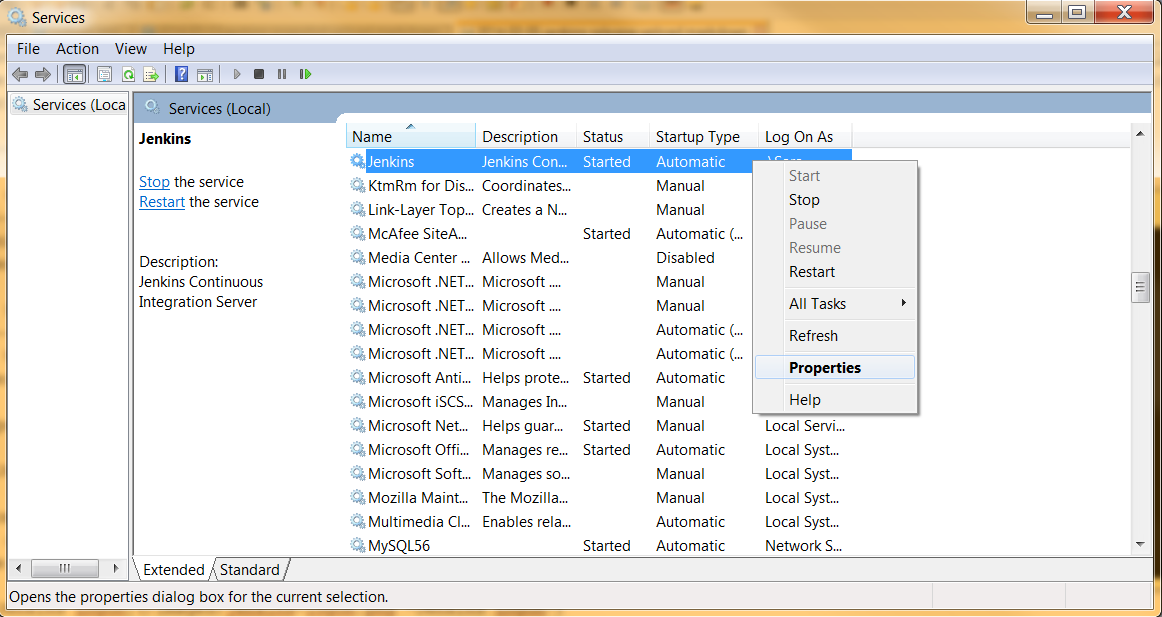
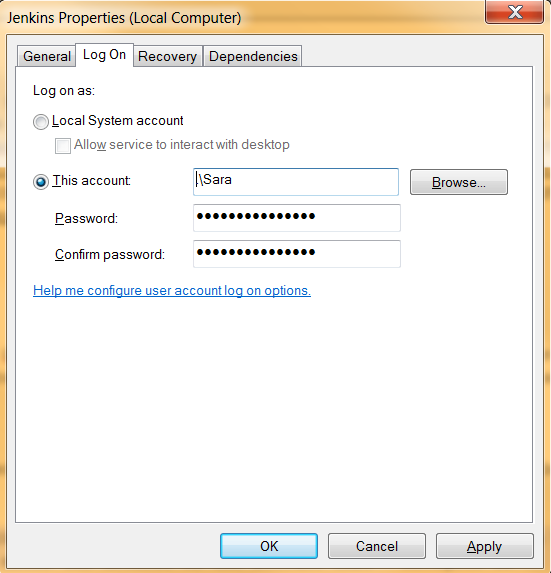
From the Jenkins Properties windows, navigate to Log on tab. Choose Log on as ‘This account’, enter the details of the account (use the Browse option to choose/check the name of the account) and click Ok. The account credentials will generally match the log in account for the Windows as shown in the snapshot below
Once the changes are saved, restart the Jenkins service from the Services Management by Right clicking on Jenkins service and choose Restart as shown below

3. Install Plugins
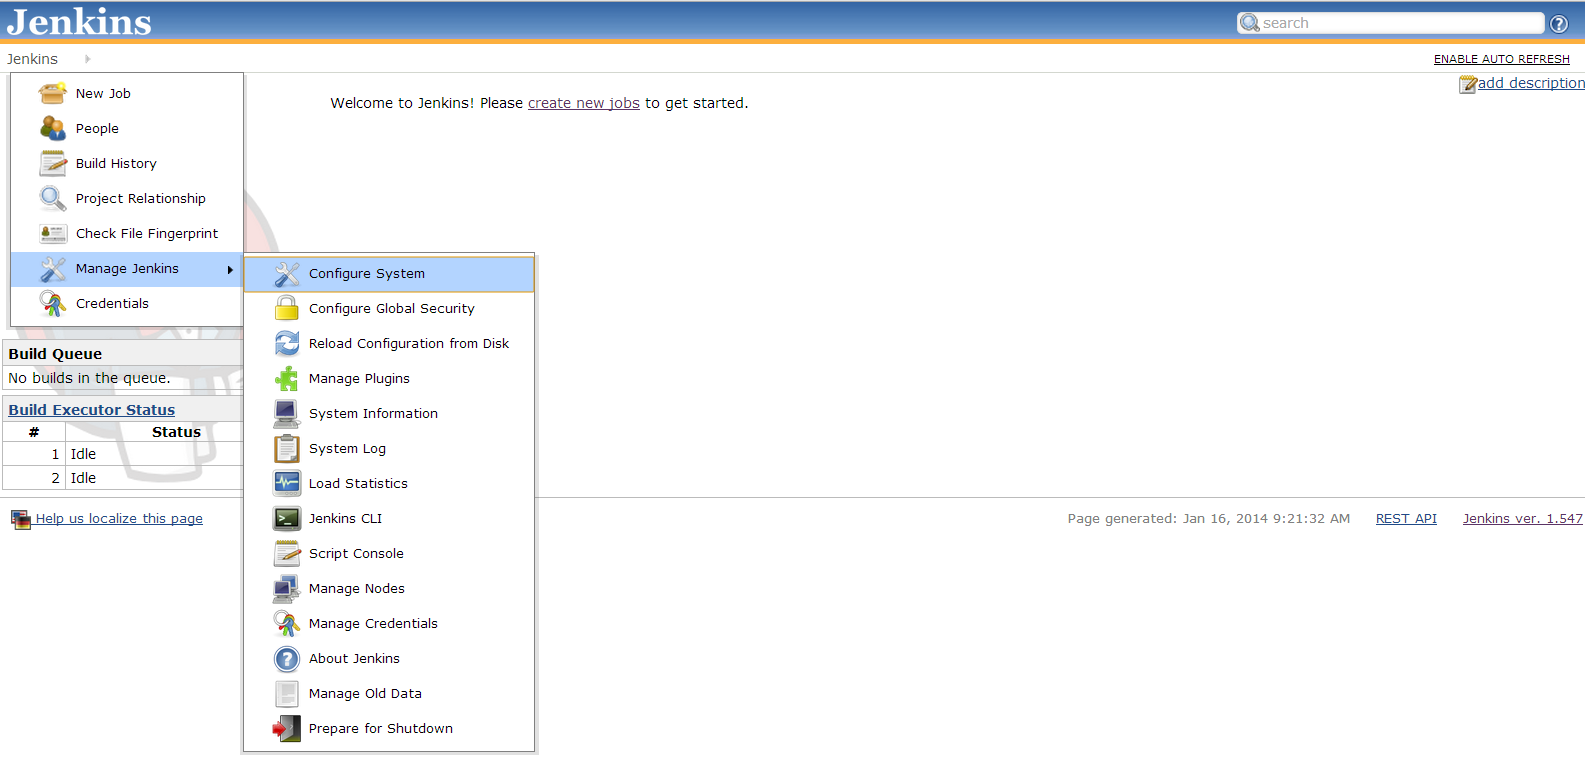
On the Jenkins Dashboard, navigate to Manage Jenkins –> Manage Plugins as shown in the snapshot below.

Install the following plugins and restart Jenkins for the changes to take effect.
- Jenkins Release Plugin (for Maven release)
4. Configure System
On the Jenkins Dashboard, navigate to Manage Jenkins –> Configure System as shown in the snapshot below.
Proceed to the Maven Release Plug-in section. Enable Nexus-Pro support, enter the Nexus URL, Nexus User Credentials and Save the changes.
![]()
5. Create a New Jenkins Job
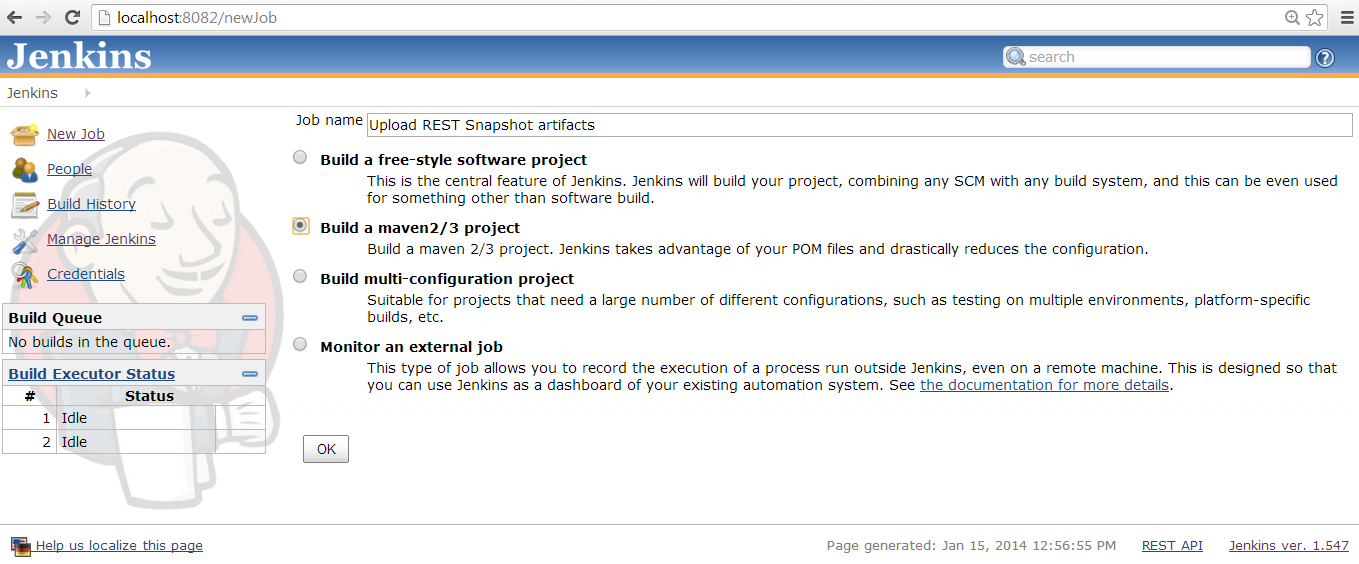
From the Jenkins Dashboard, click on “New Job” to create a new job. Enter a name for the job and choose “Build a maven2/3 project” as option and click on OK as shown below.
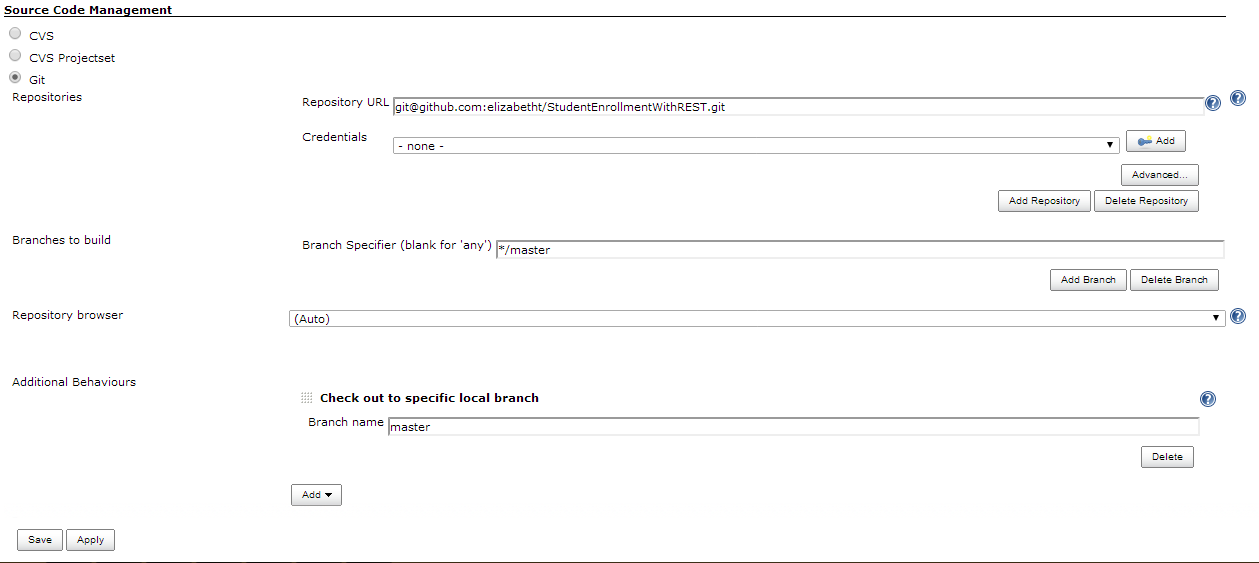
From the New Job Configuration screen, proceed to the Source Code Management section and specify the Git Repository URL for the project as shown below. From the additional behaviors section, click on “Add” and select Check out to specific local branch. Enter the branch name as master and Save the changes.
Proceed to the Build Environment section, enable Maven Release Build option and enter the release goals.

Proceed to the Build section, enter the maven goals for building a snapshot as shown below and Save the changes.
![]()
Proceed to the Build Settings section. Select the option for Email Notification and enter the values for the email recipients as shown below. Save the changes.

6. Configure settings.xml
In order to upload the built Maven artifacts to the artifactory server, configure the Jenkins settings.xml found in C:\Program Files (x86)\Jenkins\tools\hudson.tasks.Maven_MavenInstallation\Maven_3.1\conf folder with the same parameters as found in the default settings.xml (usually found under C:\Program Files\Apache Software Foundation\apache-maven-3.1.0\conf for a Windows machine) of the Maven installation on the system.
Typically, the server section for staging repository needs to be configured with httpHeaders in the settings.xml for the Maven Release.
<servers>
    <server>
      <id>sonatype-nexus-staging</id>
      <username>username</username>
      <password>password</password>
    <configuration>
      <httpHeaders>
        <property>
          <name>User-Agent</name>
          <value>Maven m2Release (java:${java.vm.version} ${env.BUILD_TAG }</value>
        </property>
      </httpHeaders>
      </configuration>
    </server>
</servers>
Also, a profile section needs to be configured for the PGP Signature, the details of how to Generate PGP Signatures with Maven can be found from the section Generate a Key Pair at How to Generate PGP Signatures With Maven
<profiles>
    <profile>
      <id>gpg-release</id>
      <properties>
          <gpg.passphrase>passphrase</gpg.passphrase>
          <gpg.useagent>true</gpg.useagent>
          <gpg.defaultKeyring>false</gpg.defaultKeyring>
          <gpg.homedir>C:/Users/Sara/AppData/Roaming/gnupg</gpg.homedir>
          <gpg.publicKeyring>C:/Users/Sara/AppData/Roaming/gnupg/pubring.gpg</gpg.publicKeyring>
          <gpg.secretKeyring>C:/Users/Sara/AppData/Roaming/gnupg/secring.gpg</gpg.secretKeyring>
      </properties>
    </profile>
</profiles>
6. Update pom.xml
The pom.xml file for the project needs to be configured with the following plugins under the build section.
- maven-enforcer-plugin
- maven-release-plugin
<build>
    <plugins>
      <plugin>
          <groupId>org.apache.maven.plugins</groupId>
          <artifactId>maven-enforcer-plugin</artifactId>
          <version>1.2</version>
          <executions>
              <execution>
                  <id>enforce-maven</id>
                  <goals>
                      <goal>enforce</goal>
                  </goals>
                  <configuration>
                      <rules>
                          <requireMavenVersion>
                              <version>(,2.1.0),(2.1.0,2.2.0),(2.2.0,)</version>
                              <message>Maven 2.1.0 and 2.2.0 produce incorrect GPG signatures
                                  and checksums respectively.</message>
                          </requireMavenVersion>
                      </rules>
                  </configuration>
              </execution>
          </executions>
      </plugin>
  </plugins>

  <pluginManagement>
      <plugins>
          <plugin>
              <groupId>org.apache.maven.plugins</groupId>
              <artifactId>maven-release-plugin</artifactId>
              <version>2.4.2</version>
              <configuration>
                  <tagBase>https://github.com/elizabetht/StudentEnrollmentWithREST/tags</tagBase>
                  <mavenExecutorId>forked-path</mavenExecutorId>
                  <useReleaseProfile>false</useReleaseProfile>
                  <arguments>-Psonatype-oss-release</arguments>
              </configuration>
          </plugin>
      </plugins>
  </pluginManagement>
</build>
Update the pom.xml with a profile section for the maven-gpg-plugin
<profiles>
  <profile>
      <id>sign</id>
      <build>
          <plugins>
              <plugin>
                  <groupId>org.apache.maven.plugins</groupId>
                  <artifactId>maven-gpg-plugin</artifactId>
                  <executions>
                      <execution>
                          <id>sign-artifacts</id>
                          <phase>verify</phase>
                          <goals>
                              <goal>sign</goal>
                          </goals>
                      </execution>
                  </executions>
              </plugin>
          </plugins>
      </build>
  </profile>
</profiles>
Add a distribution management section to pom.xml to specify the snapshot and staging repository URLs.
<distributionManagement>
  <repository>
      <id>sonatype-nexus-staging</id>
      <url>https://oss.sonatype.org/service/local/staging/deploy/maven2</url>
  </repository>
  <snapshotRepository>
      <id>sonatype-nexus-snapshots</id>
      <url>https://oss.sonatype.org/content/repositories/snapshots</url>
  </snapshotRepository>
</distributionManagement>
8. Build Now
Once the above configuration steps are complete, click on “Build Now” under the Jenkins –> Upload REST Release Artifacts (or the respective Job name) to build the project based on the configuration.
The console output has the detailed logs of what steps were initiated by the configuration and the outcome of the entire build. Verify that the build succeeds.
9. Perform Maven Release
Once the build succeeds and snapshots are uploaded to the snapshot repository, click on “Perform Maven Release” under Jenkins –> Upload REST Release Artifacts (or the respective Job name) to start the Maven Release process.
Verify that the Release version and the next Development Version are correct. Enable ‘Specify custom SCM comment prefix’ to enter a custom SCM Comment. Enable ‘Specify custom SCM tag’ to enter a custom SCM tag. Click on Schedule Maven Release Build.

Once the release process succeeds, the staging repository will be uploaded with the release artifacts.
Thus the entire process of performing the maven release of artifacts to the staging repository and triggering emails to the recipients can be automated with a click of a button through Jenkins. The staging repository can be taken then through the steps of Close (if its still open) and Release to complete the promotion of the artifacts.
