The upcoming version of JBoss Application Server will no longer use Tomcat as integrated webserver, but will replace it with undertow. The architecture of undertow is based on handlers that can be added dynamically via a Builder API to the server. This approach is similar to the way of constructing a webserver in Node.js. It allows developers to embed the undertow webserver easily into their applications. As the addition of features is done via the Builder API, one can only add the features that are really required in one’s application. Beyond that undertow supports WebSockets and the Servlet API in version 3.1. It can be run as blocking or non-blocking server and it is said, that first tests have proven that undertow is the fastest webserver written in Java.
As all of this sounds very promising, so let’s try to set up a simple websocket server. As usual we start by creating a simple java project and add the undertow maven dependency:
<dependency>
  <groupId>io.undertow</groupId>
  <artifactId>undertow-core</artifactId>
  <version>1.0.0.Beta20</version>
</dependency>
With undertow’s Builder API our buildAndStartServer() method looks like this:
public void buildAndStartServer(int port, String host) {
    server = Undertow.builder()
            .addListener(port, host)
            .setHandler(getWebSocketHandler())
            .build();
    server.start();
}
We just add a listener that specifies the port and host to listen for incoming connections and afterwards add a websocket handler. As the websocket handler code is a little bit more comprehensive, I have put it into its own method:
private PathHandler getWebSocketHandler() {
    return path().addPath("/websocket", websocket(new WebSocketConnectionCallback() {
        @Override
        public void onConnect(WebSocketHttpExchange exchange, WebSocketChannel channel) {
            channel.getReceiveSetter().set(new AbstractReceiveListener() {
                @Override
                protected void onFullTextMessage(WebSocketChannel channel, BufferedTextMessage message) {
                    String data = message.getData();
                    lastReceivedMessage = data;
                    LOGGER.info("Received data: "+data);
                    WebSockets.sendText(data, channel, null);
                }
            });
            channel.resumeReceives();
        }
    }))
    .addPath("/", resource(new ClassPathResourceManager(WebSocketServer.class.getClassLoader(), WebSocketServer.class.getPackage()))
            .addWelcomeFiles("index.html"));
}
Let’s go line by line through this code snippet. First of all we add a new path: /websocket. The second argument of the addPath() methods lets us specify what kind of protocol we want to use for this path. In our case we create a new WebSocket. The anonymous implementation has a onConnect() method in which we set an implementation of AbstractReceiveListener. Here we have a convenient method onFullTextMessage() that is called when a client has sent us a text message. A call of getData() fetches the actual message we have received. In this simple example we just echo this string back to client to validate that the roundtrip from the client to server and back works.
To perform some simple manual tests we also add a second resource under the path / which serves some static HTML and JavaScript files. The directory that contains these files is given as an instance of ClassPathResourceManager. The call of addWelcomeFiles() tells undertow which file to server when the client asks for the path /.
The index.html looks like this:
</pre>
<html>
<head><title>Web Socket Test</title></head>
<body>
  <script src="jquery-2.0.3.min.js"></script>
  <script src="jquery.gracefulWebSocket.js"></script>
  <script src="websocket.js"></script>
  <form onsubmit="return false;">
    <input type="text" name="message" value="Hello, World!"/>
    <input type="button" value="Send Web Socket Data" onclick="send(this.form.message.value)"/>
  </form>
  <div id="output"></div>
</body>
</html>
<pre>
Our JavaScript code is swapped out to the websocket.js file. We use jquery and the jquery-Plugin gracefulWebSocket to ease the client side development:
var ws = $.gracefulWebSocket("ws://127.0.0.1:8080/websocket");
ws.onmessage = function(event) {
    var messageFromServer = event.data;
    $('#output').append('Received: '+messageFromServer+'');
}

function send(message) {
    ws.send(message);
}
After having created a WebSocket object by calling $.gracefulWebSocket() we can register a callback function for incoming messages. In this method we only append the message string to the DOM of the page. The send() method is just a call to gracefulWebSocket’s send() method.
When we now start our application and open the URL http://127.0.0.1:8080/ in our webbrowser we see the following page:
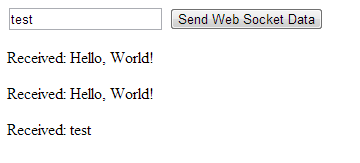
Entering some string and hitting the “Send Web Socket Data” button sends the message to the server, which in response echos it back to the client.
Now that we know that everything works as expected, we want to protect our code against regression with a junit test case. As a websocket client I have chosen the library jetty-websocket:
<dependency>
    <groupId>org.eclipse.jetty</groupId>
    <artifactId>jetty-websocket</artifactId>
    <version>8.1.0.RC5</version>
    <scope>test</scope>
</dependency>
In the test case we build and start the websocket server to open a new connection to the websocket port. The WebSocket implementation of jetty-websocket allows us to implement two callback methods for the open and close events. Within the open callback we send the test message to the client. The rest of the code waits for the connection to be established, closes it and asserts that the server has received the message:
@Test
public void testStartAndBuild() throws Exception {
    subject = new WebSocketServer();
    subject.buildAndStartServer(8080, "127.0.0.1");
    WebSocketClient client = new WebSocketClient();
    Future connectionFuture = client.open(new URI("ws://localhost:8080/websocket"), new WebSocket() {
        @Override
        public void onOpen(Connection connection) {
            LOGGER.info("onOpen");
            try {
                connection.sendMessage("TestMessage");
            } catch (IOException e) {
                LOGGER.error("Failed to send message: "+e.getMessage(), e);
            }
        }
        @Override
        public void onClose(int i, String s) {
            LOGGER.info("onClose");
        }
    });
    WebSocket.Connection connection = connectionFuture.get(2, TimeUnit.SECONDS);
    assertThat(connection, is(notNullValue()));
    connection.close();
    subject.stopServer();
    Thread.sleep(1000);
    assertThat(subject.lastReceivedMessage, is("TestMessage"));
}- As usual you can find the source code on github.
Conclusion
Undertow’s Builder API makes it easy to construct a websocket server and in general an embedded webserver that fits your needs. This also eases automatic testing as you do not need any specific maven plugin that starts and stops your server before and after your integration tests. Beyond that the jquery plugin jquery-graceful-websocket lets you send and receive messages over websockets with only a few lines of code.
