When you fire up an AWS AMI, you are given a small partition of disk space that survives reboots. For example, the base Ubuntu AMI I tend to favor comes with an 8GB primary partition; however, 8GB is often not enough, especially if you’re running a database or something that requires a lot of disk space.
If you poke around on an AMI instance, you’ll notice some AMI instances will have additional partitions and in many cases, these partitions will be huge; nevertheless, they’re transient and any data on those disks will disappear after a reboot.
Accordingly, if you need to gain some more permanent space on an AMI instance, you’ll need to leverage an Elastic Block Store (or EBS), which is basically a permanent hard disk that you can attach to a running AMI instance. The data on an EBS will survive a reboot.
Attaching an EBS is super simple and can be done in 4 steps. These steps assume you’ve got a running AMI; accordingly, if you don’t have one up and running, go ahead and do that first. Finally, these instructions are for Linix/Unix systems.
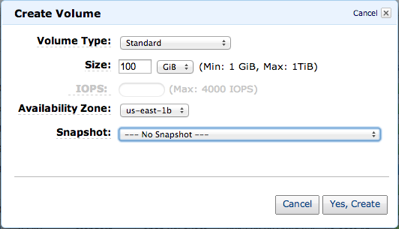
First, you’ll need to create an EBS volume in the same zone as the AMI instance. In my case, the instance I’d like to augment with a beefy hard drive resides in us-east-1b. What’s more, you’ll need to configure how much space you’ll want – you can also select if you’d like to have provisioned IOPS – this is a high performance I/O feature of AWS and is intended for databases.
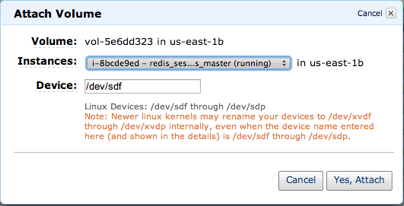
Once the EBS is created, you’ll need to attach it to your running AMI – you can do this by right clicking on the EBS in the AWS Management Console and selecting Attach Volume. You’ll need to pick your instance from a drop down. Once you’ve picked your instance, AWS will suggest a Device – I suggest you keep it. Click the “Yes, Attach” button.
SSH onto your running instance and take a peek at the /proc/partitions file – you should see at least 2 partitions with your newly attached one on the bottom. The blocks are listed in kilobytes and pay special attention to the name – you’ll need it for the next few steps.
The contents of /proc/partitions:
ubuntu@ip-10-194-97-73:~$ cat /proc/partitions
major minor  #blocks  name

 202        1    8388608 xvda1
 202       80    8388608 xvdf
As you can see above, there is an 8GB EBS volume named xvdf in the partitions file. Next, you’ll want to format the volume – I’m going to format the EBS volume as ext4. The command to do this is:
Foratting an EBS volume:
sudo mke2fs -F -t ext4 /dev/xvdf
Now that the volume is formatted, I can mount it – I’m going to mount it to a directory called /ebs; accordingly, I need to create the /ebs directory and then mount the xvdf device like so:
Creating and mounting the device to the ebs directory:
sudo mkdir /ebs
sudo mount /dev/xvdf /ebs
At this point, you are 98% done; however, the volume will not be reattached if this instance is rebooted. To make this EBS volume automatically reattach after a reboot, you’ll need to add it to the fstab file (it’s in the /etc directory). When you edit that file, the file system will be what ever you mounted (i.e /dev/xvdf), the mount point will be the directory you mounted it to – in my case, it’s /ebs. The type will be ext4 (if you formatted it that way) and for options, put default. The last two values can be 0 as well. If you need to remove your EBS volume, on the attached instance, run
Unmounting a device:
sudo umount -d /dev/xvdf
And then go into the AWS Management Console, find your EBS volume, right click on it and select detach volume. That’s it – you’re done! You’ve got a permanent store. In 4 steps, you’ve created an EBS volume, attached it to a running AMI, formatted and mounted it. And you’ve made it attach automatically after a reboot. Can you dig it?
