Animation Resources and AnimationListener
In this post i want to analyze how we can use animation in Android and how we can implements an AnimationListener. In particular i want to describe the tween animation that are the most useful ones. Tween animation can be diveded in four groups:
- translate – Move a View along X and Y axis
- rotate – Rotate a View
- scale – Scale a View
- fade – Fade effect on a view
Even if it is quite trivial to create an animation, i found a bit confusing how set animation parameter. One thing we have to know before digging into the details is in Android animations can be described using XML. To do it, we have to create a folder under res directory called anim. I won’t dig into the parameter details (you can read them in API Doc) rather i prefer to show a bit more how to animate a View considering some aspects about X and Y axis.
In general we can say that there three different way to measure and indicate how a View can move:
- absolute value (ranging from –100 to 100)
- relative to the view (ranging from –100% to 100%)
- relative to its parent (ranging from –100%p to 100%p)
Let’s suppose, for simplicity, we want to animate a TextView so we can create a layout like this one:
<RelativeLayout xmlns:android="http://schemas.android.com/apk/res/android"
    xmlns:tools="http://schemas.android.com/tools"
    android:layout_width="match_parent"
    android:layout_height="match_parent" >

    <TextView
        android:id="@+id/logo"
        android:layout_width="wrap_content"
        android:layout_height="wrap_content"
        android:text="S/A"
        tools:context=".MainActivity" />

</RelativeLayout>
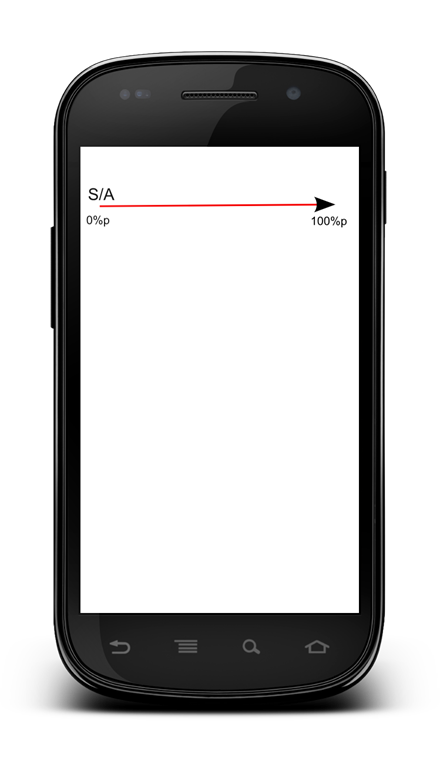
This TextView is placed upper left side of then screen. Let’s suppose we want to move it to the right, to do it we create a file called move_to_right_anim.xml like this one:
<?xml version="1.0" encoding="utf-8"?>
<translate xmlns:android="http://schemas.android.com/apk/res/android"
           android:fromXDelta="0%"
           android:toXDelta="100%p"
           android:duration="800"
           android:interpolator="@android:anim/accelerate_interpolator">
</translate>
In this file we simply tell to the Android OS that X as to move from 0% to 100%p (so it means to the parent right side) and that this animation has to last for 800ms. Now what’s the interpolator? Interpolator defines how to movement takes place. In this case we say that the View has to move faster while it reaches the right side.
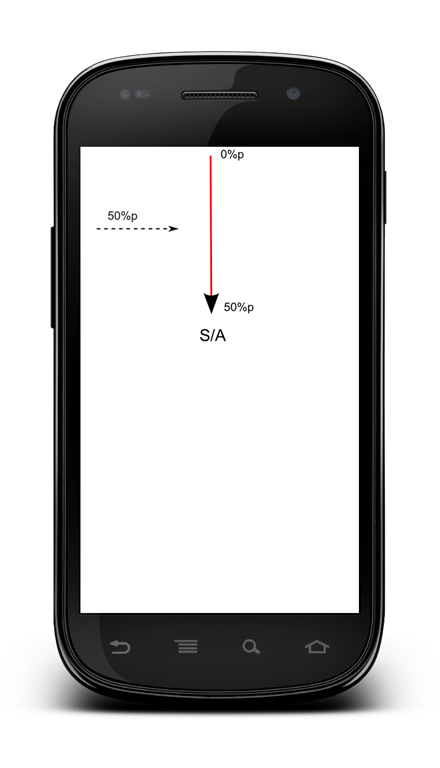
Let’s suppose we want our TextView Falls from the top to the middle of the screen with a bouncing effect. Well this is very simply we need just to modify the xml animation file. Let’s call it fall_bounce_anim.xml. In this case we want that the animation takes place along Y axis moving from 0%p to 50%p while along X axis we want to place the TextView in the middle of the screen so 50%p.
So the XML file is:
<?xml version="1.0" encoding="utf-8"?>
<translate xmlns:android="http://schemas.android.com/apk/res/android"
           android:fromXDelta="50%p"
           android:toXDelta="50%p"
           android:fromYDelta="0%p"
           android:toYDelta="50%p"
           android:duration="1000"
           android:interpolator="@android:anim/bounce_interpolator">
</translate>
In this case the duration is 1000ms so 1 sec.
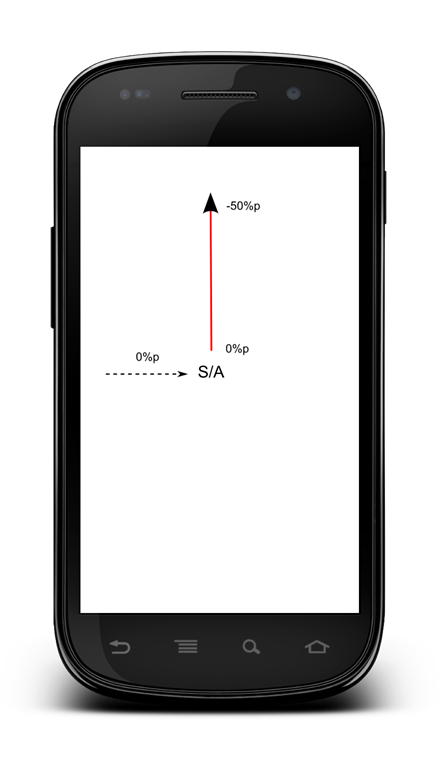
Let’s suppose now that our TextView is placed in the middle of the screen and we want to move it up. In this case the “origin” of our animations is the middle of the screen
then the XML file looks like:
<?xml version="1.0" encoding="utf-8"?>
<translate xmlns:android="http://schemas.android.com/apk/res/android"
           android:fromXDelta="0%p"
           android:toXDelta="0%p"
           android:fromYDelta="0%p"
           android:toYDelta="-50%p"
           android:duration="1000"
           android:interpolator="@android:anim/bounce_interpolator">
</translate>
In other words we have to move up of –50%p.
Another interesting animation type is rotation. In this case we have to specify the rotation angle expressed in degrees. In this case two parameter pivotX and pivotY specify the coordinates of the rotation point. If we want, for example, that the rotation takes place around the middle point of our view we have simply to specify the pivotX and pivotY equals to 50%. XML is like this:
<?xml version="1.0" encoding="utf-8"?>
<rotate xmlns:android="http://schemas.android.com/apk/res/android"
        android:interpolator="@android:anim/cycle_interpolator"
        android:fromDegrees="0"
        android:toDegrees="360"
        android:pivotX="50%"
        android:pivotY="50%"
        android:duration="1000"/>
You can try other kind of animation, like fading and so son and other type of interpolators.
How to start the Animation
Once we have defined our animation using the XML we have to “apply” this animation to the view and then starts it. The first thing we need to do is loading the animation. This can be done using an helper class called AnimationUtil. For example, to load the rotate animation we need to write
Animation anim = AnimationUtils.loadAnimation(this, R.anim.rotate_anim);
>where this is the context. The we simply start the activity using the method startActivity passing as parameter the animation loaded (anim).
@Override
 public void onCreate(Bundle savedInstanceState) {
     super.onCreate(savedInstanceState);
     setContentView(R.layout.activity_main);

     final TextView tv = (TextView) findViewById(R.id.logo);
     //Animation anim = AnimationUtils.loadAnimation(this, R.anim.move_to_right_anim);
     //Animation anim = AnimationUtils.loadAnimation(this, R.anim.fall_bounce_anim);
     final Animation anim = AnimationUtils.loadAnimation(this, R.anim.rotate_anim);
     tv.startAnimation(anim);

  ......
}
Animation listener
One interesting aspect of animation is the capability to add a listener, AnimationListener. Implementing this listener we can get notification when animation starts ( onAnimationStart(Animation animation) ) , repeat ( onAnimationRepeat(Animation animation) ) and ends ( onAnimationEnd(Animation animation) ). In this method we can implements our logic.
For example let’s suppose we want animate a TextView when an user clicks on it and then starts another Activity. The first thing we need is to catch the click event, this is trivial:
tv.setOnClickListener(new View.OnClickListener() {

    @Override
    public void onClick(View v) {
        // We implement our logic

    }
});
Remember that tv is the TextView reference retrieved by findViewById() method. Now in the method we simply starts the animation and then we implement the AnimationListener like that:
tv.setOnClickListener(new View.OnClickListener() {

 @Override
 public void onClick(View v) {
     tv.startAnimation(anim);
     anim.setAnimationListener(new Animation.AnimationListener() {

         @Override
         public void onAnimationStart(Animation animation) {
             // TODO Auto-generated method stub

         }

         @Override
         public void onAnimationRepeat(Animation animation) {
             // TODO Auto-generated method stub

         }

         @Override
         public void onAnimationEnd(Animation animation) {
             // We start the Activity

         }
     });

 }
 });
In the onAnimationEnd method that is called at the end of our animation we start our new Activity.


Yes, but how do you start a new activity if you have no View?
I wanted to add to my post: because in onAnimationEnd() there is no View declared.