JSR 356 WebSockets are one of the new and exciting features in the upcoming JEE 7 release and includes Server- as well as Client API’s in its reference implementation. This makes it well suited to integrate it with JavaFX on client side. JacpFX is a RCP framework on top of JavaFX which uses a message based approach to interact with components. This message based approach makes it easy to integrate WebSocket-ClientEndpoints and to pass incoming messages to your JavaFX/JacpFX application.
The following article will show you how to create a simple Websocket-SeverEndpoint on GlassFish 4 and how to contact this endpoint from a JacpFX client. The example scenario is really simple: the server endpoint can create a connection to Twitter, it takes a query-message from a client and broadcasts the twitter result to all connected
ClientEndpoints. The example will build upon GlassFish b85 and JacpFX 1.2. The (maven) example project can be downloaded here
Part 1: creating the Server Endpoint
The example project is a simple JEE 7 maven project. The Web-project contains one POJO that acts as a WebSocket-ServerEndpoint. It receives a query request and broadcasts the result to all connected clients. The second POJO is a stateless bean which takes a query-message, performs the twitter search and returns the result to the Server-Endpoint. To avoid handling messages in text or binary we create two POJOs that are acting as encoder/decoder for WebSocket messages. So let’s start with the TwitterRepositoryBean, this is a simple stateless bean:
@Stateless(mappedName = "TwitterRepositoryBean")

public class TwitterRepositoryBean {

   public TwitterResult getTwitterDataByQuery(Query query) {

       return parser.fromJson(getFeedData(query.getQuery()), TwitterResult.class);

   }

   private String getFeedData(String input) {

       final String searchURL = "http://search.twitter.com/search.json?q=" + input + "&rpp=5&include_entities=true" +

               "&with_twitter_user_id=true&result_type=mixed";

       final URL twitter = new URL(searchURL);

…

       return "";

   }

}
Next we create a WebSocket-ServerEndpoint. The simplest way to create an endpoint is to write a POJO and annotate it with @ServerEndpoint(“path”). An endpoint can have following lifecycle annotations: @OnOpen, @OnClose, @OnError and one or more @OnMessage.
Be aware, that only one @OnMessage per native message type is allowed; those are text, binary and pong. What does it mean? You can have two methods like this: @OnMessage login(Login lg); and @OnMessage message(Message m). BUT one must be transmitted as text, and the other one as binary, otherwise you’ll get an exception on deployment.
The ServerEndpoint will look like this:
@ServerEndpoint(value = "/twitter")

public class TwitterEndpoint {

   @Inject

   private TwitterRepositoryBean twitterRepo;

   @OnMessage

   public void handleChatMessage(Query query, Session session) {

TwitterResult result =    twitterRepo.getTwitterDataByQuery(query);

broadcastMessage(result,session);

   }

   private void broadcastMessage(TwitterResult result, Session session) {

       for (Session s : session.getOpenSessions()) {

           s.getBasicRemote().sendObject(result);

       }

   }

}
Now that we created the ServerEndpoint, the question is how to handle with types like Query and TwitterResult, as the native message format is binary and text. The solution for this is: message “encoder/decoder”. So we need one decoder who transforms the binary message to Query and one encoder who encodes the TwitterResult to binary.
public class QueryDecoder implements Decoder.Binary<Query> {

   public Query decode(ByteBuffer byteBuffer) throws DecodeException {

       return (Query) SerializationUtils.deserialize(byteBuffer.array());

   }

   public boolean willDecode(ByteBuffer byteBuffer) {

       Object message = SerializationUtils.deserialize(byteBuffer.array());

       if (message == null) return false;

       return message instanceof Query;

   }

}
And the Encoder:
public class TwitterResultEncoder implements Encoder.Binary<TwitterResult> {

   public ByteBuffer encode(TwitterResult message) throws EncodeException {

       return ByteBuffer.wrap(SerializationUtils.serialize(message));

   }

}
To make the encoder/decoder usable for the endpoint we extend the @ServerEndpoint annotation like this:
@ServerEndpoint(value = "/twitter", decoders = {QueryDecoder.class},encoders = {TwitterResultEncoder.class})So now we have a full working ServerEndpoint example which you can deploy on any JEE 7 compliant Application server.
Part 2: creating the JacpFX client and a ClientEndpoint
The easiest way to start with JacpFX, is to use the provided maven archetype. It generates an example client including every interesting aspect of JacpFX. So you get a workbench, two perspectives (fxml and JavaFX), two UI components and two non-UI components out of the box. So we simply use this and extend it with WebSocket-Endpoints.
If you have > Java7u6 and maven you can simply type:
mvn archetype:generate -DarchetypeGroupId=org.jacp -DarchetypeArtifactId=JacpFX-quickstart-archetype -DarchetypeVersion=1.2 -DarchetypeRepository=http://developer.ahcp.de/nexus/content/repositories/jacp
to create a JacpFX project.
To get the dependencies for the WebSocket-Client API you need to add following dependency to the pom.xml:
<dependency>

           <groupId>org.glassfish.tyrus</groupId>

           <artifactId>tyrus-client</artifactId>

           <version>1.0-rc1</version>

           <scope>compile</scope>

       </dependency>


       <dependency>

           <groupId>org.glassfish.tyrus</groupId>

           <artifactId>tyrus-container-grizzly</artifactId>

           <version>1.0-rc1</version>

           <scope>compile</scope>

       </dependency>
And add following repository:
<repository>

           <id>java.net-promoted</id>

           <url>https://maven.java.net/content/groups/promoted/</url>

       </repository>
The basic idea is now, that we use the created stateful component and reuse it as a WebSocket- ClientEndpoint. Every time we receive a new TwitterReult, we pass it to the JacpFX message bus and delegate it to an UI component which renders the result in a table. The other way round, we delegate the input of a TextField to the stateful component which sends the Query request to the ServerEndpoint. So change the stateful component like this:
@ClientEndpoint

@CallbackComponent(id = "id003", name = "twitterEndpointComponent", active = false)

public class StatefulCallback extends AStatefulCallbackComponent {

   private Session session;

   private CountDownLatch messageLatch = new CountDownLatch(1);

   @Override

   public Object handleAction(final IAction<Event, Object> arg0) {

       if (arg0.getLastMessage() instanceof Query){

           sendQuery((Query) arg0.getLastMessage());

       }

       return null;

   }

   @OnStart

   /**

    * JacpFX lifecycle

    */

   public void init() {

       ClientManager client = ClientManager.createClient();

      session = client.connectToServer(this, ClientEndpointConfig.Builder.create().build(), getURI());

      messageLatch.await(5, TimeUnit.SECONDS);

   }


   @OnTearDown

   /**

    * JacpFX lifecycle

    */

   public void cleanup() {

if(session!=null)session.close();

   }

   @OnOpen

   /**

    * WebSocket lifecycle

    */

   public void onOpen(Session session) {

       this.session = session;

       messageLatch.countDown();

   }

   @OnMessage

   /**

    * WebSocket lifecycle

    */

   public void onTwitterMessage(TwitterResult result) {

       this.getActionListener("id001", result) .performAction(null);

   }

   private void sendQuery(Query query) throws IOException, EncodeException {

       session.getBasicRemote().sendObject(query);

   }

   private URI getURI() {return “ws://…” }

}
The class-level annotation @ClientEndpoint marks this component as a WebSocket-Endpoint, while @CallbackComponent contains JacpFX metadata for this stateless component. The @OnStart init(..) method contains the code to connect to the WebSocket-ServerEndpoint and to pass the instance of the stateful component as a ClientEndpoint. @OnStart is a JacpFX lifecycle annotation that will be executed when the component is activated. When the component receives a Query message from the UI, the “handleAction” method will be executed. Here we call “sendQuery” and use the WebSocket-Session to send the Query object to the Server-Endpoint.
When the Server executes the Query and receives the result from Twitter, he broadcasts the TwitterResult to all connected Clients, so the @OnMessage onTwitterMessage(…) method will be executed on client side. Here we call the component`s actionListener and pass the result to the component with ID “id001” which renders the Result. Like at the ServerEndpoint before, we need an “encoder/decoder” to handle with message types “Query and TwitterResult”. So, create the encoder/decoder the same way and register them on the ClientEndpoint like this:
@ClientEndpoint(decoders = {TwitterResultDecoder.class}, encoders = {QueryEncoder.class})Part 3: change the example client to show a Query- and a TableView
The last step is to change the UI components from the example JacpFX client, to have a Query- and a Table-View. You are basically free to create one component with an input-field and the table to render the results. A better approach is to create separate components for this. Before we start, you can delete PerspectiveTwo.java, ComponentFXMLRight.java and ComponentFXMLBottom.java. Also delete the references in resources/main.xml, and add the reference of componentTop to PerspectiveOne:
<bean id="perspectiveOne" class="org.jacp.client.perspectives.PerspectiveOne">

        <property name="subcomponents">

            <list>

                <ref bean="componentLeft" />

                <ref bean="componentTop" />

                <ref bean="statefulCallback" />

                <ref bean="statelessCallback" />

            </list>

        </property>

    </bean>
The first JacpFX perspective (perspectiveOne) declares its UI by FXML and acts as a container for two components. It is already a SplitPane and we simply change the code to split the views vertically. So open the resources/fxml/perspectiveOne.fxml and add the attribute orientation="VERTICAL" at the <SplitPane> element and change the dividerPositions to 0.30. Now open PerspectiveOne.java and change the registration target-names for our components to:
perspectiveLayout.registerTargetLayoutComponent("QueryView",

                    this.gridPaneLeft);

            perspectiveLayout.registerTargetLayoutComponent("TableView",
                    this.gridPaneRight);
What we did, is to set a new target layout for our components. Components can now register to one of these target layouts, and will then be rendered there. This registration mechanism allows you to define any complex UI structure in your perspective and to define rendering points for you components. Now we change the ComponentTop to be rendered in the “QueryView” target. To do this, we simply change the value of the @Component’s defaultExecutionTarget attribute like this:
@Component(defaultExecutionTarget = "QueryView", id = "id006", name = "componentTop", active = true, resourceBundleLocation = "bundles.languageBundle", localeID = "en_US")
This component already contains a TextField and a Button, so we just need to change the Button`s EventHandler to pass the value of the TextFiled.
private EventHandler<Event> getEventHandler() {

        return new EventHandler<Event>() {

            @Override

            public void handle(final Event arg0) {

                getActionListener("id01.id003",

                       textField.getText()).performAction(arg0);

            }

        };

    }
The getActionListener(“id01.id003”… simply defines the component with “id003” (the stateful component) in perspective “id01”, as the target for this message. Next, we change ComponentLeft.java to act as a TableView. Again, we just change the default executionTarget to “TableView”. We also change the createUI() method to display a TableView and we update the postHandleAction to handle the TwitterResults and to pass them to the table. The final solution will look like this:
@Component(defaultExecutionTarget = " TableView ", id = "id001", name = "componentLeft", active = true, resourceBundleLocation = "bundles.languageBundle", localeID = "en_US")

public class ComponentLeft extends AFXComponent {

   private AnchorPane pane;

   private ObservableList<Tweet> tweets = FXCollections.observableArrayList();


   @Override

   /**

    * The handleAction method always runs outside the main application thread. You can create new nodes, execute long running tasks but you are not allowed to manipulate existing nodes here.

    */

   public Node handleAction(final IAction<Event, Object> action) {

       // runs in worker thread

       if (action.getLastMessage().equals(MessageUtil.INIT)) {

           return this.createUI();

       }

       return null;

   }

   @Override

   /**

    * The postHandleAction method runs always in the main application thread.

    */

   public Node postHandleAction(final Node arg0,

                                final IAction<Event, Object> action) {

       // runs in FX application thread

       if (action.getLastMessage().equals(MessageUtil.INIT)) {

           this.pane = (AnchorPane) arg0;

       } else if (action.getLastMessage() instanceof TwitterResult) {

           tweets.clear();

           TwitterResult result = (TwitterResult) action.getLastMessage();

           if (!result.getResults().isEmpty()) {

               tweets.addAll(result.getResults());

               Collections.sort(tweets);

           }

       }

       return this.pane;

   }


   /**

    * create the UI on first call

    *

    * @return

    */

   private Node createUI() {

       final AnchorPane anchor = AnchorPaneBuilder.create()

               .styleClass("roundedAnchorPaneFX").build();

       TableView table = new TableView();

       table.setColumnResizePolicy(TableView.CONSTRAINED_RESIZE_POLICY);

       table.getColumns().addAll(createColumns());

       table.setItems(tweets);

       AnchorPane.setTopAnchor(table, 25.0);

       AnchorPane.setRightAnchor(table, 25.0);

       AnchorPane.setLeftAnchor(table, 25.0);

       anchor.getChildren().addAll(table);

       GridPane.setHgrow(anchor, Priority.ALWAYS);

       GridPane.setVgrow(anchor, Priority.ALWAYS);

       return anchor;

   }

   private List<TableColumn> createColumns() {

…

       return Arrays.asList(imageView, nameView, messageView);
   }
A JacpFX UI component has a defined lifecycle: each message first passes through the handleAction(..), and then the postHandleAction(…) method. The handleAction(..) is always executed in a worker thread, so you can do any complex and time consuming computations, without blocking the UI. Here you are free to create new UI Nodes and return them. But, you can’t change any existing Nodes because you are not on the JavaFX Application Thread. The returned Node will then be passed to the postHandleAction(…) which runs on the Application Thread. The complete lifecycle you can see here:
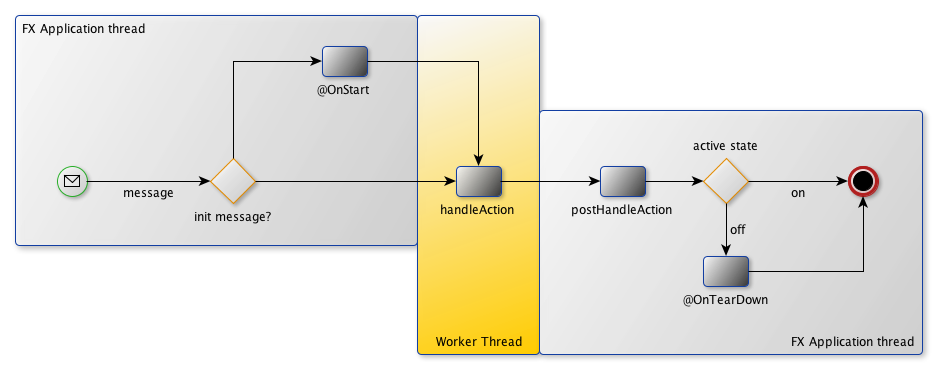
In the postHandleAction(…) we check for the TwitterResult message, and add the Twitter-Entries to the Table. Now we are done, and you can deploy the ServerEndpoint on you GlassFish 4 instance and run the application. If you start many instances, the TwitterResult will be passed to all connected clients. The complete documentation for JacpFX you can find in the project Wiki here. Further information’s about JSR 356 you can get on the project page and on Arun Gupta’s Blog
Resources
- https://blogs.oracle.com/arungupta/
- https://java.net/projects/tyrus
- https://code.google.com/p/jacp/wiki/Documentation
- http://www.javacodegeeks.com/2012/03/building-rich-clients-with-jacpfx-and.html
Reference: Using JacpFX clients with JSR 356 WebSockets from our W4G partner Andy Moncsek.
