BDD is the logical next step up from Test-Driven Development (TDD).
Behavior-Driven Development
In essence, BDD is a way to deliver requirements. But not just any requirements, executable ones! With BDD, you write scenarios in a format that can be run against the software to ascertain whether the software behaves as desired.
Scenarios
Scenarios are written in Given, When, Then format, also known as Gherkin:
Given the ATM has $250
And my balance is $200
When I withdraw $150
Then the ATM has $100
And my balance is $50
Given indicates the initial context, When indicates the occurrence of an interesting event, and Then asserts an expected outcome. And may be used to in place of a repeating keyword, to make the scenario more readable.
Given/When/Then is a very powerful idiom, that allows for virtually any requirement to be described. Scenarios in this format are also easily parsed, so that we can automatically run them.
BDD scenarios are great for developers, since they provide quick and unequivocal feedback about whether the story is done. Not only the main success scenario, but also alternate and exception scenarios can be provided, as can abuse cases. The latter requires that the Product Owner not only collaborates with testers and developers, but also with security specialists. The payoff is that it becomes easier to manage security requirements.
Even though BDD is really about the collaborative process and not about tools, I’m going to focus on tools for the remainder of this post. Please keep in mind that tools can never save you, while communication and collaboration can. With that caveat out of the way, let’s get started on implementing BDD with some open source tools.
JBehave

JBehave is a BDD tool for Java. It parses the scenarios from story files, maps them to Java code, runs them via JUnit tests, and generates reports.
JUnit
Here’s how we run our stories using JUnit:
@RunWith(AnnotatedEmbedderRunner.class)
@UsingEmbedder(embedder = Embedder.class, generateViewAfterStories = true,
    ignoreFailureInStories = true, ignoreFailureInView = false,
    verboseFailures = true)
@UsingSteps(instances = { NgisRestSteps.class })
public class StoriesTest extends JUnitStories {

  @Override
  protected List<String> storyPaths() {
    return new StoryFinder().findPaths(
        CodeLocations.codeLocationFromClass(getClass()).getFile(),
        Arrays.asList(getStoryFilter(storyPaths)), null);
  }

  private String getStoryFilter(String storyPaths) {
    if (storyPaths == null) {
      return '*.story';
    }
    if (storyPaths.endsWith('.story')) {
      return storyPaths;
    }
    return storyPaths + '.story';
  }

  private List<String> specifiedStoryPaths(String storyPaths) {
    List<String> result = new ArrayList<String>();
    URI cwd = new File('src/test/resources').toURI();
    for (String storyPath : storyPaths.split(File.pathSeparator)) {
      File storyFile = new File(storyPath);
      if (!storyFile.exists()) {
        throw new IllegalArgumentException('Story file not found: '
          + storyPath);
      }
      result.add(cwd.relativize(storyFile.toURI()).toString());
    }
    return result;
  }

  @Override
  public Configuration configuration() {
    return super.configuration()
        .useStoryReporterBuilder(new StoryReporterBuilder()
            .withFormats(Format.XML, Format.STATS, Format.CONSOLE)
            .withRelativeDirectory('../build/jbehave')
        )
        .usePendingStepStrategy(new FailingUponPendingStep())
        .useFailureStrategy(new SilentlyAbsorbingFailure());
  }

}
This uses JUnit 4?s @RunWith annotation to indicate the class that will run the test. The AnnotatedEmbedderRunner is a JUnit Runner that JBehave provides. It looks for the @UsingEmbedder annotation to determine how to run the stories:
generateViewAfterStoriesinstructs JBehave to create a test report after running the storiesignoreFailureInStoriesprevents JBehave from throwing an exception when a story fails. This is essential for the integration with Jenkins, as we’ll see below
The @UsingSteps annotation links the steps in the scenarios to Java code. More on that below. You can list more than one class.
Our test class re-uses the JUnitStories class from JBehave that makes it easy to run multiple stories. We only have to implement two methods: storyPaths() and configuration().
The storyPaths() method tells JBehave where to find the stories to run. Our version is a little bit complicated because we want to be able to run tests from both our IDE and from the command line and because we want to be able to run either all stories or a specific sub-set.
We use the system property bdd.stories to indicate which stories to run. This includes support for wildcards. Our naming convention requires that the story file names start with the persona, so we can easily run all stories for a single persona using something like -Dbdd.stories=wanda_*.
The configuration() method tells JBehave how to run stories and report on them. We need output in XML for further processing in Jenkins, as we’ll see below.
One thing of interest is the location of the reports. JBehave supports Maven, which is fine, but they assume that everybody follows Maven conventions, which is really not. The output goes into a directory called target by default, but we can override that by specifying a path relative to the target directory. We use Gradle instead of Maven, and Gradle’s temporary files go into the build directory, not target. More on Gradle below.
Steps
Now we can run our stories, but they will fail. We need to tell JBehave how to map the Given/When/Then steps in the scenarios to Java code. The Steps classes determine what the vocabulary is that can be used in the scenarios. As such, they define a Domain Specific Language (DSL) for acceptance testing our application.
Our application has a RESTful interface, so we wrote a generic REST DSL. However, due to the HATEOAS constraint in REST, a client needs a lot of calls to discover the URIs that it should use. Writing scenarios gets pretty boring and repetitive that way, so we added an application-specific DSL on top of the REST DSL. This allows us to write scenarios in terms the Product Owner understands.
Layering the application-specific steps on top of generic REST steps has some advantages:
- It’s easy to implement new application-specific DSL, since they only need to call the REST-specific DSL
- The REST-specific DSL can be shared with other projects
Gradle

With the Steps in place, we can run our stories from our favorite IDE. That works great for developers, but can’t be used for Continuous Integration (CI).
Our CI server runs a headless build, so we need to be able to run the BDD scenarios from the command line. We automate our build with Gradle and Gradle can already run JUnit tests. However, our build is a multi-project build. We don’t want to run our BDD scenarios until all projects are built, a distribution is created, and the application is started.
So first off, we disable running tests on the project that contains the BDD stories:
test {
  onlyIf { false } // We need a running server
}
Next, we create another task that can be run after we start our application:
task acceptStories(type: Test) {
  ignoreFailures = true
  doFirst {
    // Need 'target' directory on *nix systems to get any output
    file('target').mkdirs()

    def filter = System.getProperty('bdd.stories')
    if (filter == null) {
      filter = '*'
    }
    def stories = sourceSets.test.resources.matching {
      it.include filter
    }.asPath
    systemProperty('bdd.stories', stories)
  }
}
Here we see the power of Gradle. We define a new task of type Test, so that it already can run JUnit tests. Next, we configure that task using a little Groovy script.
First, we must make sure the target directory exists. We don’t need or even want it, but without it, JBehave doesn’t work properly on *nix systems. I guess that’s a little Maven-ism
Next, we add support for running a sub-set of the stories, again using the bdd.stories system property. Our story files are located in src/test/resources, so that we can easily get access to them using the standard Gradle test source set. We then set the system property bdd.stories for the JVM that runs the tests.
Jenkins
So now we can run our BDD scenarios from both our IDE and the command line. The next step is to integrate them into our CI build.
We could just archive the JBehave reports as artifacts, but, to be honest, the reports that JBehave generates aren’t all that great. Fortunately, the JBehave team also maintains a plug-in for the Jenkins CI server. This plug-in requires prior installation of the xUnit plug-in.
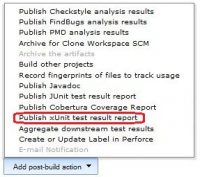
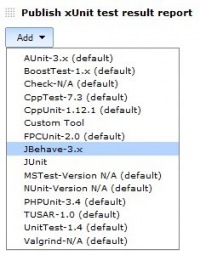
After installation of the xUnit and JBehave plug-ins into jenkins, we can configure our Jenkins job to use the JBehave plug-in. First, add an xUnit post-build action. Then, select the JBehave test report.
With this configuration, the output from running JBehave on our BDD stories looks just like that for regular unit tests:
.jpg)
Note that the yellow part in the graph indicates pending steps. Those are used in the BDD scenarios, but have no counterpart in the Java Steps classes. Pending steps are shown in the Skip column in the test results:

Notice how the JBehave Jenkins plug-in translates stories to tests and scenarios to test methods. This makes it easy to spot which scenarios require more work.
Although the JBehave plug-in works quite well, there are two things that could be improved:
- The output from the tests is not shown. This makes it hard to figure out why a scenario failed. We therefore also archive the JUnit test report
- If you configure
ignoreFailureInStoriesto befalse, JBehave throws an exception on a failure, which truncates the XML output. The JBehave Jenkins plug-in can then no longer parse the XML (since it’s not well formed), and fails entirely, leaving you without test results
All in all these are minor inconveniences, and we ‘re very happy with our automated BDD scenarios.
Happy coding and don’t forget to share!
Reference: Behavior-Driven Development (BDD) with JBehave, Gradle, and Jenkins from our JCG partner Remon Sinnema at the Secure Software Development blog.

You mentioned gerkin GWT format which contains a bunch of “And”s but then you’re using JBehave. I can’t see your Steps.java or JBhave .story file. What did you do to to handle the gerkin? If you re-wrote the gerkin by hand to JBehave GWT, then how did you handle the “And”s?
I just thank you to post such good article. I googled and found most of scripts were written in Jbehave with junit. But I’m trying to integrate Jbehave with testNG framework. And the following were I tried so far. Feature file: Scenario: Check the google search engine Given : Open the google home page http://www.google.com When : Enter test automation in search box Then : Proper result should be displayed in results page Test step class file: public class GoogleSearchEngine_Steps { public static WebDriver driver; @Given(“Open the google home page $url”) public static void openUrl(String url) throws Exception { try… Read more »
Hello Sasikumar,
I am trying the same and unable to configure the test runner class file using TestNG.
Can you please help me with the code if you have any!
There is also Ginkgo4j. It uses Java 8’s lamda’s to mirror approaches used by Ruby’s RSpec and Go’s Ginkgo. This library allows you to build expressive, content-rich tests. “` package com.github.paulcwarren.ginkgo4j.examples; import static com.github.paulcwarren.ginkgo4j.Ginkgo4jDSL.*; import static org.hamcrest.CoreMatchers.is; import static org.hamcrest.MatcherAssert.assertThat; import org.junit.runner.RunWith; import com.github.paulcwarren.ginkgo4j.Ginkgo4jRunner; @RunWith(Ginkgo4jRunner.class) public class BookTests { private Book longBook; private Book shortBook; { Describe(“Book”, () -> { BeforeEach(() -> { longBook = new Book(“Les Miserables”, “Victor Hugo”, 1488); shortBook = new Book(“Fox In Socks”, “Dr. Seuss”, 24); }); Context(“Categorizing book length”, () -> { Context(“With more than 300 pages”, () -> { It(“should be a novel”, ()… Read more »