I’am going to show you how easy it is to set up test scenarios with the graphical user interface of JMeter. But before diving into details let’s give a shot to basic terms:
Test plan : describes a test scenario
Thread Group : represents users running your test scenario.
Samples : a way of sending request and waiting response. HTTP request, JDBC request, SOAP/XML-RPC request and java object request are examples of samples.
Logic Controller : used to customize the logic that JMeter uses to decide when to send requests
Listeners : receives test results and displays reports.
Timers : cause JMeter to delay a certain amount of time before each request that a thread makes.
Assertions : test that application returns expected responses
Note : This post is not meant to be an alternative documentation for JMeter. JMeter has a great documentation. You can find the details in its User’s Manual (http://jakarta.apache.org/jmeter/usermanual/index.html Suppose we have an application that logs every transaction into a relational database. We are going to create a test plan – step by step – in order to answer the questions below.
- How many transaction records can be inserted to transaction table in a second?
- How much time does it take to insert a single transaction record to transaction table?
- How does number of concurrent threads (users) affects the inserts/secs and average response times?
- How does number of records affects the insert/secs and average response times?
Step 1
Copy mysql jdbc driver into the lib folder of your JMeter installation. JMeter needs a suitable jdbc driver in the classpath to connect to the database.
Example ~/tools/jakarta-jmeter-2.3.4/lib/mysql-connector-java-5.0.5.jar
We are going to store orders of the customers and the result of the order in the transactions table.
CREATE TABLE transactions (
    id INT NOT NULL AUTO_INCREMENT,
    customer_id INT NOT NULL,
    order_id INT NOT NULL,
    result INT,
    PRIMARY KEY (id)
);
Step 2
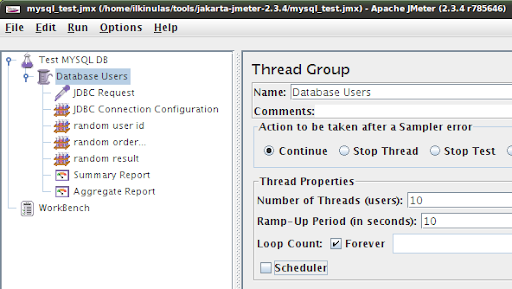
Create a test plan and name it “Test MYSQL DB”. Then add the following jmeter components to the test plan.
- Thread group named ‘Database Users’
- Sampler of type JDBC Request
- Config element of type JDBC Connection Configuration
- Three config elements of type Random Variable
- Listener of type Summary Report
After adding these components JMeter test plan looks like the following picture.

Step 3
Configure database users. The thread group component simulates the database users.
1. Number of users (threads)
2. How many times a user will send request (loop count). If you select ‘Forever’, threads will run in a while(true) {…} loop until you decide to stop the test.
Step 4
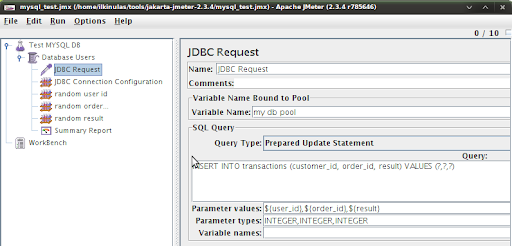
Configure JDBC connection pool. JDBC Connection Configuration component is used to create jdbc connection pools. Database url, jdbc driver, database user and password are configured with this component. Connection pools are identified by “Variable Name”. JDBC Samplers (requests) use this variable name (connection pool name) to pop and push connections. I named the test connection pool as “my db pool”

Step 5
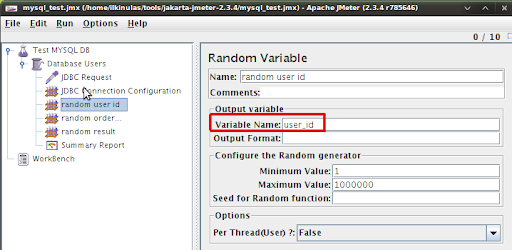
Define random variables that will be used in INSERT statements. In this test I am using three random variables : user id, order id and result. Following picture shows the a random number configuration for user id. Random number generator will give us a random integers between 1 and 1000000. We can refer to generated random number with the name user_id.
Step 6
JDBC Request component is the place where we tell our users (threads) what to do. The name of the pool that was configured in Step 3 “my db pool” will be used as the “variable name bound to pool”. All threads will execute prepared statements. User id, order id and result will be generated by the random number configurator (described in Step 5)
Step 7
Now we have our threads configured to insert transaction records to the transactions table. In this last step we will add a Listener of type Summary Report in order to view test results.
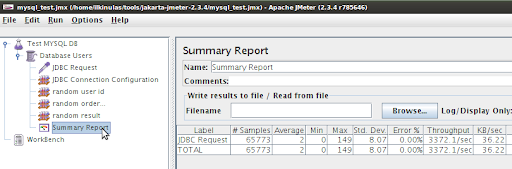
The results tells us that 10 concurrent users (threads) working in an infinite loop can insert nearly 3300 rows in our transactions table. And the average time spent for inserting a row is 2 ms. You can also choose “Graph Results” listener to view visual representation of the results.
I created and run a simple DB test plan. I hope you’ll find this post helpful. Keep this motto in mind
if you can’t measure it, you can neither manage it nor improve it
Happy testing…
Reference: Load Testing Relational Databases With JMeter from our JCG partner Ilkin Ulas at the All your base are belong to us blog.

Useful article, thanks! I think you find interesting about Connection Pool Configuration.
Not able to get success result in report tree with jdbc.
its showing …..Response message: java.sql.SQLException: No suitable driver found for jdbc:mysql://localhost:8080/cloud