Hey! Happy Advent :D I’m Simon Maple (@sjmaple), the Technical Evangelist for ZeroTurnaround. You know, the JRebel guys! We’ll as a result of writing a product like JRebel which interacts with bytecode, more often than you care to imagine, there are many things we’ve learned about it which we’d love to share.
Let’s start at the start… Java was a language designed to run on a virtual machine so that it only needed to be compiled once to run everywhere (yes, yes, write once, test everywhere). As a result, the JVM which you install onto your system would be native, allowing the code that runs on it to be platform agnostic. Java bytecode is the intermediate representation of the Java code you write as source and is the result of you compiling your code. So your class files are the bytecode.
To be more succinct, Java bytecode is the code set used by the Java Virtual Machine that is JIT-compiled into native code at runtime.
Have you ever played about with assembler or machine code? Bytecode is kind of similar, in a way, but many people in the industry don’t really play with it that much, more out of the lack necessity. However it is important to understand what’s going on, and useful if you want to out-geek someone in the pub.
Firstly, let’s take a look at some bytecode basics. We’ll take the expression ‘1+2’ first and see how this gets executed as Java bytecode. 1+2 can be written in reverse Polish notation as 1 2 +. Why? Well when we put it on a stack it all becomes clear…
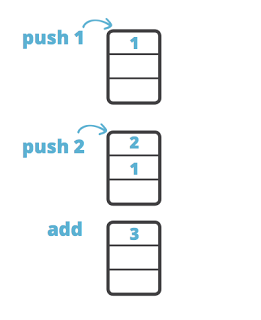
OK, in bytecode we’d actually see opcodes (iconst_1 and iconst_2) and an instruction (iadd) rather than push and add, but the flow is the same. The actual instructions are one byte in length, hence bytecode. There are 256 possible opcodes as a result, but only 200 or so are used. Opcodes are prefixed with a type followed by the operation name. So what we saw previously with iconst and iadd, are constants of integer type and an add instruction for integer types.
This is all very well and good, but how about reading class files. Typically, all you normally see in a class file when opened, in your editor of choice, is a bunch of smiley faces and some squares, dots and other weird characters, right? The answer is in javap, a code utility you actually get with your JDK. Let’s look at a code example to see javap in action.
public class Main {

    public static void main(String[] args){

        MovingAverage app = new MovingAverage();

    }

}
Once this class is compiled into a Main.class file, we can use the following command to extract the bytecode: javap -c Main
Compiled from "Main.java"

public class algo.Main {
  public algo.Main();
       Code:
       0: aload_0
       1: invokespecial #1
       4: return
// Method java/lang/Object."<init>":()V
public static void main(java.lang.String[]);
     Code:
       0: new           #2
       3: dup
       4: invokespecial #3
       7: astore_1
      8: return
}
We can see we have our default constructor and main method in the byte code straight away. By the way, this is how Java gives you a default constructor for constructor-less classes! The bytecode in the constructor is simply a call to super(), while our main method creates a new instance of the MovingAverage and returns. The #n characters actually refer to constants which we can view using the -verbose argument as follows: javap -c -verbose Main. The interesting part of what is returned is shown below:
public class algo.Main

  SourceFile: "Main.java"

  minor version: 0

  major version: 51

  flags: ACC_PUBLIC, ACC_SUPER

Constant pool:

   #1 = Methodref    #5.#21         //  java/lang/Object."<init>":()V

   #2 = Class        #22            //  algo/MovingAverage

   #3 = Methodref    #2.#21         //  algo/MovingAverage."<init>":()V

   #4 = Class        #23            //  algo/Main

   #5 = Class        #24            //  java/lang/Object
Now we can match our instructions to our constants and we can piece together what’s actually happening much easier. Is anything still bugging you about the example above? No? What about the numbers in front of each instruction…
       0: new           #2

       3: dup

       4: invokespecial #3

       7: astore_1

       8: return
Now it’s really bugging you, right? :) Here’s what we’ve got if we visualise this method body as an array:

Note that every instruction has a HEX representation, so using that we actually see this:

We can actually see this in the class file if we open it in a HEX editor:
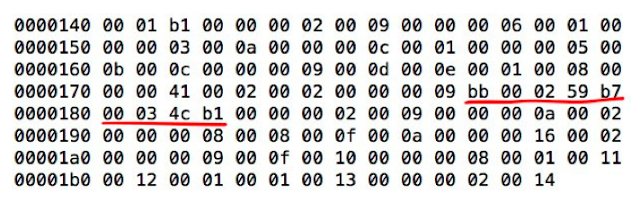
We could actually change the bytecode here in our HEX editor, but let’s be honest, it’s not something you’d really want to do, particularly on a Friday afternoon after the obligatory pub trip. Better ways to do this would be using ASM or javassist.
Let’s move on from our basic example and add some local variables that store state and interact directly with our stack. Check out the following code:
public static void main(String[] args) {

  MovingAverage ma = new MovingAverage();


  int num1 = 1;

  int num2 = 2;


  ma.submit(num1);

  ma.submit(num2);


  double avg = ma.getAvg();

}
Lets see what we get this time in our bytecode:
Code:
0: new  #2    // class algo/MovingAverage

3: dup

4: invokespecial #3  // Method algo/MovingAverage."<init>":()V

7: astore_1

8: iconst_1

9: istore_2

10: iconst_2

11: istore_3

12: aload_1

13: iload_2

14: i2d

15: invokevirtual #4        // Method algo/MovingAverage.submit:(D)V

18: aload_1

19: iload_3

20: i2d

21: invokevirtual #4        // Method algo/MovingAverage.submit:(D)V

24: aload_1

25: invokevirtual #5        // Method algo/MovingAverage.getAvg:()D

28: dstore     4


LocalVariableTable:

Start  Length  Slot  Name   Signature


0       31         0    args   [Ljava/lang/String;

8       23        1      ma     Lalgo/MovingAverage;

10      21         2     num1   I

12       19         3      num2   I

30       1        4    avg     D
This looks a lot more interesting… We can see that we create an object of type MovingAverage which is stored in local variable, ma, via the astore_1 instruction (1 is the slot number in the LocalVariableTable). Instructions iconst_1 and iconst_2 are there to load constants 1 and 2 to the stack and store them in LocalVariableTable slots 2 and 3 respectively by instructions istore_2 and istore_3. A load instruction pushed a local variable onto the stack, which a store instruction pops the next item from the stack and stores it in the LocalVariableTable. It’s important to realise that when a store instruction is used, the item is taken off of the stack and if you want to use it again, you’ll need to load it.
How about the flow of execution? All we’ve seen is a simple progression from one line to the next. I want to see some BASIC style GOTO 10 in the mix! Let’s take another example:
MovingAverage ma = new MovingAverage();

for (int number : numbers) {

    ma.submit(number);

}
In this case the flow of execution will jump around many times as we traverse the for loop. This bytecode, assuming that the numbers variable is a static field in the same class is shown as the following:
0: new #2 // class algo/MovingAverage

3: dup

4: invokespecial #3 // Method algo/MovingAverage."<init>":()V

7: astore_1

8: getstatic #4 // Field numbers:[I

11: astore_2

12: aload_2

13: arraylength

14: istore_3

15: iconst_0

16: istore 4

18: iload 4

20: iload_3

21: if_icmpge 43

24: aload_2

25: iload 4

27: iaload

28: istore 5

30: aload_1

31: iload 5

33: i2d

34: invokevirtual #5 // Method algo/MovingAverage.submit:(D)V

37: iinc 4, 1

40: goto 18

43: return


LocalVariableTable:

Start  Length  Slot  Name   Signature

30       7         5    number I

12       31        2    arr$     [I

15       28        3    len     $I

18       25         4     i$      I

0       49         0     args  [Ljava/lang/String;

8       41         1    ma     Lalgo/MovingAverage;

48      1         2    avg    D
The instructions from position 8 through 17 are used to setup the loop. There are three variables in the LocalVariable table that aren’t really mentioned in the source, arr$, len$ and i$. These are the loop variables. arr$ stores the reference value of the numbers field from which the length of the loop, len$ is derived. i$ is the loop counter which is incremented by the iinc instruction.
First we need to test our loop expression, which is performed by a comparison instruction:
18: iload 4

20: iload_3

21: if_icmpge 43
We’re loading 4 and 4 onto the stack, which are the loop counter and the loop length. We’re checking id i$ is greater than or equal to len$. If it is, we jump to statement 43, otherwise we proceed. We can then perform our logic in the loop and at the end, we increment our counter and jump back to our code that checks the loop condition on statement 18.
37: iinc       4, 1       // increment i$

40: goto       18         // jump back to the beginning of the loop
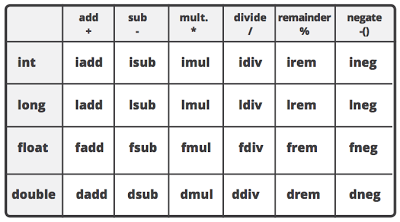
There are a bunch of arithmetical opcodes and type command combinations that can be used in bytecode, including the following:
As well as a number of type conversion opcodes which are important when assigning say an integer to a variable of type long.
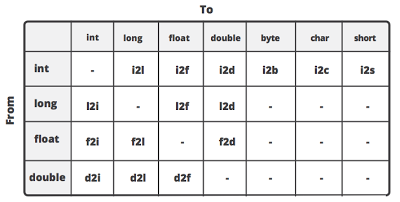
In our precious example we pass an integer to a submit method which takes a double. Java syntax does this for us, but in bytecode, you’ll see the i2d opcode is used:
31: iload 5


33: i2d


34: invokevirtual #5 // Method algo/MovingAverage.submit:(D)V
So, you’ve made it this far. Well done, you’ve earned a coffee! Is any of this actually useful to know or is it just geek fodder? Well, it’s both! Firstly now, you can tell your friends that you’re a JVM that can process bytecode, and secondly you can better understand what you’re doing when writing bytecode. For example, when using ObjectWeb ASM, which is one of the most widely used bytecode manipulation tools, you’ll find yourself constructing instructions and this knowledge will prove invaluable!
If you found this interesting and want to know more, then checkout our free Mastering Java Bytecode report from Anton Arhipov, the JRebel Product Lead at ZeroTurnaround. (JRebel uses javassist and we have had lots of fun learning and interactive with Java bytecode!) This report goes into more depth and touches on how to use ASM.
Thanks for reading! Let me know what you thought! (@sjmaple)

Thanks! very well written
Awesome, well explained !
Thanks! Looks like there is a small typo in the HEX representation. In the byte array, BB instead of FF at index 0 for NEW instruction and B7 instead of F7 at index 4 for INVOKESPECIAL
how can i check local variable table?? I tried javap -l command but could not find the table as shown above