This tutorial is the first part of the “Setting up an infrastructure for Instant Messaging” article series. In this tutorial, we are going to setup an Instant Messaging infrastructure for a private intranet. This should come really handy if you don’t wish to depend on solutions running on the internet or if your network administrator has blocked all the traditional IM services (MSN, Google Talk, Skype etc.). I will show you how to setup the IM server as well as configure the clients to connect to it.
The server we will use is Openfire, a real-time-collaboration (RTC) server provided by Ignite Realtime under the Open Source GPL. The protocol that Openfire uses is Extensible Messaging and Presence Protocol (XMPP), also known as Jabber. Actually, Google Talk uses XMPP for its instant messaging function.
Download the latest version for your platform here. I personally prefer to run my servers on linux machines, so I chose the linux platform. There are precompiled versions (RPM for Red Hat and variants – DEB packages for Debian and variants), but I will use the tarball version for a more “distribution-agnostic” installation. The current version is 3.6.4 and can be directly downloaded here.
Openfire is a Java based server and does not require administrator privileges in order to start. The .tar.gz build does not contain a bundled Java runtime (JRE). Therefore, a JDK or JRE 1.5.0 (Java 5) or later has to be installed on your system. If not, follow one of the countless online tutorials on how to install it. Note that Java can also be installed without administrator privileges.
The next step is to extract the tarball. This can be done in any folder, I chose my home folder:
tar -xvzf openfire_3_6_4.tar.gz
An installation guide is also found in “documentation/install-guide.html”. I am copying the description of some folders from that guide:
- The conf directory is where Openfire stores configuration files.
- The bin directory contains the server executables. Depending on which distribution you installed, different executables will be available.
- The lib directory contains libraries necessary for running Openfire.
- The plugins directory contains server plugins. By default, Openfire ships with a web-based admin console plugin.
- The resources/database directory contains SQL schema files to create new Openfire databases, as well as upgrade scripts for existing installations.
- The resources/security directory is where Openfire maintains keystores to support SSL connection security.
- The documentation directory contains server documentation.
It seems that Openfire can be extended and multiple plug-ins can be installed. Nice.
Continue by browsing into the folder with the executables:
cd openfire/bin/
There should be an executable file named “openfire”. Make sure this has executable rights by running the following command:
chmod +x openfire
The “openfire” file is really a linux script providing support for running the classic “start|stop|status” commands. For example, check if the server is running by writing:
./openfire status
Ok, it is time to finally start the server. Do it by issuing the following command:
./openfire start
You will receive the following response:
nohup: appending output to `nohup.out’
Openfire uses the nohup command in order to allow execution after the user who issued the command has logged out. Moreover, a file named “nohup.out” is created and all output is directed there. You can view the log messages by using the “tail” command:
tail -f nohup.out
The server binds to port 9090 by default. So let’s visit the administration console by visiting the following URL (“myserver” is the linux machine hostname):
http://myserver:9090/
If everything worked, you should see the following screen:
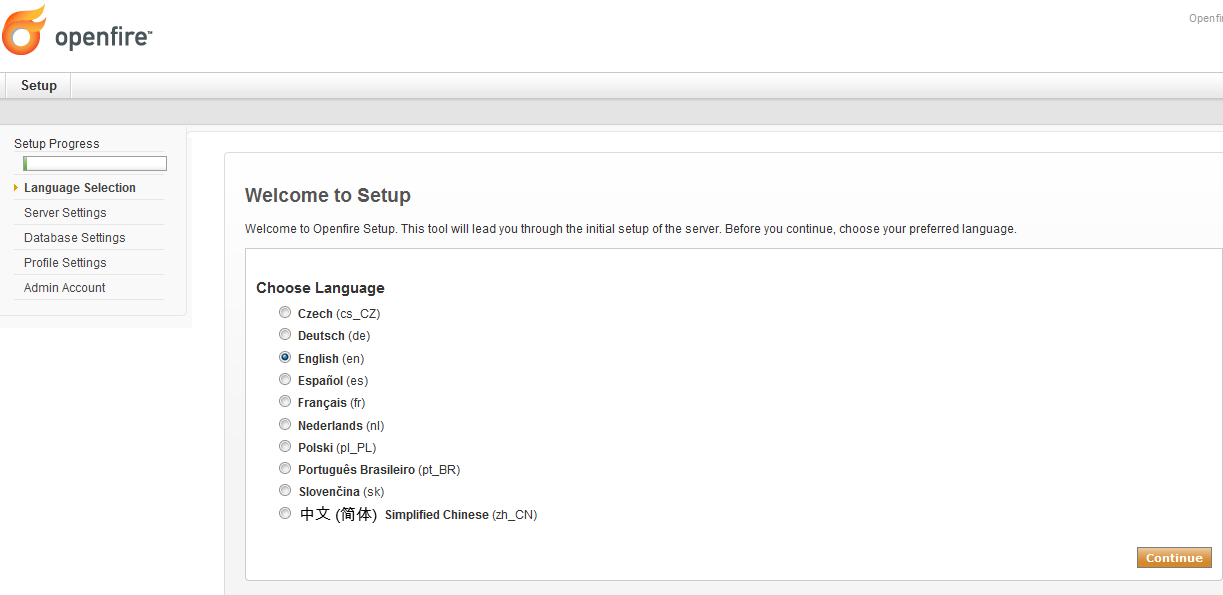
Choose your language (I will go with English) and hit “Continue”. In the following screen, the server settings are configured.

The “Domain” option should be automatically populated. Choose the ports for Admin Console. Actually, the default options should be just fine.
Next step is to configure the database settings. Openfire can use various external databases, but also an embedded one.
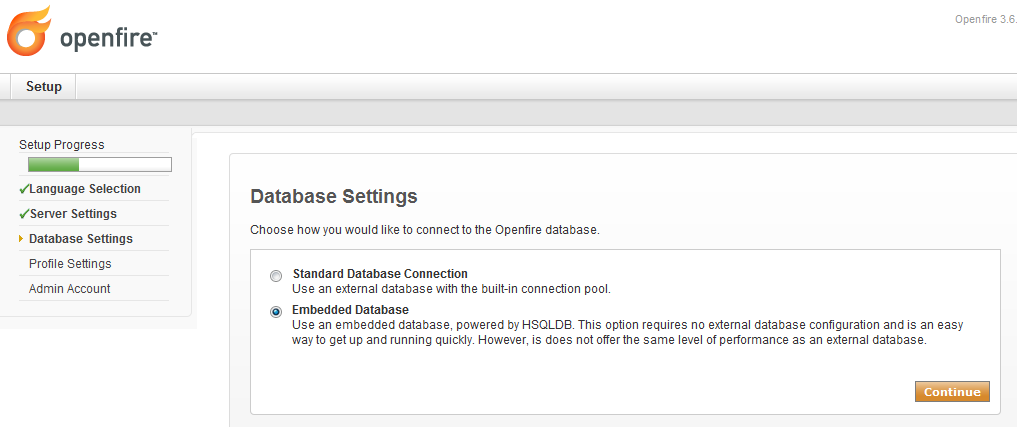
For reasons of simplicity, I chose to go with the embedded HSQLDB option, but if you wish to connect with another database, there is a guide in the file “documentation/database.html”. Note that HQSLDB will use a folder named “embedded-db”, so make sure this does not get deleted.
Next we provide the profile settings.

This allows you to leverage external authentication systems (LDAP etc.) but the simplest option is to use “Default”, where all users and groups are stored in the server database.
Finally, we setup an administrator account. Choose a valid email address and provide the password for the built-in “admin” account.

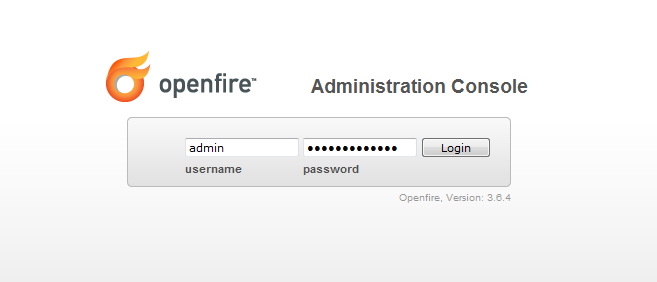
That’s it. If the installation was successful, you should see the following picture:

Hit the corresponding button in order to login to the admin console. Here is the catch:
The first login attempt fails. You need to restart the Openfire server!
Yes sounds a little idiotic, but this is something that a lot of people have faced. However, restarting Openfire fixed the problem (at least in my case).
So, first stop the server:
./openfire stop
and then start it again:
./openfire start
(Note that the start up procedure takes a little time, be patient).
Browse again to the admin console page (http://myserver:9090/) and use “admin” as user, along with the password that you provided during the installation procedure.
We are done with the installation part. In the next tutorial, we will configure our server and create some users so that we actually use the IM services.

Hello,
I have a problem with accessing the admin console page.
After I started the server, i tried to access the “http://myserver:9090/” page, but i’m receiving an error from my browser(“This webpage is not available!”).
Which could be the problem?
Thank you!
try this -” http://localhost:9090/ “
i’m new android developer. i have implement xmpp server but only on local server . so please help me set up open fire on live server or in cpenal. Please provide any example and documation of install open fire server on admin panel .
Hi Mehtab. How are you? i am also new android developer can you please send mein code for xmpp. It will be your kind. You can mail me on arslan.aliuaar@gmail.com
thanks in advance
Hi guys! I would like to make an android client connecting to xmpp servers and sending/receiving messages. Do you have any usable(!!) android code, or examples?
Thanks in advance!
ask anything at JustQuarry.com
https://www.justquarry.com/sarkari-result
https://www.rojgarresults.online/
https://sarkariresults.justquarry.com/
https://www.aexampaper.com/
https://www.sarkari-results.online/
Thanks for giving this information
Hi Nice article thanks for giving this information
Thanks for giving this important information it’s very helpful for me Thanks