Hello. In this tutorial, we will understand how to secure restful apis in a nodejs with the help of the json web token.
1. Introduction
To protect the restful apis in a nodejs application once usually recommends the most common approach known as the json web token (popularly called the “jwt” or “jot”). Json web tokens (or jwt) are an open standard that provides a secure way to set up communication between the two parties. It includes a header, payload, and signature separated by a dot. Jwt tokens are usually when there is a need to maintain a stateless communication between the server and client. The below picture presents a simple jwt token –
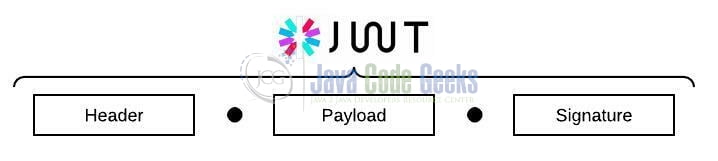
Any jwt can be read by pasting the given token on this website.
1.1 Setting up Node.js
To set up Node.js on windows you will need to download the installer from this link. Click on the installer (also include the NPM package manager) for your platform and run the installer to start with the Node.js setup wizard. Follow the wizard steps and click on Finish when it is done. If everything goes well you can navigate to the command prompt to verify if the installation was successful as shown in Fig. 1.

2. Securing Restful APIs with Nodejs and Express
To set up the application, we will need to navigate to a path where our project will reside and I will be using Visual Studio Code as my preferred IDE.
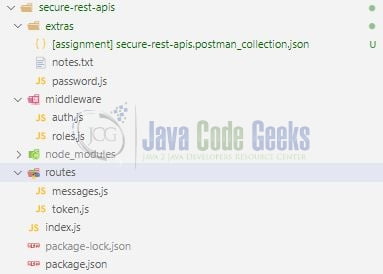
Let us take a look at the code structure.
2.1 Setting up dependencies
Navigate to the project directory and run npm init -y to create a package.json file. This file holds the metadata relevant to the project and is used for managing the project dependencies, script, version, etc. Replace the generated file with the code given below –
package.json
{
  "name": "secure-rest-apis",
  "version": "1.0.0",
  "description": "how to secure rest apis in express",
  "main": "index.js",
  "scripts": {
    "start": "node index.js",
    "dev": "nodemon index.js",
    "test": "echo \"Error: no test specified\" && exit 1"
  },
  "keywords": [
    "restful apis",
    "jwt",
    "express",
    "nodejs",
    "nodemon",
    "bcrypt",
    "jsonwebtoken"
  ],
  "author": "geeks",
  "license": "MIT",
  "dependencies": {
    "bcrypt": "^5.0.1",
    "express": "^4.17.3",
    "jsonwebtoken": "^8.5.1"
  },
  "devDependencies": {
    "nodemon": "^2.0.15"
  }
}
2.2 Setting up middleware for the application
The middleware folder is responsible for two items i.e. validation of the authentication token and roles sent to the /api/messages endpoint.
2.2.1 Validation of authentication token
This file is responsible to validate the token passed in the request to fetch the data. The function will fetch the token from the request header, validate it, and throw the required exception (if any).
auth.js
const jwt = require("jsonwebtoken");

module.exports = (req, res, next) => {
  const auth_token = req.header("x-auth-token");
  if (!auth_token)
    return res.status(401).send({
      status: "unauthorized",
      code: 401,
      error: "No auth token provided"
    });

  try {
    const decoded = jwt.verify(auth_token, "jwtPrivateKey");
    req.user = decoded;
  } catch (error) {
    return res.status(401).send({
      status: "unauthorized",
      code: 401,
      error: "Token expired"
    });
  }

  next();
};
2.2.2 Validation of roles in the authentication token
This file is responsible to validate the presence of user roles in the token. These roles will be added to the authentication token after successful credentials validation.
roles.js
const msg = "Access denied";
const forbidden = "forbidden";
const s_code = 403;

function admin(req, res, next) {
  if (!req.user.roles.includes("admin"))
    return res.status(403).send({
      status: forbidden,
      code: s_code,
      error: msg
    });

  next();
}

function editor(req, res, next) {
  if (!req.user.roles.includes("editor"))
    return res.status(403).send({
      status: forbidden,
      code: s_code,
      error: msg
    });

  next();
}

function viewer(req, res, next) {
  if (!req.user.roles.includes("viewer"))
    return res.status(403).send({
      status: forbidden,
      code: s_code,
      error: msg
    });

  next();
}

// export router
module.exports = { admin, editor, viewer };
2.3 Setting up application routes
The routes folder is responsible to define the application routes.
2.3.1 Creating token endpoint
This file is responsible for validating user credentials and creating a jwt token. The database authentication is omitted from the scope of the tutorial and hence we will use a mock authentication object but you’re free to update the code as per your wish.
token.js
const express = require("express");
const jwt = require("jsonwebtoken");
const bcrypt = require("bcrypt");

// setting up express server router
const router = express.Router();

// user authentication

// http post - http://localhost:3005/api/token
/*
{
    "email": "abc@example.com",
    "password": "P@ssword01!"
}
*/
router.post("/", async (req, res) => {
  // mock data
  const users = [
    {
      email: "abc@example.com",
      password: "$2b$15$U9UK8N.m5uWbletbMwKlHuYRxXRY5j/cbaWmtK9TAxSncFgk5vdQu", // P@ssword01!
      roles: ["admin", "editor", "viewer"]
    }
  ];

  // get user from db and if not found throw error
  let user = users.find((u) => req.body.email == u.email);
  if (!user) throw new Error("Invalid user");

  // compare password with password from the db
  const valid = await bcrypt.compare(req.body.password, user.password);
  if (!valid) throw new Error("Invalid password");

  const tkn = jwt.sign(
    {
      id: user.id,
      roles: user.roles
    },
    "jwtPrivateKey",
    { expiresIn: "15m" }
  );

  res.status(200).send({
    status: "ok",
    code: 200,
    token: tkn
  });
});

// export router
module.exports = router;
2.3.2 Creating the messages endpoint
This file is responsible for exposing the endpoints that a user can play with. Each endpoint is protected with authentication and authorization.
The auth keyword represents the authentication mechanism set by the auth.js while the admin or editor or viewer keywords represent the authorization mechanism set by the roles.js.
messages.js
const express = require("express");
const auth = require("../middleware/auth");
const { admin, editor, viewer } = require("../middleware/roles");

// setting up express server router
const router = express.Router();

// mock data
let messages = [
  {
    id: 1,
    name: "Lorem ipsum dolor"
  }
];

// messages routes
// each request must have an x-auth-token request header containing a valid access token

// http get - http://localhost:3005/api/messages
router.get("/", [auth, viewer], (req, res) => {
  res.status(200).send({
    status: "ok",
    code: 200,
    result: messages
  });
});

// http post - http://localhost:3005/api/messages
/*
{
    "name": "Some random name"
}
*/
router.post("/", [auth, editor], async (req, res) => {
  messages.push({ id: messages.length + 1, name: req.body.name });
  res.status(201).send({
    status: "created",
    code: 201
  });
});

// http delete - http://localhost:3005/api/messages?key=1
router.delete("/", [auth, admin], async (req, res) => {
  const idToRemove = req.query.key;
  messages = messages.filter(function (item) {
    return item.id != idToRemove;
  });

  res.status(202).send({
    status: "accepted",
    code: 202
  });
});

// Todo - implement put

// export router
module.exports = router;
2.4 Setting up implementation file
This file describes the main implementation (i.e. the driver code).
index.js
const express = require("express");

// setting up express server
const app = express();
app.use(express.json());

const token = require("./routes/token");
const messages = require("./routes/messages");

// application routes
app.use("/api/token", token);
app.use("/api/messages", messages);

// driver code
const SERVER_PORT = 3005;
app.listen(SERVER_PORT, () => {
  console.log(`Service endpoint = http://localhost:${SERVER_PORT}`);
});
3. Run the Application
To run the application navigate to the project directory and enter the following command as shown below in the terminal.
Run command
$ npm run dev
If everything goes well the application will be started successfully at the service endpoint – http://localhost:3005
4. Application endpoints
The application exposes the below endpoints that you can explore around the application with the help of the postman tool. You can also download the postman collection from the Downloads section and import it into the tool for an easy setup.
Application endpoints
// user authentication
// http post - http://localhost:3005/api/token
/*
{
    "email": "abc@example.com",
    "password": "P@ssword01!"
}
*/

// application endpoints
// each request must have an "x-auth-token" request header containing a valid access token

// http get - http://localhost:3005/api/messages

// http post - http://localhost:3005/api/messages
/*
{
    "name": "Some random name"
}
*/

// http delete - http://localhost:3005/api/messages?key=1
That is all for this tutorial and I hope the article served you with whatever you were looking for. Happy Learning and do not forget to share!
5. Summary
In this tutorial, we saw the implementation of securing the restful apis using the JSON web token (jwt). You can download the source code from the Downloads section.
6. Download the Project
This was a tutorial to secure the restful apis in a nodejs and express application.
You can download the full source code of this example here: Securing Restful APIs with Nodejs and Express
