In this tutorial, we’ll take a look at using sqlite in flutter. SQLite is a SQL engine used in mobile devices and some computers. We can use it to persist data for our app. Persistent storage can be useful for caching network calls while fresh data is loaded and for offline apps.
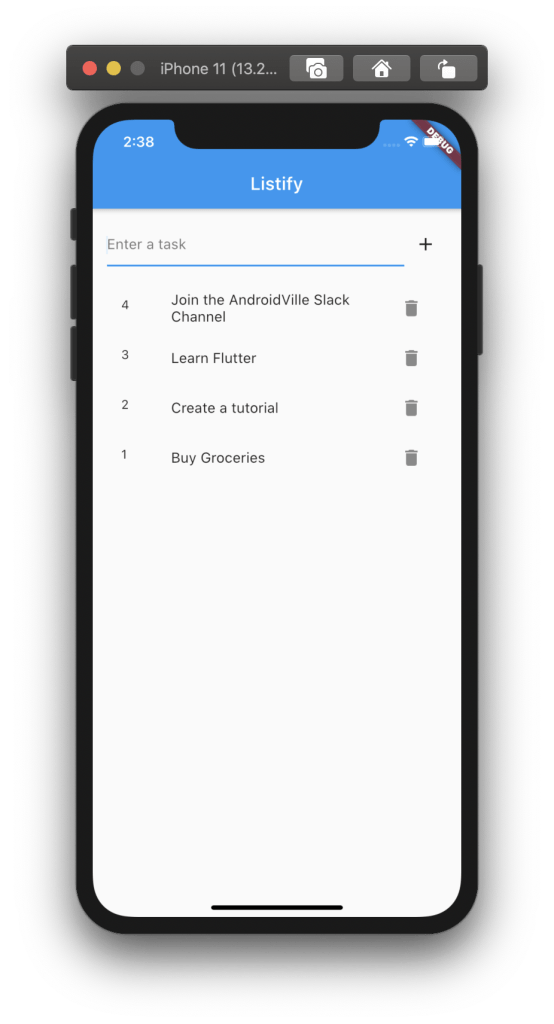
SQLite in flutter can be used to persist data in Android and iOS apps. In this tutorial, we’ll be building a simple app to log data in lists such as a Grocery List. Here is a screenshot of the app.
Note: It will be useful if you’re aware of some basics of flutter. This post would be a good place to start.
Getting Started
Go ahead and create a new project. I’ll name mine flutter_sqlite, you can name it whatever you want.
1 | ➜ ~ flutter create flutter_sqflite |
We’ll remove the default code and comments and just put in a container for now. On running the app you’ll see a blank screen.
01 02 03 04 05 06 07 08 09 10 11 12 13 14 15 16 17 18 19 20 21 22 23 24 25 26 27 28 29 30 31 32 33 34 35 36 37 38 39 40 41 42 | import 'package:flutter/material.dart';void main() { runApp(MyApp());}class MyApp extends StatelessWidget { @override Widget build(BuildContext context) { return MaterialApp( title: 'Flutter Demo', theme: ThemeData( primarySwatch: Colors.blue, visualDensity: VisualDensity.adaptivePlatformDensity, ), home: MyHomePage(title: 'Listify'), ); }}class MyHomePage extends StatefulWidget { MyHomePage({Key key, this.title}) : super(key: key); final String title; @override _MyHomePageState createState() => _MyHomePageState();}class _MyHomePageState extends State<MyHomePage> { @override Widget build(BuildContext context) { return Scaffold( appBar: AppBar( title: Text(widget.title), ), body: Container(), ); }} |
Next up, add the following dependency to your pubspec.yaml file:
01 02 03 04 05 06 07 08 09 10 11 12 13 14 15 16 17 18 19 20 21 22 23 24 | name: flutter_sqflitedescription: A new Flutter project.publish_to: 'none'version: 1.0.0+1environment: sdk: ">=2.7.0 <3.0.0"dependencies: flutter: sdk: flutter sqflite: cupertino_icons: ^0.1.3dev_dependencies: flutter_test: sdk: flutterflutter: uses-material-design: true |
Building the UI
We’ll create a basic text field, a button to save and a list to display our todos. First, let’s go ahead and create our input field. This will be inside of the scaffold body:
01 02 03 04 05 06 07 08 09 10 11 12 13 14 15 16 17 18 19 20 21 22 23 24 25 26 27 28 29 30 31 32 33 34 35 36 37 38 39 40 41 42 43 44 45 46 47 48 49 50 51 52 53 54 55 56 57 58 59 60 | import 'package:flutter/material.dart';void main() { runApp(MyApp());}class MyApp extends StatelessWidget { @override Widget build(BuildContext context) { return MaterialApp( title: 'Flutter Demo', theme: ThemeData( primarySwatch: Colors.blue, visualDensity: VisualDensity.adaptivePlatformDensity, ), home: MyHomePage(title: 'Listify'), ); }}class MyHomePage extends StatefulWidget { MyHomePage({Key key, this.title}) : super(key: key); final String title; @override _MyHomePageState createState() => _MyHomePageState();}class _MyHomePageState extends State<MyHomePage> { @override Widget build(BuildContext context) { return Scaffold( appBar: AppBar( title: Text(widget.title), ), body: Container( alignment: Alignment.topLeft, padding: EdgeInsets.all(16), child: Column( children: <Widget>[ Row( children: <Widget>[ Expanded( child: TextFormField( decoration: InputDecoration(hintText: "Enter a task"), controller: textController, ), ) ], ) ], ), ), ); }} |
Add a TextEditingController as a property of this class which will help us retrieve the data from this field.
1 2 3 4 5 | class _MyHomePageState extends State<MyHomePage> { TextEditingController textController = new TextEditingController();... |
Next up, create a button to save the todo:
01 02 03 04 05 06 07 08 09 10 11 12 13 14 15 16 17 18 19 20 21 22 23 24 25 26 27 28 29 30 31 32 33 34 35 36 37 38 39 40 41 42 43 44 45 46 47 48 49 50 51 52 53 54 55 56 57 58 59 60 61 62 63 | import 'package:flutter/material.dart';void main() { runApp(MyApp());}class MyApp extends StatelessWidget { @override Widget build(BuildContext context) { return MaterialApp( title: 'Flutter Demo', theme: ThemeData( primarySwatch: Colors.blue, visualDensity: VisualDensity.adaptivePlatformDensity, ), home: MyHomePage(title: 'Listify'), ); }}class MyHomePage extends StatefulWidget { MyHomePage({Key key, this.title}) : super(key: key); final String title; @override _MyHomePageState createState() => _MyHomePageState();}class _MyHomePageState extends State<MyHomePage> { TextEditingController textController = new TextEditingController(); @override Widget build(BuildContext context) { return Scaffold( appBar: AppBar( title: Text(widget.title), ), body: Container( alignment: Alignment.topLeft, padding: EdgeInsets.all(16), child: Column( children: <Widget>[ Row( children: <Widget>[ Expanded( child: TextFormField( decoration: InputDecoration(hintText: "Enter a task"), controller: textController, ), ), IconButton( icon: Icon(Icons.add), onPressed: null, ), ], ) ], ), ), ); }} |
We’ll not be adding validation for the sake of simplicity, you can do that in your app. We’ll keep the focus of this article on using sqlite in flutter.
With the input field and button created, let’s add a list to display the items. But for that, we’ll need to create a model of the items. Create a file named todo.dart and add the following class:
01 02 03 04 05 06 07 08 09 10 | class Todo { int id; String title; Todo({this.id, this.title}); Map<String, dynamic> toMap() { return {'id': id, 'title': title}; }} |
Now let’s go ahead and create our list. If you want to know how to create a ListView in Flutter, you can check out this post. We’ll be adding our list in the body of Scaffold.
01 02 03 04 05 06 07 08 09 10 11 12 13 14 15 16 17 18 19 20 21 22 23 24 25 26 27 28 29 30 31 32 33 34 35 36 37 38 39 40 41 42 43 44 45 46 47 48 49 50 51 52 53 54 55 56 57 58 59 | class MyHomePage extends StatefulWidget { MyHomePage({Key key, this.title}) : super(key: key); final String title; @override _MyHomePageState createState() => _MyHomePageState();}class _MyHomePageState extends State<MyHomePage> { TextEditingController textController = new TextEditingController(); List<Todo> taskList = new List(); @override Widget build(BuildContext context) { return Scaffold( appBar: AppBar( title: Text(widget.title), ), body: Container( alignment: Alignment.topLeft, padding: EdgeInsets.all(16), child: Column( children: <Widget>[ Row( children: <Widget>[ Expanded( child: TextFormField( decoration: InputDecoration(hintText: "Enter a task"), controller: textController, ), ), IconButton( icon: Icon(Icons.add), onPressed: null, ) ], ), SizedBox(height: 20), Expanded( child: Container( child: taskList.isEmpty ? Container() : ListView.builder(itemBuilder: (ctx, index) { if (index == taskList.length) return null; return ListTile( title: Text(taskList[index].title), leading: Text(taskList[index].id.toString()), ); }), ), ) ], ), ), ); }} |
We’re using the ListTile which is an excellent widget providing us basic layouts of a list row.
With this done, now it’s time to go ahead and set up sqlite in flutter.
Creating the DatabaseHelper
Create a file named DatabaseHelper.dart, we’ll be creating DatabaseHelper as a singleton using factory constructors. Add the following code to DatabaseHelper.dart
01 02 03 04 05 06 07 08 09 10 11 12 13 14 15 16 17 18 19 20 21 22 23 24 25 26 27 28 29 30 31 32 33 34 35 36 37 38 39 40 | import 'package:path/path.dart';import 'package:sqflite/sqflite.dart';import 'todo.dart';class DatabaseHelper { static final _databaseName = "todo.db"; static final _databaseVersion = 1; static final table = 'todo'; static final columnId = 'id'; static final columnTitle = 'title'; DatabaseHelper._privateConstructor(); static final DatabaseHelper instance = DatabaseHelper._privateConstructor(); static Database _database; Future<Database> get database async { if (_database != null) return _database; _database = await _initDatabase(); return _database; } _initDatabase() async { String path = join(await getDatabasesPath(), _databaseName); return await openDatabase(path, version: _databaseVersion, onCreate: _onCreate); } // SQL code to create the database table Future _onCreate(Database db, int version) async { await db.execute(''' CREATE TABLE $table ( $columnId INTEGER PRIMARY KEY AUTOINCREMENT, $columnTitle FLOAT NOT NULL ) '''); }} |
The static fields are information about our database such as version, table name, db name and column names. DatabaseHelper._privateConstructor() is how we’re using factory constructors in Dart.
Next up, let’s add methods to insert, delete the table, read all data and clear all data from the table.
01 02 03 04 05 06 07 08 09 10 11 12 13 14 15 16 17 18 19 20 21 | Future<int> insert(Todo todo) async { Database db = await instance.database; var res = await db.insert(table, todo.toMap()); return res;}Future<List<Map<String, dynamic>>> queryAllRows() async { Database db = await instance.database; var res = await db.query(table, orderBy: "$columnId DESC"); return res;}Future<int> delete(int id) async { Database db = await instance.database; return await db.delete(table, where: '$columnId = ?', whereArgs: [id]);}Future<void> clearTable() async { Database db = await instance.database; return await db.rawQuery("DELETE FROM $table");} |
Note: For queryAllRows we’re using orderBy: “$columnId DESC” which will sort the rows in descending order of id. By default it’s ascending.
This is the base of setting up SQLite in flutter. Now we’ll see how to add and delete data using this helper class. Some of the code for helper class was referenced from this post. Here’s what the final helper class looks like:
01 02 03 04 05 06 07 08 09 10 11 12 13 14 15 16 17 18 19 20 21 22 23 24 25 26 27 28 29 30 31 32 33 34 35 36 37 38 39 40 41 42 43 44 45 46 47 48 49 50 51 52 53 54 55 56 57 58 59 60 61 | import 'package:path/path.dart';import 'package:sqflite/sqflite.dart';import 'todo.dart';class DatabaseHelper { static final _databaseName = "todo.db"; static final _databaseVersion = 1; static final table = 'todo'; static final columnId = 'id'; static final columnTitle = 'title'; DatabaseHelper._privateConstructor(); static final DatabaseHelper instance = DatabaseHelper._privateConstructor(); static Database _database; Future<Database> get database async { if (_database != null) return _database; _database = await _initDatabase(); return _database; } _initDatabase() async { String path = join(await getDatabasesPath(), _databaseName); return await openDatabase(path, version: _databaseVersion, onCreate: _onCreate); } // SQL code to create the database table Future _onCreate(Database db, int version) async { await db.execute(''' CREATE TABLE $table ( $columnId INTEGER PRIMARY KEY AUTOINCREMENT, $columnTitle FLOAT NOT NULL ) '''); } Future<int> insert(Todo todo) async { Database db = await instance.database; var res = await db.insert(table, todo.toMap()); return res; } Future<List<Map<String, dynamic>>> queryAllRows() async { Database db = await instance.database; var res = await db.query(table, orderBy: "$columnId DESC"); return res; } Future<int> delete(int id) async { Database db = await instance.database; return await db.delete(table, where: '$columnId = ?', whereArgs: [id]); } Future<void> clearTable() async { Database db = await instance.database; return await db.rawQuery("DELETE FROM $table"); }} |
I’ve added the clearTable method as an extra in case you want to try it out to clear the table.
Reading from SQLite in Flutter
We want to initialise our list with data whenever the app restarts. For this, we’ll use the queryAllRows method in initState() lifecycle callback.
Override the initState() method in _MyHomePageState class and add the following code.
01 02 03 04 05 06 07 08 09 10 11 12 13 14 | @overridevoid initState() { super.initState(); DatabaseHelper.instance.queryAllRows().then((value) { setState(() { value.forEach((element) { taskList.add(Todo(id: element['id'], title: element["title"])); }); }); }).catchError((error) { print(error); });} |
When the app starts, initState will get called and we’ll read the data from our database. SetState will update the UI when the data is available and our ListView will take care of the rest.
Inserting Data in SQLite in Flutter
To add the task entered to our database, we’ll create a method _addToDb in main.dart file. This will be invoked on ‘+’ button click:
1 2 3 4 5 6 7 | void _addToDb() async { String task = textController.text; var id = await DatabaseHelper.instance.insert(Todo(title: task)); setState(() { taskList.insert(0, Todo(id: id, title: task)); });} |
First, we’ll get the text from the field, then add it to db and finally update our view.
Note: Since we’ve marked id as AUTO INCREMENT in our Database we don’t need to set the id of our Todo Object while inserting. Insert method will provide us the id of the object inserted. We can use that to update the UI.
Deleting a Row
Now, the only thing left to do is to be able to delete a record in the database. Add an icon to our ListTile row using trailing argument:
1 2 3 4 5 6 7 8 | return ListTile( title: Text(taskList[index].title), leading: Text(taskList[index].id.toString()), trailing: IconButton( icon: Icon(Icons.delete), onPressed: () => _deleteTask(taskList[index].id), ),); |
For it’s onPressed we’ll create a method _deleteTask which will delete the todo using the id. Finally we’ll update the UI just like before:
1 2 3 4 5 6 | void _deleteTask(int id) async { await DatabaseHelper.instance.delete(id); setState(() { taskList.removeWhere((element) => element.id == id); });} |
And with that we’re done. Here’s how your final main.dart file would look like:
001 002 003 004 005 006 007 008 009 010 011 012 013 014 015 016 017 018 019 020 021 022 023 024 025 026 027 028 029 030 031 032 033 034 035 036 037 038 039 040 041 042 043 044 045 046 047 048 049 050 051 052 053 054 055 056 057 058 059 060 061 062 063 064 065 066 067 068 069 070 071 072 073 074 075 076 077 078 079 080 081 082 083 084 085 086 087 088 089 090 091 092 093 094 095 096 097 098 099 100 101 102 103 104 105 106 107 108 109 110 111 112 113 114 115 | import 'package:flutter/material.dart';import 'package:flutter_sqflite/database_helper.dart';import 'package:flutter_sqflite/todo.dart';void main() { runApp(MyApp());}class MyApp extends StatelessWidget { @override Widget build(BuildContext context) { return MaterialApp( title: 'Flutter Demo', theme: ThemeData( primarySwatch: Colors.blue, visualDensity: VisualDensity.adaptivePlatformDensity, ), home: MyHomePage(title: 'Listify'), ); }}class MyHomePage extends StatefulWidget { MyHomePage({Key key, this.title}) : super(key: key); final String title; @override _MyHomePageState createState() => _MyHomePageState();}class _MyHomePageState extends State<MyHomePage> { TextEditingController textController = new TextEditingController(); List<Todo> taskList = new List(); @override void initState() { super.initState(); DatabaseHelper.instance.queryAllRows().then((value) { setState(() { value.forEach((element) { taskList.add(Todo(id: element['id'], title: element["title"])); }); }); }).catchError((error) { print(error); }); } @override Widget build(BuildContext context) { return Scaffold( appBar: AppBar( title: Text(widget.title), ), body: Container( alignment: Alignment.topLeft, padding: EdgeInsets.all(16), child: Column( children: <Widget>[ Row( children: <Widget>[ Expanded( child: TextFormField( decoration: InputDecoration(hintText: "Enter a task"), controller: textController, ), ), IconButton( icon: Icon(Icons.add), onPressed: _addToDb, ) ], ), SizedBox(height: 20), Expanded( child: Container( child: taskList.isEmpty ? Container() : ListView.builder(itemBuilder: (ctx, index) { if (index == taskList.length) return null; return ListTile( title: Text(taskList[index].title), leading: Text(taskList[index].id.toString()), trailing: IconButton( icon: Icon(Icons.delete), onPressed: () => _deleteTask(taskList[index].id), ), ); }), ), ) ], ), ), ); } void _deleteTask(int id) async { await DatabaseHelper.instance.delete(id); setState(() { taskList.removeWhere((element) => element.id == id); }); } void _addToDb() async { String task = textController.text; var id = await DatabaseHelper.instance.insert(Todo(title: task)); setState(() { taskList.insert(0, Todo(id: id, title: task)); }); }} |
One thing to note here is that the UI re-builds entirely when we add/delete an item. This can be further optimised with the use of Provider pattern in flutter, which I’ve already discussed before. Make sure to check it out.
Conclusion
In this tutorial, we saw how SQLite works in flutter. We added the ability to add, remove the tasks from a list and update the list simultaneously.
Published on Java Code Geeks with permission by Ayusch Jain, partner at our JCG program. See the original article here: Using SQLite in Flutter – Tutorial Opinions expressed by Java Code Geeks contributors are their own. |

In today’s date there are hardly any applications that have not been built using a framework or a library. They make development so much easier.
Thank you so much for the detailed article. Helps a lot to fix my application problem.
This blog helped me a lot to build an mobile app. I have build an grocery app which is useful for people near our community. Thank you for this detailed informative blog.
great article!
Very nice! Detailed explanation easy to read and understand. Thanks for sharing this with us.
Very informative article.