In this tutorial, we’ll explore another popular behavioral design pattern – the State Design Pattern.
The knowledge of state design pattern comes handy when we’re working with an object which can exist in multiple states. We should use it primarily when the behavior of an object depends on its current state. This pattern helps us avoid long conditional checks of the object’s state within methods of that class.
With it, let’s get started!
State Design Pattern:
We can represent the state design pattern with the following UML diagram:
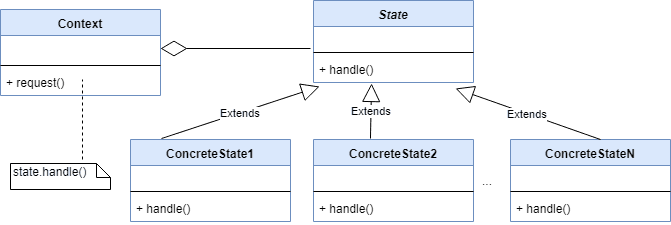
Where,
- State – represents an abstract class or an interface for declaring the minimum expected functionality for each concrete state object
- ConcreteState – these are the implementation classes for the State
- Context – This is the class we expose to the world and is usually responsible for maintaining the current state instance. It also delegates the responsibility to the concrete state classes to perform a task
Implementation Example:
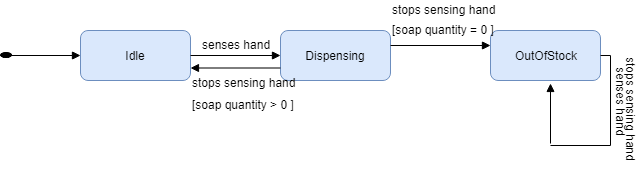
Let’s say we have an automatic soap dispenser. It ideally can exist in these states – Ideal, Dispensing, or OutOfStock. Let’s visualize it with the help of a state diagram:
Defining State Classes:
We first start by defining our DispenserState interface:
1 2 3 4 5 | public DispenserState { void sensesHand(AutoDispenser autoDispenser); void stopsSensingHand(AutoDispenser autoDispenser);} |
Each of our state classes must implement the DispenserState and define the behavior for that state. Our IdleState class would look like:
01 02 03 04 05 06 07 08 09 10 11 12 | public class IdleState implements DispenserState { public void sensesHand(AutoDispenser autoDispenser) { System.out.println("Hand sensed"); autoDispenser.startDispensing(); autoDispenser.setDispenserState(autoDispenser.getDispensingState()); } public void stopsSensingHand(AutoDispenser autoDispenser) { System.out.println("Sensor inactive already!"); }} |
Similarly, we can define our other two classes representing state:
01 02 03 04 05 06 07 08 09 10 11 12 13 14 15 16 17 18 19 20 21 22 23 24 25 26 27 | public class DispensingState implements DispenserState { public void sensesHand(AutoDispenser autoDispenser) { System.out.println("Already dispensing"); } public void stopsSensingHand(AutoDispenser autoDispenser) { System.out.println("Stopped sensing"); autoDispenser.stopDispensing(); if(autoDispenser.getQuantity() > 1) { autoDispenser.setDispenserState(autoDispenser.getIdleState()); } else { autoDispenser.setDispenserState(autoDispenser.getOutOfStockState()); } }} public class OutOfStockState implements DispenserState { public void sensesHand(AutoDispenser autoDispenser) { System.out.println("nothing to dispense"); } public void stopsSensingHand(AutoDispenser soapDispenser) { System.out.println("dispenser is already inactive"); }} |
Defining the Context:
Finally, let’s define our context class – the AutoDispenser, which will interact with the client code:
01 02 03 04 05 06 07 08 09 10 11 12 13 14 15 16 17 18 19 20 21 22 23 24 25 26 27 28 29 30 31 32 33 34 35 36 37 | public class AutoDispenser { private IdleState idleState; private DispensingState dispensingState; private OutOfStockState outOfStockState; private DispenserState currentDispenserState; public AutoDispenser() { this.idleState = new IdleState(); this.dispensingState = new DispensingState(); this.outOfStockState = new OutOfStockState(); if(getQuantity() > 0) { this.currentDispenserState = idleState; } else { this.currentDispenserState = outOfStockState; } } public int getQuantity() { //returns current soap quantity ... } public void startDispensing() { ... } public void stopDispensing() { ... } public void sensesHand() { this.currentDispenserState.sensesHand(this); } public void stopsSensingHand() { this.currentDispenserState.stopsSensingHand(this); } } |
Here, we maintain the current state of our auto-dispenser and invoke the method in the concrete state class to achieve the operation.
Why the State Pattern?
Apart from helping us avoid long conditionals, it also provides other benefits:
- Adding a new state is very easy and straightforward as we just need to define another concrete state class
- Similarly, removing a state will only require to delete the associated class
- Makes code easier to read and follow along
- Is a great demonstration of the Single-Responsibility Principle
Conclusion:
As a programmer, it’s really important for us to choose the right design pattern for solving any design problem.
In this quick tutorial, we explored the State Design Pattern. We learned how and when to implement it.
Published on Java Code Geeks with permission by Shubhra Srivastava, partner at our JCG program. See the original article here: State Design Pattern In Java Opinions expressed by Java Code Geeks contributors are their own. |
