In this article we are going to explore building a simple native Android application that utilizes the Chatter REST API within the Salesforce Platform. To accomplish this, we will use the Salesforce Mobile SDK 2.1, which acts as a wrapper for low-level HTTP functions, allowing us to easily handle OAuth and subsequent REST API calls. The TemplateApp provided in the SDK as a base is really going to be your cleanest starting point. My tutorial essentially uses the structure of the TemplateApp and build upon it by borrowing and modifying from the REST Explorer sample application; this helps to ensure things are as straightforward as possible. We aren’t going to touch on every aspect of building this application, but instead cover the salient points, giving the reader a good starting point and trying to expand on the salesforce.com documentation. This tutorial attempts to serve as a bit of a shim for developers are not overly familiar with the platform to use the API in a way that is presumably more familiar. A lot of what we’ll cover will complement the Salesforce Mobile SDK Developer Guide; throughout this tutorial I will reference the relevant page numbers from that document instead of reproducing that information here in its entirety.
Getting Set Up
I’m using IntelliJ IDEA for this tutorial, this is the IDE that Android Studio is based on. If you’re already using Android Studio, there will be no appreciable difference in workflow as we proceed; Eclipse users are good to go. Once you have your IDE setup we can go about installing the Salesforce Mobile SDK 2.1 (see link in paragraph above). Salesforce.com recommends a Node.js based installation using the node package manager. We will go an alternate route; instead we are going to clone the repo from Github [Page 16].
Once you have your basic environment setup, go to https://developer.salesforce.com/signup, and sign up for your Developer Edition (DE) account. For the purposes of this example, I recommend sign up for a Developer Edition even if you already have an account. This ensures you get a clean environment with the latest features enabled. Then, navigate to http://login.salesforce.com to log into your developer account.
After you’ve completed your registration, follow the instructions in the Mobile SDK Guide for creating a Connected App [Page 13]. For the purposes of this tutorial you only need to fill out the required fields.
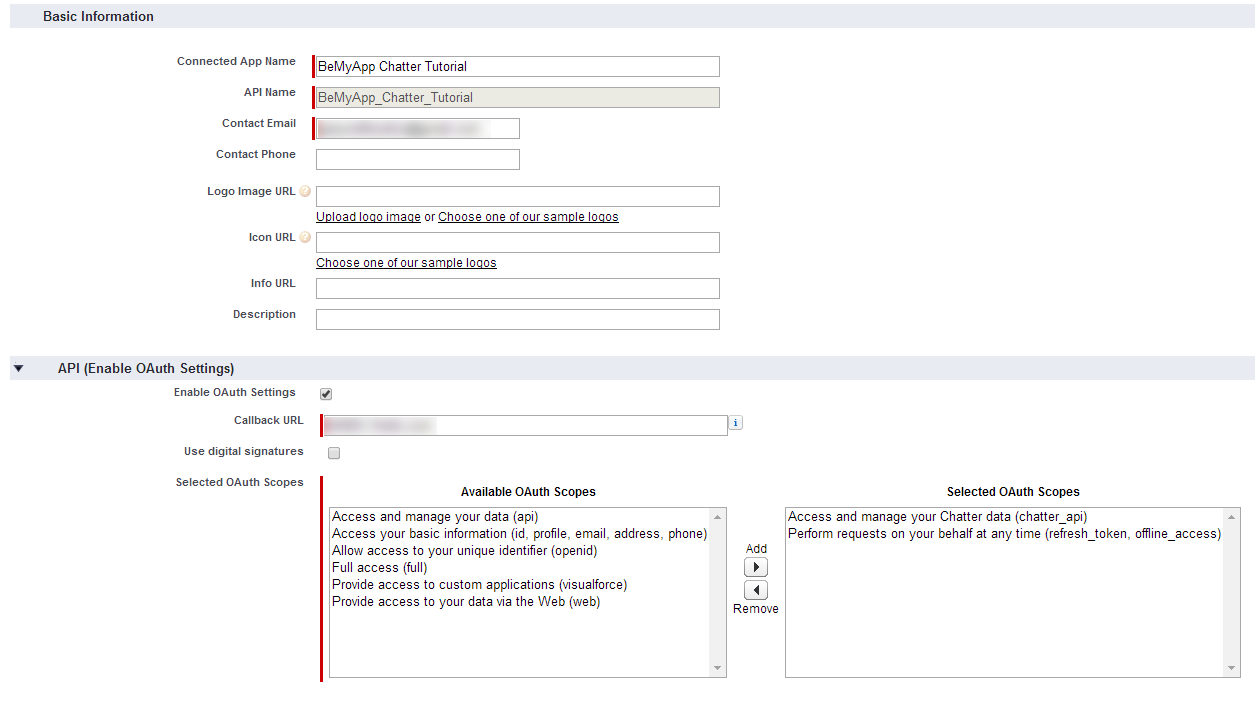
The Callback URL provided for OAuth does not have to be a valid URL; it only has to match what the app expects in this field. You can use any custom prefix, such as sfdc://.
Important: For a native app you MUST put “Perform requests on your behalf at any time (refresh_token)” in your selected OAuth scopes or the server will reject you, and nobody likes rejection. The Mobile SDK Guide kind of glosses over this point, for more details see: [ http://github.com/forcedotcom/SalesforceMobileSDK-iOS/issues/211#issuecomment-23953366 ]
When you’re done, you should be shown a page that contains your Consumer Key and Secret among other things.

Now that we’ve taken care of things on the server side, let’s shift our focus over to setting up our phone app.
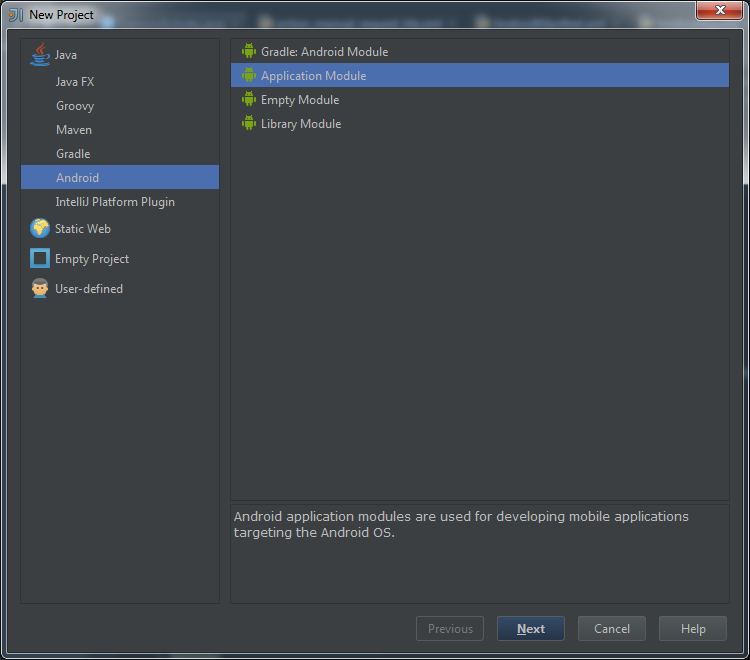
First, we’re going to start a new Project in IntelliJ; make sure you choose Application Module and not Gradle: Android Application Module,as the way the project will be structured doesn’t play nice with the Gradle build system.
Name it whatever you want, be sure to uncheck the box that says Create “Hello World!” Activity, as we won’t be needing that. Now that you’ve created your project, go to File -> Import Module…
Navigate to the directory where you cloned the Mobile SDK repo, expand the native directory and you should see a project named “SalesforceSDK” with an IntelliJ logo next to it.
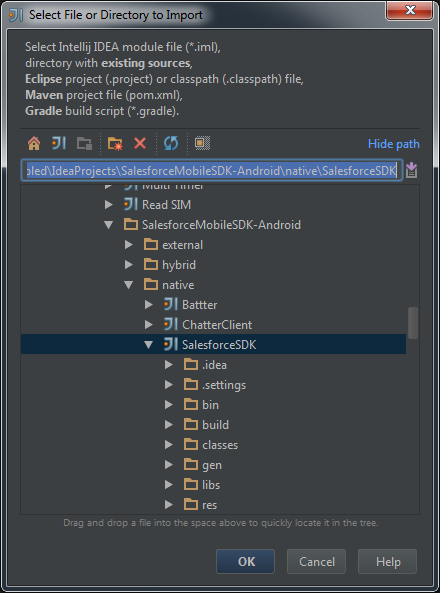
Select it and hit ok. On the next screen, make sure the option to import from external model is selected, and that the Eclipse list item is highlighted. Click next, and then click next again on the following screen without making any changes. When you reach the final screen, Check the box next to SalesforceSDK and then click finish. IntelliJ will now import the Eclipse project (Salesforce SDK) in your project as a module.
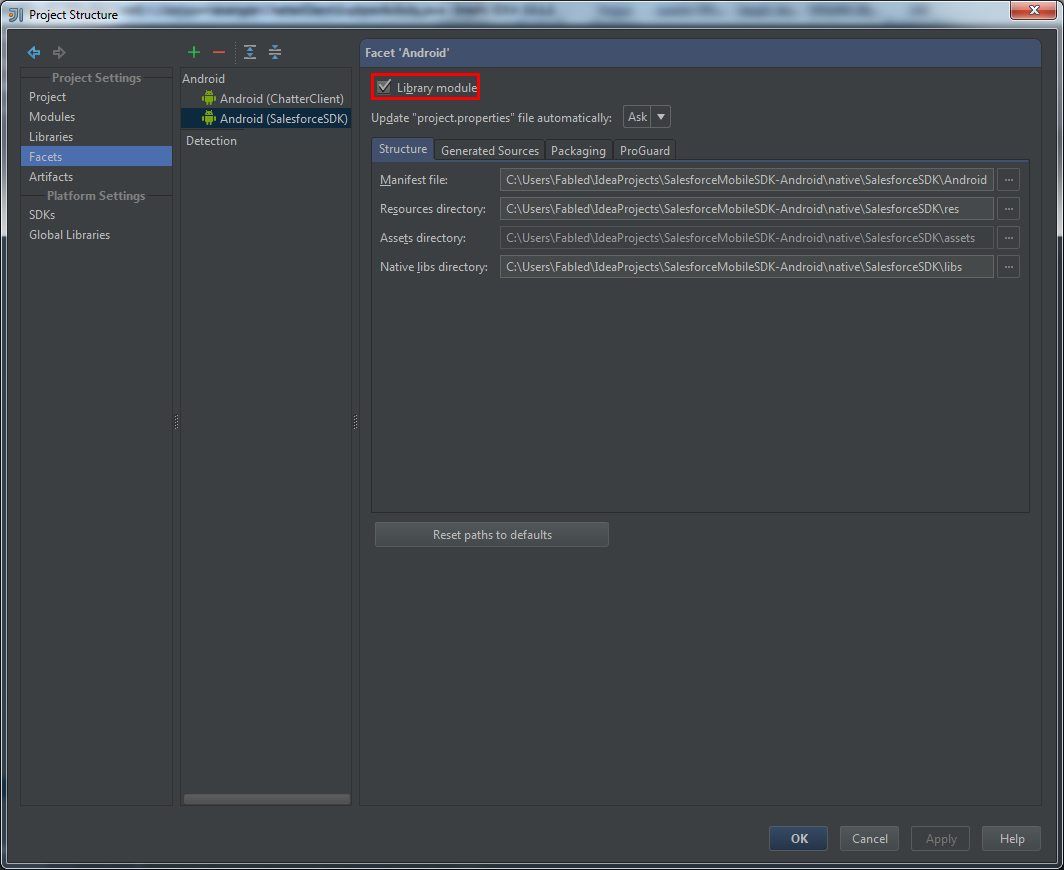
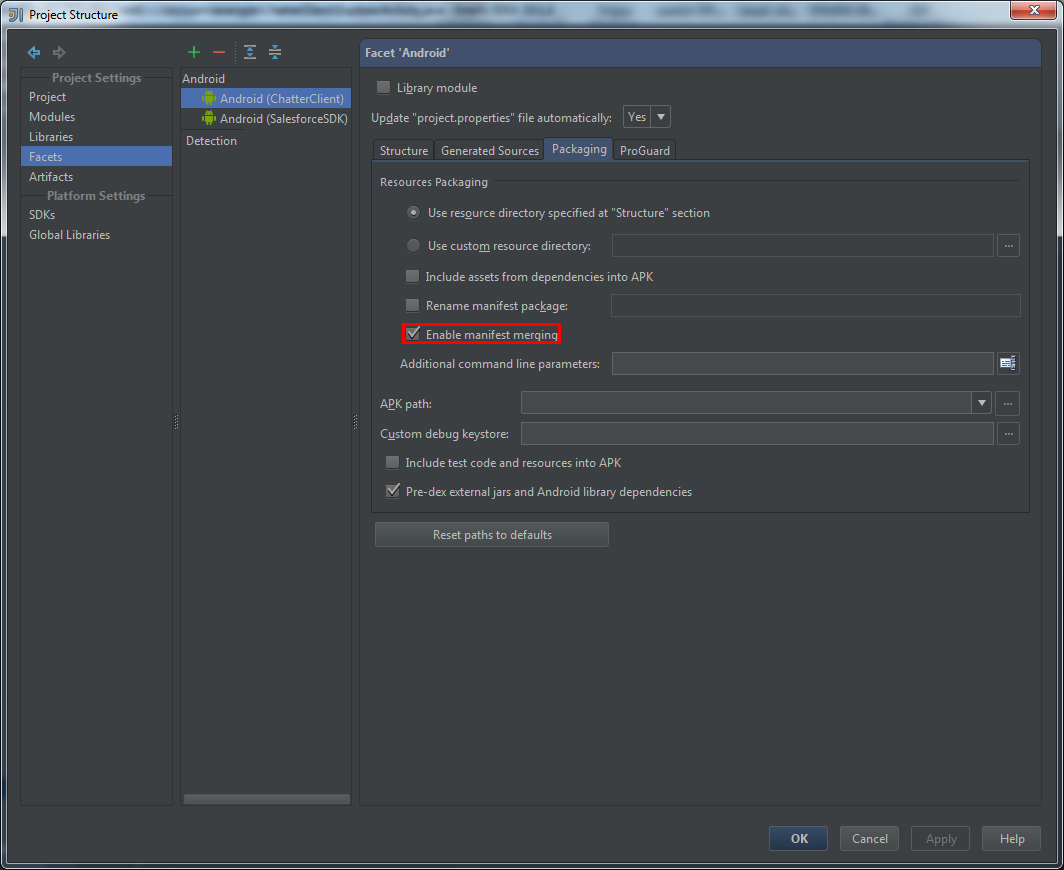
The Salesforce Mobile SDK is now yours to command….almost; go to File -> Project Structure… Select ‘Facets’ under ‘Project Settings’, now choose the one that has Salesforce SDK in parenthesis; make sure Library module box is checked [IMG]. Now, select the other, then select the Packaging tab, and make sure the Enable manifest merging box is checked.
Next, select ‘Modules’ from the ‘Project Settings‘ list, then select the SalesforceSDK module. Under the dependencies tab there should be an item with red text; right-click on it and remove it. From there, click on <your module name>; under the dependencies tab click the green ‘+’, select ‘Module Dependency…’, Salesforce SDK should be your only option, click ‘Ok’. Now select ‘Apply’ in the Project Structure window and then click ‘Ok’.
Making the calls
Create a file named bootconfig.xml in res/values/; the content of that file should be as follows:
<?xml version="1.0" encoding="utf-8"?>

<resources>
    <string name="remoteAccessConsumerKey"> YOUR CONSUMER KEY </string>
    <string name="oauthRedirectURI"> YOUR REDIRECT URI </string>
    <string-array name="oauthScopes">
        <item>chatter_api</item>
    </string-array>
    <string name="androidPushNotificationClientId"></string>
</resources>
Remember the connected app we created earlier? That’s where you will find the consumer key and redirect (callback) uri.
For the curious, despite the fact that we specified refresh_token in our OAuth Scopes server-side, we don’t need to define it here. The reasoning behind this is that this scope is always required to access the platform from a native app, so the Mobile SDK includes it automatically.
Next, make sure your String.xml file look something like this:
<?xml version="1.0" encoding="utf-8"?>
<resources>
    <string name="account_type">com.salesforce.samples.templateapp.login</string>
	<string name="app_name"><b>Template</b></string>
	<string name="app_package">com.salesforce.samples.templateapp</string>
    	<string name="api_version">v30.0</string>
</resources>
The above values should be unique to your app.
Now create another class named KeyImpl.
public class KeyImpl implements KeyInterface {

    @Override
    public String getKey(String name) {
        return Encryptor.hash(name + "12s9adpahk;n12-97sdainkasd=012", name + "12kl0dsakj4-cxh1qewkjasdol8");
    }
}
Once you have done this, create an arbitrary activity with a corresponding layout that extends SalesforceActivity, and populate it as follows:
public class TutorialApp extends Application {

    @Override
    public void onCreate() {
        super.onCreate();
        SalesforceSDKManager.initNative(getApplicationContext(), new KeyImpl(), TutorialActivity.class);

		/*
		 * Un-comment the line below to enable push notifications in this app.
		 * Replace 'pnInterface' with your implementation of 'PushNotificationInterface'.
		 * Add your Google package ID in 'bootonfig.xml', as the value
		 * for the key 'androidPushNotificationClientId'.
		 */
        // SalesforceSDKManager.getInstance().setPushNotificationReceiver(pnInterface);
    }
}
This is our application entry point where we initialize the SalesforceSDKManager.
From the Salesforce Mobile SDK Developer Guide:
“The top-level SalesforceSDKManager class implements passcode functionality for apps that use passcodes, and fills in the blanks for those that don’t. It also sets the stage for login, cleans up after logout, and provides a special event watcher that informs your app when a system-level account is deleted. OAuth protocols are handled automatically with internal classes.”
For this tutorial, our corresponding layout is as follows:
<?xml version="1.0" encoding="utf-8"?>
<LinearLayout xmlns:android="http://schemas.android.com/apk/res/android"
              android:orientation="vertical" android:layout_width="match_parent"
              android:layout_height="match_parent" android:background="#454545"
              android:id="@+id/root">

<TextView
        android:layout_width="match_parent"
        android:layout_height="wrap_content"
        android:textAppearance="?android:attr/textAppearanceLarge"
        android:text="Large Text"
        android:id="@+id/data_display"/>

    <Button
        android:layout_width="match_parent"
        android:layout_height="wrap_content"
        android:text="Fetch Data"
        android:id="@+id/button"
        android:layout_gravity="bottom"
        android:onClick="onFetchClick"/>
</LinearLayout>
As you can see above, for the purposes of this tutorial, we’re keeping things really simple. A button to make the call and a text box to display it.
Before we get into implementation details, I want to mention a critical point about the manifest file.
Since we have new application entry point, in our case TutorialApp, we need to let the system know by defining this in the manifest.
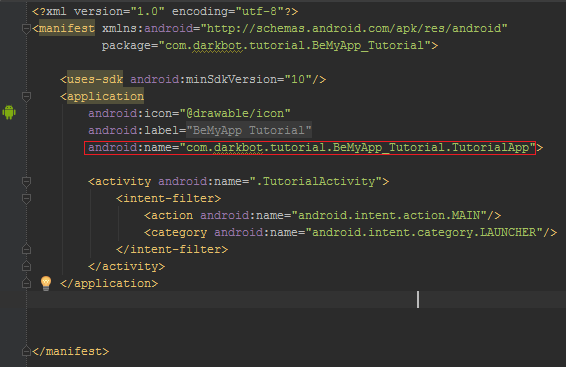
If you miss this step, your application will crash with a runtime error complaining that you haven’t made the appropriate call to SalesforceSDKManager.init()
Once this is complete, your application should run without a problem
Now, we’re going to write the functions to make the actual request. The following methods will go in the activity created above.
private void sendRequest(RestRequest restRequest) {
        client.sendAsync(restRequest, new RestClient.AsyncRequestCallback() {

            @Override
            public void onSuccess(RestRequest request, RestResponse result) {
                try {

                    //Do something with JSON result.
                    println(result);  //Use our helper function, to print our JSON response.

                } catch (Exception e) {
                    e.printStackTrace();
                }

                EventsObservable.get().notifyEvent(EventsObservable.EventType.RenditionComplete);
            }

            @Override
            public void onError(Exception e) {
                e.printStackTrace();
                EventsObservable.get().notifyEvent(EventsObservable.EventType.RenditionComplete);
            }
        });
    }
The code above will execute a RestRequest object we pass to it and return the results asynchronously.
Let’s construct a RestRequest object for the client to execute:
First, we need a couple of helper methods to help construct our HttpEntities
private Map<String, Object> parseFieldMap(String jsonText) {
        String fieldsString = jsonText;
        if (fieldsString.length() == 0) {
            return null;
        }

        try {
            JSONObject fieldsJson = new JSONObject(fieldsString);
            Map<String, Object> fields = new HashMap<String, Object>();
            JSONArray names = fieldsJson.names();
            for (int i = 0; i < names.length(); i++) {
                String name = (String) names.get(i);
                fields.put(name, fieldsJson.get(name));
            }
            return fields;

        } catch (Exception e) {
            Log.e("ERROR", "Could not build request");
            e.printStackTrace();
            return null;
        }
    }


    private HttpEntity getParamsEntity(String requestParamsText)
            throws UnsupportedEncodingException {
        Map<String, Object> params = parseFieldMap(requestParamsText);
        if (params == null) {
            params = new HashMap<String, Object>();
        }
        List<NameValuePair> paramsList = new ArrayList<NameValuePair>();
        for (Map.Entry<String, Object> param : params.entrySet()) {
            paramsList.add(new BasicNameValuePair(param.getKey(),
                    (String) param.getValue()));
        }
        return new UrlEncodedFormEntity(paramsList);
    }
Next, we define the method that will generate our desired RestRequest object.
private RestRequest generateRequest(String httpMethod, String resource, String jsonPayloadString) {
        RestRequest request = null;

        if (jsonPayloadString == null) {
            jsonPayloadString = "";
        }
        String url = String.format("/services/data/%s/" + resource, getString(R.string.api_version)); // The IDE might highlight this line as having an error. This is a bug, the code will compile just fine.
        try {
            HttpEntity paramsEntity = getParamsEntity(jsonPayloadString);
            RestRequest.RestMethod method = RestRequest.RestMethod.valueOf(httpMethod.toUpperCase());
            request = new RestRequest(method, url, paramsEntity);
            return request;
        } catch (UnsupportedEncodingException e) {
            Log.e("ERROR", "Could not build request");
            e.printStackTrace();
        }
        return request;
    }
Lastly, the helper method that prints our result. This isn’t strictly necessary, but is included here for
/**
 * Helper method to print object in the result_text field
 *
 * @param object
 */

    private void println(Object object) {
        if (resultText == null)
            return;

        StringBuffer sb = new StringBuffer(resultText.getText());
        String text;
        if (object == null) {
            text = "null";
        } else {
            text = object.toString();
        }
        sb.append(text).append("\n");
        resultText.setText(sb);
    }
Usage:
Remember that button we created earlier in our layout? Now we’re going to give it some life.
public void onFetchClick(View view) {
        RestRequest feedRequest = generateRequest("GET", "chatter/feeds/news/me/feed-items", null);
        sendRequest(feedRequest);
    }
Now, run your app and if all goes well you will be asked to put in your Salesforce credentials. You will then be asked to authorize the app you just created; click allow and you will then see your app.
When you press the button it should dump all of the JSON data from our request into our textfield. It’s not pretty, but it gets the job done and illustrates the concepts.
Now you can take this data, bind it to a ListView or use it to make other requests such as a ‘like’ or ‘comment’.
Here’s a fully working sample app for reference:
Note:
I’d recommend using a library for parsing JSON such as Gson or Jackson. We didn’t do that here for the sake of understanding and continuity, as its closer to everything you will see in the Salesforce documentation and examples.
Resources
Refer to these documents to see much of what you can do.
- Salesforce Developer Platform – Mobile Resources
- Chatter REST API Cheat Sheet (pdf)
- Chatter REST API documentation
Have fun!

Hi,
I’ve managed to make your code working, but I wanna modify it according to our business process. I have been working on this for days now but I’m still nowhere near completion. Here’s the problem: once I run the app, it should not redirect to salesforce login page yet. It should go first to an Acitivity where I put a button. Once clicked, then that’s the time it should proceed to the login page. I can’t seem to get this part working. Hope you can help.
Thanks.
Hi Ayinde,
Thank you for presenting good article
Is there any way we can bring this login page after the splash screen is loaded ?
I mean, according to my logic, once my application splash screen is loaded, need to load the login page and again in successful login, navigating back to my home screen
Is it possible ?
Thanks in advance