Gradle is a build tool which replaces XML based build scripts with an internal DSL which is based on Groovy programming language.
It has gained a lot of traction recently and that is why I decided to take a closer look at it.
This blog post is the first part of my Gradle tutorial, and it has two goals:
- to help us install Gradle
- to describe some of its basic concepts which helps us understand the future parts of this tutorial.
Let’s start by finding out how we can install Gradle.
Installing Gradle
If we are using Windows or Linux, we can install Gradle by following these steps:
- Download the binaries from the downloads page.
- Unpack the zip file and add the GRADLE_HOME/bin directory to the PATH environment variable.
If you run into problems during the installation, check out the official installation guide.
If we are using OS X, we can install Gradle by using Homebrew. We can do this by running the following command at command prompt:
brew install gradle
We can verify that Gradle is working properly by running the command gradle -v at command prompt. If Gradle is working properly, we should see the following output (Windows and Linux users will naturally see a bit different output):
> gradle -v

------------------------------------------------------------

Gradle 1.12

------------------------------------------------------------

Build time:   2014-04-29 09:24:31 UTC

Build number: none

Revision:     a831fa866d46cbee94e61a09af15f9dd95987421

Groovy:       1.8.6

Ant:          Apache Ant(TM) version 1.9.3 compiled on December 23 2013

Ivy:          2.2.0

JVM:          1.8.0 (Oracle Corporation 25.0-b70)

OS:           Mac OS X 10.9.3 x86_64
Let’s take a quick look at the basic concepts of a Gradle build.
A Short Introduction to Gradle Build
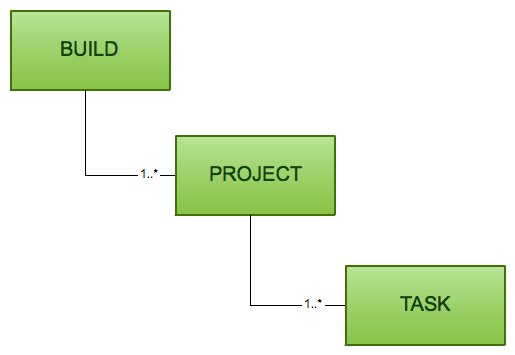
Gradle has two basic concepts: projects and tasks. These concepts are explained in the following:
- A project is either something we build (e.g. a jar file) or do (deploy our application to production environment). A project consists of one or more tasks.
- A task is an atomic unit work which is performed our build (e.g. compiling our project or running tests).
So, how are these concepts related to a Gradle build? Well, every Gradle build contains one or more projects.
The relationships between these concepts are illustrated in the following figure:
We can configure our Gradle build by using the following configuration files:
- The Gradle build script (build.gradle) specifies a project and its tasks.
- The Gradle properties file (gradle.properties) is used to configure the properties of the build.
- The Gradle Settings file (gradle.settings) is optional in a build which has only one project. If our Gradle build has more than one projects, it is mandatory because it describes which projects participate to our build. Every multi-project build must have a settings file in the root project of the project hierarchy.
You can get more information about Gradle build scripts by reading the Chapter 6. Build Scripts Basics of the Gradle User Guide.
Let’s move on and find out how we can add functionality to a Gradle build by using Gradle plugins.
Even Shorter Introduction to Gradle Plugins
The design philosophy of Gradle is that all useful features are provided by Gradle plugins. A Gradle plugin can:
- Add new tasks to the project.
- Provide a default configuration for the added tasks. The default configuration adds new conventions to the project (e.g. the location of source code files).
- Add new properties which are used to override the default configuration of the plugin.
- Add new dependencies to the project.
The User’s Manual of Gradle provides a list of standard Gradle plugins.
We can apply a Gradle plugin (this term is used when we add a plugin to a project) by using either its name or type.
We can apply a plugin by name (the name of the plugin is foo) by adding the following line to the build.gradle file:
apply plugin: 'foo'
On the other hand, if we want to apply a plugin by type (the type of the plugin is com.bar.foo), we must add the following line to the build.gradle file:
apply plugin: 'com.bar.foo'
You can get more information about applying plugins by reading the section 21.1 Applying Plugins of the Gradle User Guide.
That’s all for today. Let’s summarize what we learned from this blog post.
Summary
This blog post has taught us three things:
- We learned how we can install Gradle.
- We understood the basic building blocks of a Gradle build.
- We know how we can add functionality to our build by using Gradle plugins.
The next part of this tutorial describes how we can create a simple Java project by using Gradle.
| Reference: | Getting Started with Gradle: Introduction from our JCG partner Petri Kainulainen at the Petri Kainulainen blog. |
