Have you ever worked with Rails’ migrations? They make database changes a breeze, don’t they? While every software release doesn’t necessarily involve a migration, when one does happen to make use of one, I’m always pleased on how easily things work out. Whether it’s to add new data or alter existing data structures, Rails migrations make evolving a datastore (be it an RDMBS or NoSQL one like MongoDB) painless.
When I recently found myself altering the data structure of a SQLite database for one of my Android apps, I found myself wishing there was some similar migration mechanism for Android as there is in Rails. Alas, I could fine none, so I did what any other developer would do: I wrote one.
Droid Migrate is a simple command line framework that generates and runs database migrations for your Android apps that use SQLite. A migration is encapsulated by a DBVersion class that contains an up and down method. The up method is called for an upgrade and down for a rollback. What those methods do is entirely up to you.
In addition, Droid Migrate generates a DatabaseHelper class through which you obtain underlying connections to a SQLite instance – this is the canonical way to interact with SQLite in an Android app anyway, but with Droid Migrate, you get a specially enhanced DatabaseHelper that determines which version of a target database instance is the most current and runs the appropriate migrations to bring the database to that version.
Thus, with your newly minted DatabaseHelper class, you can still interact with your app’s database like you would normally, however, by using this class, all migrations are handled for you. Allow me to demonstrate.
I’ve created a simple app that doesn’t interact with any database at this point – it simply creates a ListView that is intended to hold a list of records for viewing. You can find this app on Github if you’d like to follow along. Nevertheless, the app’s main Activity is shown below.
Simple Android app w/o any SQLite logic
package com.b50.db.ex;

import android.app.Activity;
import android.os.Bundle;
import android.widget.TextView;

public class MainActivity extends Activity {

  protected void onCreate(Bundle savedInstanceState) {
    super.onCreate(savedInstanceState);
    setContentView(R.layout.activity_main);
    TextView textView = (TextView) findViewById(R.id.textView1);
    textView.setText("This would be a list from a DB if there was a DB");
  }
}
What I’d like to do is add the ability to interact with a SQLite database; plus, I’d like to be able to evolve the data model on subsequent releases. This is where Droid Migrate shines.
After I’ve installed Droid Migrate (simply clone or download the code, build it, and put it into your PATH and create new environment variable dubbed DROID_MIGRATE_HOME), I can initialize my app to use Droid Migrate by opening up a terminal in the root of my app and typing:
Initializing Droid Migrate
$> droid-migrate init -d a_catalog
The -d flag specifies the name of my desired database. I can optionally provide a package name via the -p flag if I’d like my newly generated classes in a separate package from my main app.
If you take a look at your app’s code, you should notice a number of new things. First, you’ll see two new classes and a new jar file. The classes are the aforementioned DatabaseHelper and a class dubbed DBVersion1. The newly added jar file in your app’s libs folder contains a few classes that correspond to Droid Migrate’s runtime dependencies – this jar is extremely compact at 4KB.
The DatabaseHelper class is brutally simple:
DatabaseHelper couldn’t be any easier
package com.b50.db.ex;

import com.b50.db.ex.R;
import android.content.Context;
import com.b50.migrations.MigrationsDatabaseHelper;

public class DatabaseHelper extends MigrationsDatabaseHelper {

  public DatabaseHelper(Context context) {
    super(context, context.getString(R.string.database_name), null,
      context.getResources().getInteger(R.integer.database_version),
      context.getString(R.string.package_name));
  }
}
This class extends Droid Migrate’s MigrationsDatabaseHelper, which ultimately extends Android’s SQLiteOpenHelper so as I mentioned earlier, you’ve got everything you need to interact with SQLite at your fingertips via DatabaseHelper. If you look closely, you’ll see that this class makes use of a specialized XML file (that is ultimately generated into your R class).
Take a look in the res/values folder and open up the newly created migrations.xml file. It should look something like this:
migrations.xml contains database version, package name and database name
<?xml version="1.0" encoding="utf-8"?>
<resources>
    <integer name="database_version">1</integer>
    <string name="database_name">a_catalog</string>
    <string name="package_name">com.b50.db.ex</string>
</resources>
Note the value of database_version – it’s 1. This corresponds to the DBVersion1 class that was generated. Take a look at that class:
DBVersion1 is your initial migration class
package com.b50.db.ex;

import com.b50.migrations.AbstractMigration;

public class DBVersion1 extends AbstractMigration {

  public void up() {
      //execSQL("some sql create stmts");
  }

  public void down() {
      //execSQL("some delete sql stmts");
  }
}
This class is where you implement your initial migration, which would create various tables and populate them. Use the execSQL method to pass in a valid SQL String. For example, I’ll create an initial migration like so:
DBVersion1 is now implemented
package com.b50.db.ex;

import com.b50.migrations.AbstractMigration;

public class DBVersion1 extends AbstractMigration {

  public void up() {
      String create = "CREATE TABLE hops (_id integer  PRIMARY KEY AUTOINCREMENT DEFAULT NULL, name TEXT, description TEXT, substitutions TEXT DEFAULT '', alpha_acid TEXT DEFAULT '', beer_styles TEXT DEFAULT '', type TEXT DEFAULT '', user_notes TEXT DEFAULT '');";
      execSQL(create);
      String oneThing = "INSERT INTO 'hops' VALUES(1,'Amarillo','Spicy hop with mild bitterness and a noble aroma.  Good all around hop.','Cascade, Centennial','7 to 10','Ale, IPA','Aroma', '');";
      execSQL(oneThing);
  }

  public void down() {
      execSQL("DROP TABLE hops;");
  }

}
As you can see, my up method creates a table and inserts one record. My down method rolls things back, which in this case means dropping the created table.
Now all I have to do is make use of my app’s DatabaseHelper instance and Droid Migrate will ensure things are properly initialized. Therefore, I’ll update the original Activity to display a list of what’s in the database, which I know only to be one record based upon my initial migration.
Updated Activity to interact with SQLite
package com.b50.db.ex;

import android.app.Activity;
import android.database.Cursor;
import android.database.sqlite.SQLiteDatabase;
import android.os.Bundle;
import android.widget.ListAdapter;
import android.widget.ListView;
import android.widget.SimpleCursorAdapter;

public class MainActivity extends Activity {

  protected SQLiteDatabase db;

  protected void onCreate(Bundle savedInstanceState) {
    super.onCreate(savedInstanceState);
    setContentView(R.layout.activity_main);

    this.db = (new DatabaseHelper(this)).getWritableDatabase();
    ListView list = (ListView) findViewById(R.id.list);

    ListAdapter adapter = getAdaptorForQuery("SELECT _id, name, description FROM hops ORDER BY name ASC", null);
    list.setAdapter(adapter);
  }

  private ListAdapter getAdaptorForQuery(String queryString, String[] parameters) {
    Cursor cursor = this.db.rawQuery(queryString, parameters);
    return new SimpleCursorAdapter(this, R.layout.list_item, cursor,
              new String[] { "name", "description" }, new int[] { R.id.hopName, R.id.description }, 0);
  }
}
As you can see from the code above, the app now makes a query to the underlying SQLite instance and builds a ListView from the result set of the query.
The key line is how the SQLiteDatabase instance is obtained: this.db = (new DatabaseHelper(this)).getWritableDatabase(); – that is where all the magic takes place. Droid Migrate passes along the version number to the Android platform and if there is a change, the Android platform will call a series of life-cycle methods, which Droid Migrate wires up with your migrations.
For instance, let’s imagine that a subsequent release of this app adds more data to the hops table. Therefore, I’ll generate a new migration. This is done by typing the following command within the root directory of your project like so:
Generating a new migration
$> droid-migrate generate up
The up flag signifies an increase in the database version (i.e. version++) and down indicates a rollback (i.e. version–). If you take a look at your app’s code, you’ll notice a new class: DBVersion2 and your migrations.xml file has been updated: the database_version value is now 2.
I’ll implement my DBVersion2 class like so:
Implementing DBVersion2 to add one more row of data
package com.b50.db.ex;
import com.b50.migrations.AbstractMigration;
public class DBVersion2 extends AbstractMigration {
public void up() {
execSQL("INSERT INTO 'hops' VALUES(100,'Zythos','New IPA style hop blend created to optimize and exceed the aroma characteristics of the traditional, and sometimes hard to get, IPA hops.','Amarillo, Columbus, Cascade','9.5 to 12','IPAs','Bittering and Aroma', '');");
}
public void down() {
execSQL("DELETE from 'hops' where _id = 100");
}
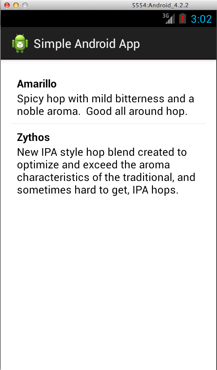
}Now if I fire up my app, the ListView will have 2 items in it!
What about if you need to rollback? That’s just as easy. Imagine that the addition of that second row of data was a gigantic mistake and instead I really only want one row (i.e. I only want the data originally created in DBVersion1). All I have to do is type within the root of my project:
Rollbacks in Droid Migrate are just as easy
$> droid-migrate generate down
After typing the above command, you should see the following output:
Rollback to version 1!
Generating a rollback migration...
Rolling back your migrations.xml file to indicate database version 1
Done!
The only thing that’ll change in your project is the migrations.xml file – the database_version value will be rolled back to 1 (or what ever 1 minus the current version is).
Fire the app back up, and behold: one value is displayed because DBVersion2’s down method was executed!
Droid Migrate makes upgrades and rollbacks to your underlying SQLite database a breeze; what’s more, it can handle upgrades or rollbacks beyond just one version. That is, if an app instance is upgraded from version 2 to version 6, each migration will be run in order (3, 4, 5, and 6). The same is true of a rollback.
If you are working with SQLite in an Android app, I highly recommend you take a look at Droid Migrate!
