In this piece, we are going to dive into the ReactJS lifecycle methods. We explore the events as a component renders to the DOM. Updates to a component trigger additional lifecycle events that we will also look at. We build a simple ticker component and log out method names as they run.
To start off I will be using create-react-app to create skeletal of our project. create-react-app is an npm package that helps create a starting point for a ReactJS Application.
I have used the below toolset for the application in this article. Some of them are necessary whilst you can switch to your favorites for others.
1. Initial Setup
Firstly, we will create our application skeletal using create-react-app. We do this by running the below command on the command prompt.
> npx create-react-app my-app .
Once the command completes we run the following command to complete setup of our application.
>npm i @types/react typescript react-app-polyfill
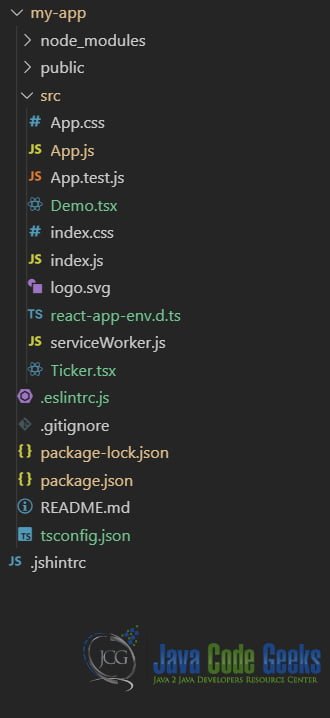
Now our generated application when opened in Visual Studio Code should look like below:
2. Ticker Component
We create a new React component in a file called Ticker.tsx. This component sets up a ticker using the JavaScript function setInterval. On each passing of the interval a method updateTicker is executed. This method updates the state of the component storing the current datetime in it. The component re renders every 2 seconds since I have set the interval to 2 seconds The code for our component so far looks like below:
Ticker.tsx
import React from 'react';

class Ticker extends React.Component {
    timerId = 0;
    constructor(props: any) {
        super(props);
        this.state = { time: new Date()};
    }
    componentDidMount = () => {
        this.timerId = setInterval(this.updateTicker, 2000);
    }
    updateTicker: any = () => {
        this.setState({ time: new Date() });
    }
    render = () => {
        return <div>{this.state.time.toString()}</div>;
    }
}
export default Ticker;
As you might notice in the above code we have already started using lifecycle methods. In particular we leverage the componentDidMount lifecycle method to setup our interval. This method is called as the component is initially loaded or mounted into the DOM.
3. Demo Component
This component acts as the parent of our Ticker component. This component, in addition to our Ticker, renders a checkbox that we use to show hide our Ticker component. I will explain the utility of this feature as the article progresses. The code for our Demo Component looks like below and resides in a file named Demo.tsx.
Demo.tsx
import React from 'react';
import Ticker from './Ticker';

class Demo extends React.Component{
    constructor(props: any) {
        super(props);
        this.state = { hideTicker: false };
    }
    render = () => {
        return <div>
            <input onChange={this.hideTicker} type="checkbox" />
            Hide Ticker
            { !this.state.hideTicker && <Ticker />}
        </div>;
    }
    hideTicker = (event: any) => {
        this.setState({ hideTicker: event.target.checked });
    }
}
export default Demo;
4. Initial Render
The following lifecycle methods run in order as the application starts up. We can leverage them to write code that needs to execute at a particular stage during the lifecycle of a React Component. Let us take a look at these methods.
- Constructor
This is the first method run on Application startup. Typically we call the parent React.Component Class constructor passing in the props. As well as initializing the internal state of our Component.
- getDerivedStateFromProps
This method is a static one. And called just before the render method. The props and state of the component are passed to this component. We must either return the updated props and state or null if we do not want to perform any updates. It does not have access to the component instance. We can use this method to update internal state of the Component dependent on prop value changes. The React team discourages use of this method and provides alternatives.
- render
This method is mandatory and required for each Component. It should be a pure function. Meaning that it should not modify or change the state of the component.
- componentDidMount
Upon mounting or rendering of the component this lifecycle method is immediately invoked. This method is the place to put any code for network requests to pull data.
Our Ticker component with the above described lifecycle methods implemented looks like below:
Ticker.tsx
import React from 'react';

class Ticker extends React.Component {
    timerId = 0;
    constructor(props: any) {
        super(props);
        this.state = { time: new Date()};
        console.log("constructor");
    }
    updateTicker: any = () => {
        this.setState({ time: new Date() });
    }
    static getDerivedStateFromProps = (props: any, state: any) => {
        console.log("getDerivedStateFromProps", props, state);
        return null;
    }
    componentDidMount = () => {
        console.log("componentDiDMount");
        this.timerId = setInterval(this.updateTicker, 2000);
    }
    render = () => {
        console.log("render");
        return <div>{this.state.time.toString()}</div>;
    }
}
export default Ticker;
Now, let us run our application to view the results using the below command:
>npm start
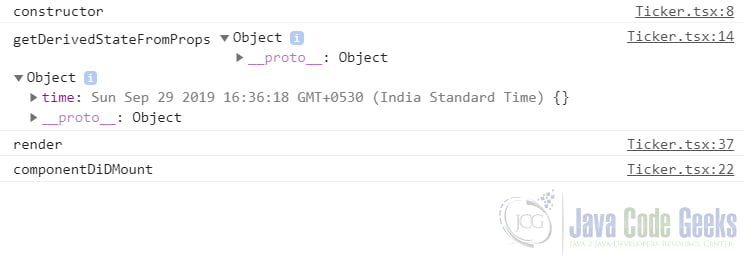
The following is output in the browser’s console under developer tools.
5. Updates Cycle
I say cycle because over the course of time while the application runs, each component keeps getting updated and is re rendered multiple times. The lifecycle methods that run in order are as below.
- getDerivedStateFromProps
As discussed previously, this lifecycle method runs right before the render method during the initial load. But whilst updating another lifecycle method runs after this and before render method. This method must return null or updated props and state.
- shouldComponentUpdate
This method runs right before render. This method receives the nextProps and nextState of the component. It can inform React if the changes affect the component or not. By returning true or false from this method we can instruct React. This method does not run if forceUpdate is called on a component. If we return false then the following lifecycle methods namely render and componentDidUpdate will not be called. Although this does not prevent the child components from re rendering. With all being said this method of skipping updates is not future proof as React may start treating the return value of false less like a strict directive and more of a hint.
- render
This is the mandatory method that every component must have. It returns either JSX, HTML Markup, Arrays, Fragments, Boolean or null, portal, string or numbers.
- getSnapshotBeforeUpdate
This lifecycle method runs before changes to the DOM. We get a last look at the props and state before updates in this method. Any value returned from this method is passed on to the next in line lifecycle method componentDidUpdate.
- componentDidUpdate
This method runs after an update. Although it is not run for the initial load cycle of a component. Actions like placing network request are recommended in this method.
We implement each of the above lifecycle methods and write out to console as each one runs. Our Ticker component code now looks like below:
import React from 'react';

class Ticker extends React.Component {
    timerId = 0;
    constructor(props: any) {
        super(props);
        this.state = { time: new Date()};
        console.log("constructor");
    }
    updateTicker: any = () => {
        this.setState({ time: new Date() });
    }
    static getDerivedStateFromProps = (props: any, state: any) => {
        console.log("getDerivedStateFromProps", props, state);
        return null;
    }
    getSnapshotBeforeUpdate = (prevProps: any, prevState: any) => {
        console.log("getSnapshotBeforeUpdate", prevProps, prevState);
        return null;
    }
    componentDidMount = () => {
        console.log("componentDiDMount");
        this.timerId = setInterval(this.updateTicker, 2000);
    }
    componentDidUpdate = () => {
        console.log("componentDidUpdate");
    }
    shouldComponentUpdate = (nextProps: Readonly, nextState: Readonly) => {
        console.log("shouldComponentUpdate", nextProps, nextState);
        return true;
    }
    render = () => {
        console.log("render");
        return <div>{this.state.time.toString()}</div>;
    }
}
export default Ticker;
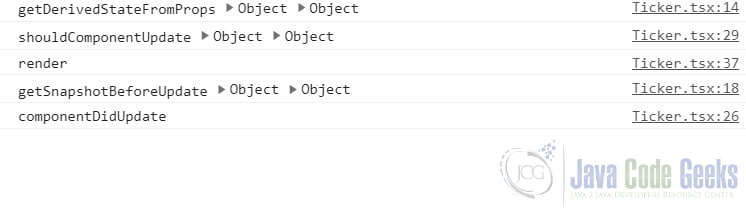
Let us run the application again and look at the console.
6. Application End
As the application runs to an end or when a component is unmounted from the DOM. This final lifecycle method is run, namely componentWillUnmount. It is a great place to write cleanup code and release resources to prevent memory leaks. We emulate this condition here using a checkbox to hide our Ticker component which in turn runs this lifecycle method.

7. Download the Source Code
You can download the full source code of this example here: React Lifecycle Methods Tutorial
