JetBrains MPS is our tool of choice to build Domain Specific Languages targeting professionals who are not developers.
MPS is a great choice but over several projects we ran into specific issues for which we are researching an answer.
In this article we see how we can solve one of these issues by using Modelix to store MPS models into a database, and therefore having multiple users collaborating by working on the same models, in a very easy way.
We will also discuss ideas on how to further improve DSL editors and make them more and more easy to use for our users.
Pros of MPS
MPS is great because:
- It permits to prototype a DSL very quickly. In this way we discuss with clients, and experiment very rapidly. We can build something, they can try it and keeping providing feedback as we iterate
- It supports multiple notations: textual, tabular, graphical, and more. This permits to make DSLs more approachable, as many professionals are used to work with non-textual notations
- It has all the necessary features to build advanced languages and editors: typesystem, constraints, etc., in this way we can build editors that support users effectively
- It is a rich environment which permits to build great integrated tooling: interpreters, simulators, debuggers, documentation generator, etc. In our experience the tools built around DSLs make a difference to increase productivity
- It permits to evolve languages without breaking existing code. This is very important because DSLs are always designed and evolved in an incremental way
What our clients do not like about MPS
Some clients however are looking for solutions to these specific problems:
- The UI of the environment looks too complex. While it is possible to customize it and build an environment with a refined UI, in general IDEs built with MPS looks like… IDEs, with all their vast amount of menus, advanced project panels and so on. While the editors built for our DSLs can look easy to understand and simple, users are sometimes scared by the environment around the editor, what we call the IDE-shell
- MPS editors are desktop applications, not web applications. This means that the editor must be installed and updated on the machines of the users. While we can setup plugins repositories which limit the cost of keeping those systems up-to-date, we still need to do a new installation when we want to migrate to a new version of MPS. It also means that editors built in MPS cannot be integrated out of the box with web applications.
- MPS models are stored on files. In all the projects we have worked on we had multiple persons collaborating on the same project. We definetely do not want people passing files around. Also storing those files on a Dropbox folder (or something similar) would not be ideal and lead to conflicts. So to keep these files in sync we typically use git. Now, git is hard to learn and it is confusing for most professionals. So an alternative to it would be really welcome. We are going to see one in this article.
How can we move things forward in DSL development?
We think that the solutions to all these problems could come from the Modelix project, possibly in conjunction with projects started at Strumenta (namely MPSServer and WebEditKit).
What are these projects?
- Modelix is a project started by Sascha Lißon, at Itemis. This project intends to enable the idea of an Active Repository, which has been promoted by Markus Völter. You can find more about it reading this white paper. Among other things, this project permits to store MPS models into a database. We will take advantage of it in this article. Note that while I contributed to that project and plan to keep contributing in the future, the architecture and the hard conceptual work has been from Sascha. As a community I think we should be very grateful to him, Itemis, and Markus for releasing this as open-source
- MPSServer is a plugin for MPS which starts a web server from MPS. It can be used to access all features of MPS through HTTP calls and websockets. This can be useful to read and modify models, but also to get information about errors, trigger intentions, verify constraints, calculate types, and so on. This project has been started at Strumenta, but it received important contributions from Sergej Koščejev
- WebEditKit is a framework to build web projectional editors for languages developed using MPS. It is indeed to work in combination with MPSServer. With WebEditKit one can define editors that call the MPSServer to get the information they need and send back the changes performed by the user. As for MPSServer, this project has been started at Strumenta, but it received important contributions from Sergej Koščejev
All these three projects are open-source and available on GitHub.
| What can be achieved | Projects used | |
| Using MPS on the desktop, saving models on database | Modelix | |
| Using MPS in the browser, saving models on git | MPSServer + WebEditKit | |
| Using MPS in the browser, saving models on database | Modelix + MPSServer + WebEditKit |
In this article we are going to see how to use Modelix in MPS, to save models on the database. In this way users do not need to learn how to use git, but they can instead use an intuitive interface to support versioning.
On the other hand we are already using MPSServer and WebEditKit to build web-based editors for our clients. In this way users to do not need to install MPS on their machines, they can work concurrently, and they can get a simple interface, as there is not IDE shell. They can also integrate the editors we build in larger web applications they have.
So the natural next step is to combine all these projects to have web-based editors for languages built in MPS, and have them store models on the database. This should permit to solve all the main problems faced by our clients.
If you want to see how MPSServer and WebEditKit looks like you can take a look to this demo. It is not up to date but it should give you an idea:
How to store MPS models on a database
Now we are going to see a step-by-step tutorial to:
- create a simple language to define processes
- create a modelix-server, configuring it to use a Postgres database to store models
- use the modelix-server inside MPS to work on our models and having them seamlessly saved on the database by the modelix-server
As always the code is available on GitHub: https://github.com/Strumenta/processes-modelix-demo
Defining the language
The language we are going to define is just a toy. We can use it to define simple processes.
In the video below I show how I defined the language and I used it to specify the process for writing an article.
You can also just get the language from the GitHub repository.
You should note that we are using MPS 2020.1.1 for this tutorial. You can obtain it from here: https://www.jetbrains.com/mps/download
Create a database
Modelix could store our models on a kubernetes cluster hosted on GCloud, ensuring we have multiple nodes hosting our models and they are kept in sync. We should do that if you want to use our languages in production in a medium-to-large organization.
However Modelix also supports using a simple Postgres database, which is perfect for our needs. You can get your Postgres database as you wish: run it locally, using a Postgres installation you already have, using some cloud services, etc.
If you want just to try Modelix and you want to get a Postgres database quickly you can just use elephantsql.com . It offers hosted Postgres databases and it has a free plan.
You can sign up and get a free db quite quickly:

Install Modelix in your MPS
We always install the gradle wrapper. For that you will need to have gradle installed on your machine.
We then run:
|
1
|
gradle wrapper --gradle-version 6.7 --distribution-type all |
At this point we create our build.gradle file. We will add instructions to download modelix.
|
01
02
03
04
05
06
07
08
09
10
11
12
13
14
15
16
17
18
19
20
21
22
23
24
25
26
27
28
29
30
31
32
33
34
35
36
37
38
39
|
buildscript { repositories { jcenter() } }repositories { mavenLocal() mavenCentral()}configurations { mpsArtifacts}ext.artifactsDir = new File(rootDir, 'artifacts')dependencies { mpsArtifacts "org.modelix:mps-model-plugin:0.0.6" mpsArtifacts "de.itemis.mps:extensions:2020.1+"}task resolveMpsArtifacts(type: Copy) { dependsOn configurations.mpsArtifacts from { configurations.mpsArtifacts.resolve().collect { zipTree(it) } } into artifactsDir doFirst { delete artifactsDir }}task setup(dependsOn: resolveMpsArtifacts) { doLast { print "Setup completed." }} |
At this point you can run:
|
1
|
./gradlew setup |
You should now have a directory named artifacts. It should contain three sub-directories:
de.itemis.mps.extensions,org.modelix.common, andorg.modelix.model.
Now we should specify into our MPS project that we want to use those directories as libraries.
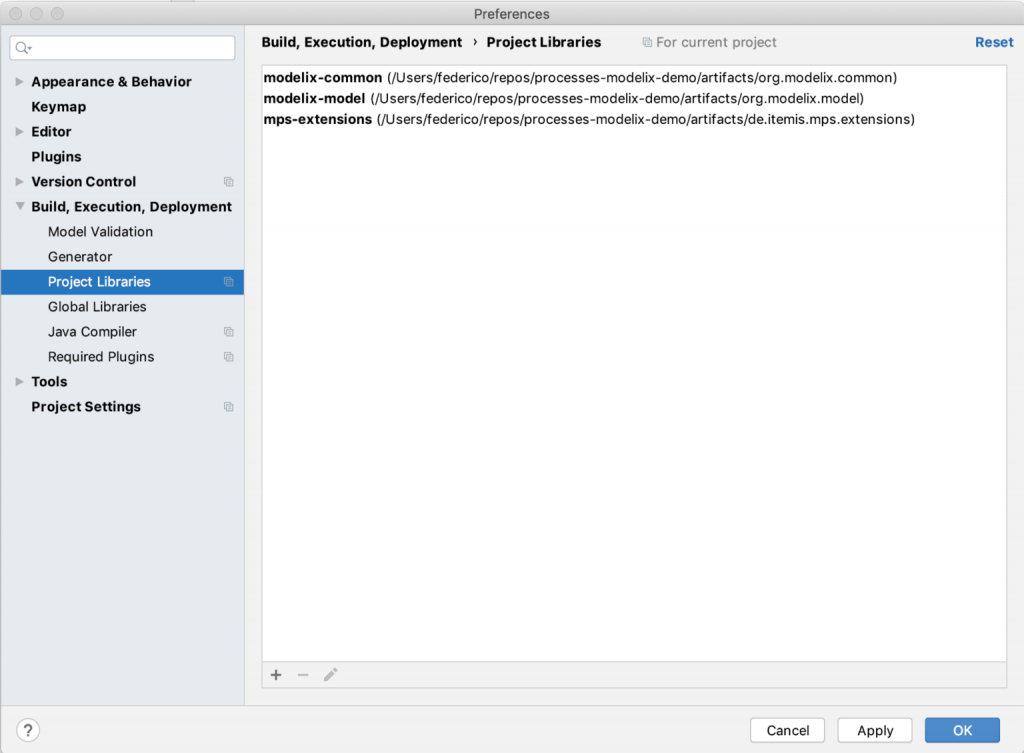
Note that while the UI shows the absolute path to these libraries (for example, in my case it is showing a path starting with /Users/federico/), the path saved is actually relative to the root of the project.
You can verify that by looking at the file .mps/libraries.xml:
|
01
02
03
04
05
06
07
08
09
10
11
12
13
14
15
16
17
18
19
20
21
22
23
24
25
26
27
28
29
30
31
32
33
|
<?xml version="1.0" encoding="UTF-8"?><project version="4"> <component name="ProjectLibraryManager"> <option name="libraries"> <map> <entry key="modelix-common"> <value> <Library> <option name="name" value="modelix-common" /> <option name="path" value="$PROJECT_DIR$/artifacts/org.modelix.common" /> </Library> </value> </entry> <entry key="modelix-model"> <value> <Library> <option name="name" value="modelix-model" /> <option name="path" value="$PROJECT_DIR$/artifacts/org.modelix.model" /> </Library> </value> </entry> <entry key="mps-extensions"> <value> <Library> <option name="name" value="mps-extensions" /> <option name="path" value="$PROJECT_DIR$/artifacts/de.itemis.mps.extensions" /> </Library> </value> </entry> </map> </option> </component></project> |
In this way, you can clone this project from GitHub and the libraries will be loaded correctly on your machine. You will just need to run ./gradlew setup to get the modelix and MPS-extensions libraries from the Maven repository.
If this worked, you should see the Cloud panel in your MPS IDE:
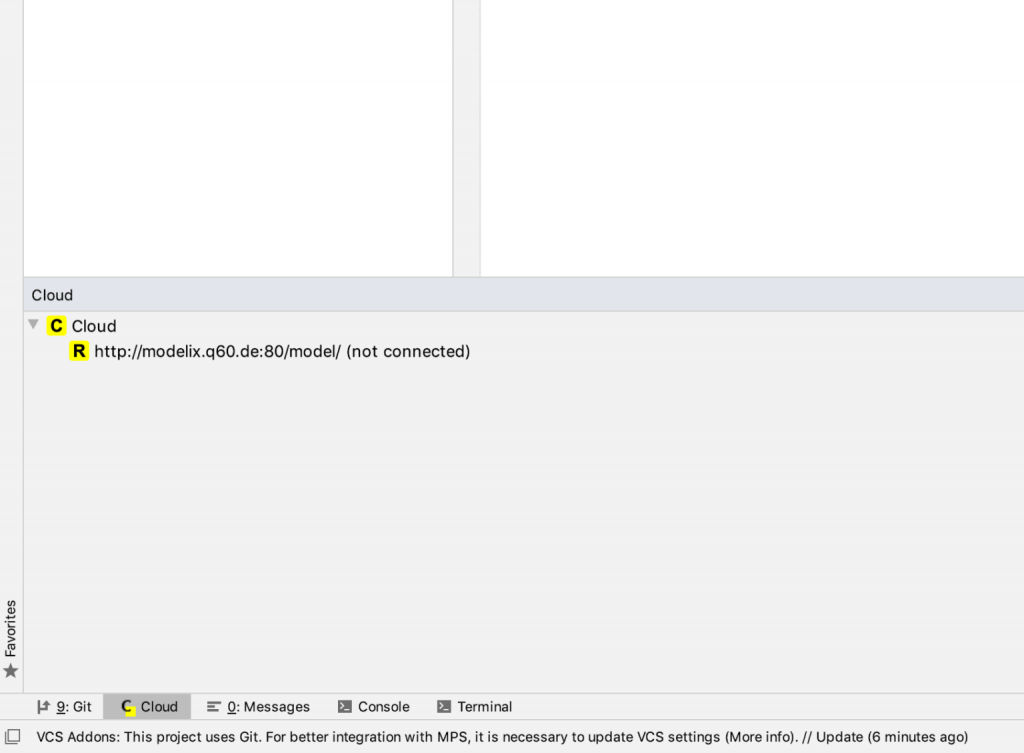
By default Modelix comes with a pre-configured modelix-server which has been used by the author of the project (Sascha Lißon) during development.
We will remove that modelix-server and add our own.
Before doing that we need to run our Modelix server.
Run a Modelix server
We will need first of all to download it. To do that we will update our gradle script:
|
01
02
03
04
05
06
07
08
09
10
11
12
13
14
15
16
17
18
19
20
21
22
23
24
25
26
27
28
29
30
31
32
33
34
35
36
37
38
39
40
41
42
43
44
45
46
47
48
49
50
|
buildscript { repositories { jcenter() } }repositories { mavenLocal() mavenCentral()}configurations { mpsArtifacts apps}ext.artifactsDir = new File(rootDir, 'artifacts')ext.appsDir = new File(rootDir, 'apps')dependencies { mpsArtifacts "org.modelix:mps-model-plugin:0.0.6" mpsArtifacts "de.itemis.mps:extensions:2020.1+" apps "org.modelix:model-server-fatjar:0.0.6"}task resolveMpsArtifacts(type: Copy) { dependsOn configurations.mpsArtifacts from { configurations.mpsArtifacts.resolve().collect { zipTree(it) } } into artifactsDir doFirst { delete artifactsDir }}task resolveApps(type: Copy) { dependsOn configurations.apps from { configurations.apps.resolve() } into appsDir doFirst { delete appsDir }}task setup(dependsOn: [resolveMpsArtifacts, resolveApps]) { doLast { print "Setup completed." }} |
We have now our model-server: it is simply a jar named model-server-fatjar-0.0.6.jar which is contained under the apps directory. This is a fat jar: it means a JAR containing an application and all of its dependencies wrapped together. In this way you do not need to get libraries to run it.
We will set it up to run using the Postgres server but before we do that we can just start it using in-memory storage. We do not want to use this modality in production, as all information will be lost when the modelix server is restarted, however it is useful for testing.
You should be able to run the server in this way:
|
1
|
java -jar apps/model-server-fatjar-0.0.6.jar -inmemory |
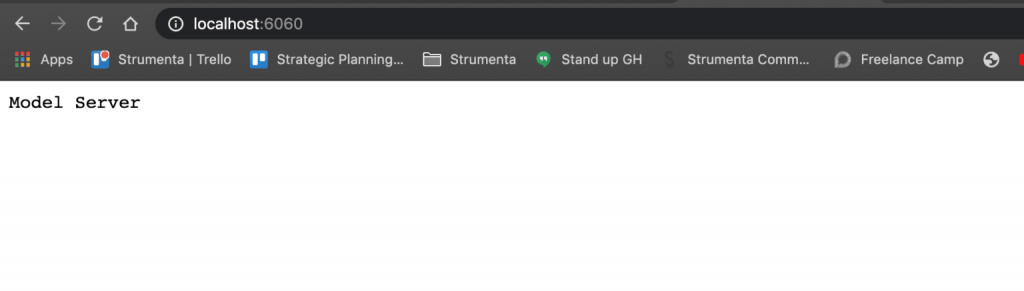
By default the server is started on port 28101. We can control the port at which it is started using the PORT environment variable. For example, to launch it on port 6060 we can use this command:
|
1
|
PORT=6060 java -jar apps/model-server-fatjar-0.0.6.jar -inmemory |
We can verify the server has been started by visiting http://localhost:6060 . We should see the message Model Server, as displayed in the screenshot below.
Now we should configure it to use our Postgres database.
Make the modelix server use a Postgres database
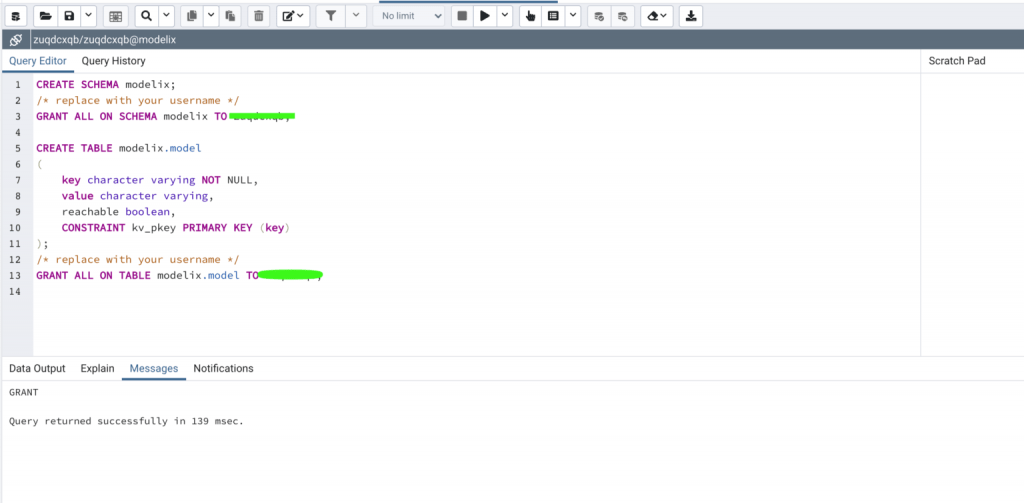
The first thing we should do is to prepare the modelix schema and create the only table we will need inside it. You can do that in many ways. For example, you could run the psql command, if it is installed on your machine.
If you are looking for an easy way to do this you can use pgAdmin. You must configure it with the data of your elephantsql installation and then run this query:
|
01
02
03
04
05
06
07
08
09
10
11
12
13
|
CREATE SCHEMA modelix;# replace with your usernameGRANT ALL ON SCHEMA modelix TO xxxxxxx;CREATE TABLE modelix.model( key character varying NOT NULL, value character varying, reachable boolean, CONSTRAINT kv_pkey PRIMARY KEY (key));# replace with your usernameGRANT ALL ON TABLE modelix.model TO xxxxxxx; |
You should get something like this:
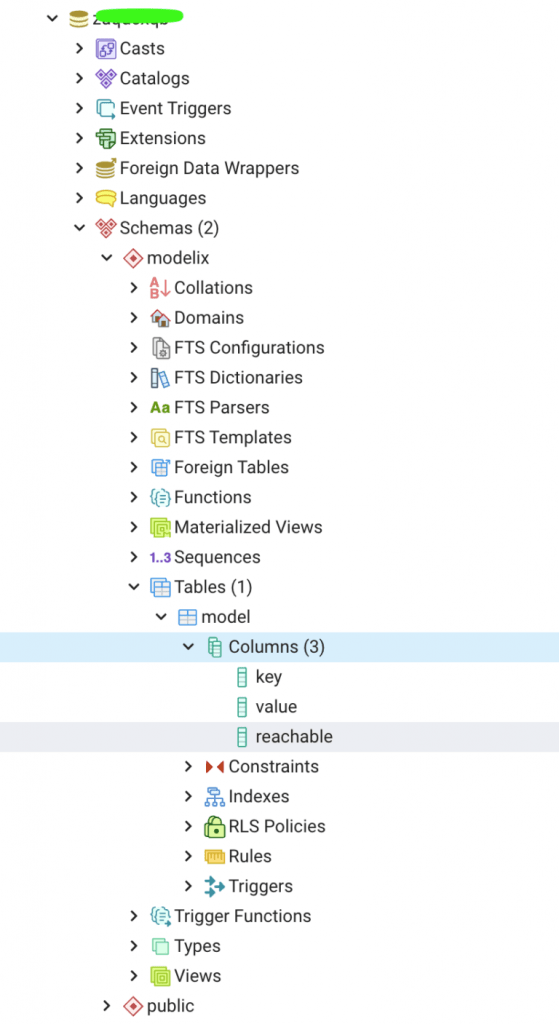
Now you can refresh the database view and you should see the new schema with the model table and its three columns.
Now that the database is ready, we can define the JDBC configuration, so that our modelix server could learn how to reach the database.
To do this we create a file named database.properties and we populate it with data from the elepanthsql installation:
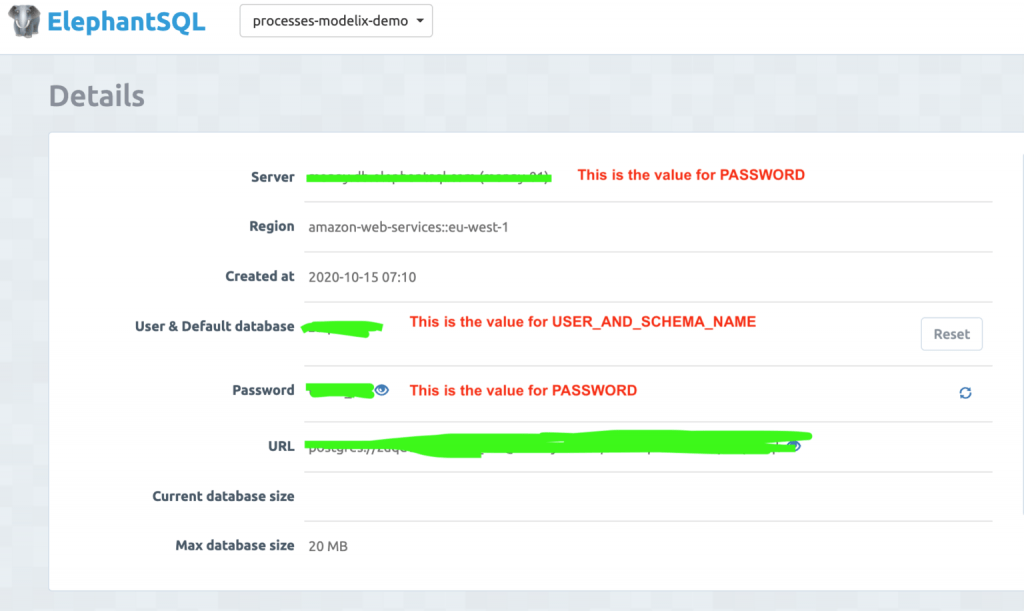
We use those values in this way:
|
1
2
3
4
5
|
jdbc.driver=org.postgresql.Driverjdbc.url=jdbc:postgresql://HOSTNAME:5432/USER_AND_DB_NAMEjdbc.schema=modelixjdbc.user=USER_AND_SCHEMA_NAMEjdbc.pw=PASSWORD |
Finally we can start our modelix server targeting the database:
|
1
|
java -jar apps/model-server-fatjar-0.0.6.jar -jdbcconf database.properties |
Using Modelix
At this point we have seen:
- How we can add support for Modelix in our MPS project
- How to run a Modelix server locally
- How to configure a Modelix server to use a Postgres database
There is just one thing left to do: actually use the Modelix server!
In the video below we see how we can connect to our Modelix server, how we can create modules on the server, and how we can then work on those modules locally. It is fairly easy. And then, by magic, all our changes will be reflected on the server and therefore stored on our databases. Isn’t that great?
Summary
We have seen DSLs built using MPS provide a ton of value to clients working in very different fields. Medical doctors, engineers, accountants: all of them have been made more productive by adopting DSLs to support their processes.
Yet, MPS is not perfect and as we took part in the industrialization of those DSLs we have encountered some specific problems. There is a plan to fix each and every of those problems. Today we have seen one key component of that plan: Modelix and its ability to edit MPS models stored in a database.
While these projects seems promising there is a lot more work to do. All of the projects we discussed are not battle-tasted and they would need to mature before being adopted by more clients. However they are already usable to build prototypes and the ideas are getting proven. It is a matter of pouring more work on it.
We are also seeing more ideas and projects coming up. For example, ProjectIt is a framework to build web-based projectional editors which are not related to MPS. While we believe that MPS is extremely valuable and it would make a lot of sense to keep using it on the server, we also monitor alternative strategies, to learn from them and to understand what works best in practice. At the moment ProjectIt is not interoperable with Modelix, but something that is being considered is to make them interoperable. In this way Modelix could become a more general solution for storing models, not just one that works for models built with MPS.
This is definitely an area which is very important for Language Engineering, and ideas that have been circulating for some time are now being transformed into code and tested. These are exciting times and I am extremely happy to be working in this area. We are seeing discussions on these topics going on in the Strumenta Community and we are looking forward to see how things evolve, giving our contribution where possible.
|
Published on Java Code Geeks with permission by Federico Tomassetti, partner at our JCG program. See the original article here: Saving JetBrains MPS models in a database using Modelix Opinions expressed by Java Code Geeks contributors are their own. |
