In the previous posts we build few micro services (Order Service, Product Service, Customer Service) for an order management system using Docker and Spring Boot. We used Netflix libraries to manage, discover and load balance the micro services.
Managing these micro services and their multiple containers could get a bit tricky; especially in terms of Scalability, Observability, Security, Monitoring and managing resources. Hence we would use Kubernetes for our container orchestration. Click here to read more about Kubernetes.
In order to get started, we could either use a local Kube cluster in the laptop or use a cloud provider like AWS/Azure/GCP.
Local Kube Cluster :
We can use Minikube or Docker for Desktop for setting up local kube cluster. Follow their respective documentations to install them on your laptop/computer. In this tutorial we will be using Docker for Desktop on Mac, so if you are using the same follow this documentation for setting it up.
Use Amazon Elastic Kubernetes Service (EKS):
You can also set up a cluster on EKS to deploy the applications, for that you will need an account on AWS (https://aws.amazon.com/).
Once logged into AWS, go to EKS and create a Cluster. Read this documentation for setting up the cluster.
Kubectl :
KubeCtl is a command line interface for running commands against Kubernetes clusters. If you are using Docker for Desktop, it is already included and configured to connect to the local Kubernetes server, otherwise set up KubeCtl on your laptop using this documentation.
In order for kubectl to find and access a Kubernetes cluster, it needs a kubeconfig file. By default, kubectl configuration is located at:
1 | ~/.kube/config. |
Check that kubectl is properly configured by getting the cluster state:
1 | kubectl cluster-info |
for managing cluster in EKS, use this documentation to set up kubeconfig.
Deploying Applications in Kube cluster :
Now that we have successfully created a kube cluster and have configured kubectl to manage and deploy into that cluster, we are ready to deploy our applications to it.
In the previous blogs we have created 3 microservices running in Docker containers. We can use the image of any of these microservices to deploy into kube cluster. If we are using local kube cluster (Docker for desktop or MiniKube) we can use the local docker image to deploy to the cluster.
(For local images to work, we need to set a property called “imagePullPolicy” to “Never” in our deployment definition.)
For EKS we will need the image to be in a registry, we can use docker hub public repo for now so we dont have to worry about authentication with with the registry. If we have to use ECR (Amazon Elastic Container Registry) we would need to give ECR pull permissions to the instances running the nodes in cluster, for simplicity, we will bypass this part for now.
Build local image
In order to deploy the application in local kube cluster, we will create its docker image in our laptop.
So, if you have the source code for any of the services we used in the previous blogs, we will use them.
– Go to the root folder of productService and run the docker build command :
1 | docker build -t productservice . |
This will create a local image with tag “productservice”. Test if this image works fine by running it.
1 | docker run -p 8001:8001 productservice:latest |
This service requires access to a local Postgres Database server, hence it fails to start. For simplicity, lets make a quick change to the application and use an in-memory DB (H2).
Make the following changes to build.gradle : (replace postgres depenendcy with H2)
1 2 3 4 5 6 7 8 | dependencies { implementation('org.springframework.boot:spring-boot-starter-data-jpa') implementation('org.springframework.boot:spring-boot-starter-web') implementation('org.springframework.cloud:spring-cloud-starter-netflix-eureka-client') runtime("com.h2database:h2:1.3.176") compileOnly 'org.projectlombok:lombok:1.18.4' testImplementation('org.springframework.boot:spring-boot-starter-test')} |
And Replace the spring datasource to use H2 in application.properties :
1 2 3 4 5 | spring.datasource.url=jdbc:h2:mem:testdbspring.datasource.driverClassName=org.h2.Driverspring.datasource.username=saspring.datasource.password=spring.h2.console.enabled=false |
Once these 2 changes are done, the application would be good to start and work. This time rebuild the image (make sure you clean the old tag) and run it. Use the previous blog to test the endpoints. (create and get products @ /products)
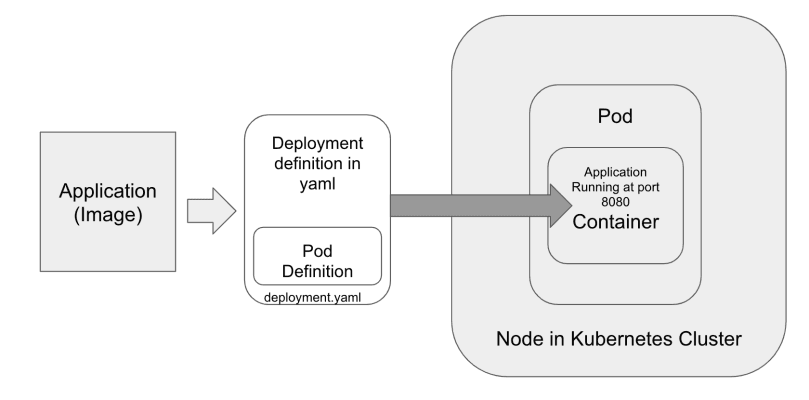
Creating deployment.yaml
For deploying the images to kube, we need a deployment definition (or a pod definition if we just want to install a pod).
01 02 03 04 05 06 07 08 09 10 11 12 13 14 15 16 17 18 19 20 | apiVersion: apps/v1kind: Deploymentmetadata: name: product-service-deploymentspec: selector: matchLabels: app: product-service replicas: 1 template: metadata: labels: app: product-service spec: containers: - name: product-app image: productservice:latest imagePullPolicy: Never ports: - containerPort: 8001 |
Make sure to use the tag of the local image created in “name”.
Save the above file as product-service-deployment.yaml and run the following command from where the file is saved.
1 | kubectl apply -f product-service-deployment.yaml |
This will create a Pod in the cluster running the application inside the container. Now this application is running inside a pod in the kube cluster and has been assigned an IP address, which is accessible only from inside the cluster. We can access this pod from inside the cluster using this IP address, but as the pods are volatile (can be scaled up and scaled down, recreated and destroyed) we would need an interface or a service to access them by a “service name” which would not change when the pods are recreated. This “service” will also act as a load balancer for distributing requests to the pods.
Create a Kubernetes Service:
Now, we will create a service in Kubernetes which can be used to access the pod. Read more about Kubernetes services here. For this blog we will create a service of type “ClusterIP” which will be accessbile from withtin the cluster.
Create a file in the same root folder with the name product-service.yaml with the following contents:
01 02 03 04 05 06 07 08 09 10 | apiVersion: v1kind: Servicemetadata: name: product-servicespec: selector: app: product-service ports: - port: 8001 targetPort: 8001 |
To create this service, run the following command :
1 | kubectl apply -f product-service.yaml |
Run the kubectl get services command to see if the service is successfully created :
1 | kubectl get svc |
You should see the service “product-service” there with an assigned ClusterIP.
Access the service from your laptop.
To access this service from our laptop we will use something called as “kube port-forwarding” run the following command :
1 | kubectl port-forward svc/product-service 8001:8001 |
Now we can access the service using http://localhost:8001/products.
You can test the product service by creating some products and retrieving them as mentioned in the previous blog.
So, we have now our application running in the local kube cluster.
In the next series of blogs we will deploy couple of more applications into the cluster with the external Database and have a fully functional microservices application. We will also learn how the internal services communicate with each other and how can we expose them to the outside world using Ingress Controller.
| Published on Java Code Geeks with permission by Anirudh Bhatnagar, partner at our JCG program. See the original article here: Spring Boot Microservices , Docker and Kubernetes workshop – part3
Opinions expressed by Java Code Geeks contributors are their own. |
