1. Introduction
Java NIO is a library introduced from Java 1.4. Java NIO has since its launch provided an alternative way to handle I/O and networking transactions. It is considered to be an alternative to Java Networking and Java IO libraries. Java NIO was developed with the goal to make the transactions for input and output asynchronous and non-blocking. The concept of blocking and non-blocking IO is explained in further sections.
Table Of Contents
2. Terminologies in Java NIO
Java NIO introduced a bunch of new terms in the I/O processing using Java. In earlier scenario, the Java I/O was based on character streams and byte streams. However, with Java NIO, the data now is read and processed through channels – Either via Channel into a buffer or a buffer into a channel. In this section, we discuss the various terms associated with Java NIO to help us understand the further tutorial better.
2.1 Blocking Input & Output
With character streams and byte streams, the file was loaded into the JVM memory and locked for reading or writing. This resulted in a blocking situation for other programs trying to read the same file. Such a scenario wasted the CPU power as the programs were forced to wait despite the available processing power. Such an arrangement of reading data or writing data is called Blocking Input and Output.
2.2 Non-Blocking Input & Output
With the non-blocking input and output coming into picture, the data started to be read into channels. In a non-blocking input and output arrangement, the JVM uses channels to buffer the data. The channels allows to read the data dynamically without blocking the file for external use. The channels are a buffered piece of memory that gets filled in as soon as the previous buffer data has been read. This ensures that the file is not blocked during the complete read cycle and the other programs have the necessary access to it.
Java NIO is mainly all about three terms:
- Channels
- Selectors
- Buffers
These terms will be declared further in this article.
3. Java NIO – Terminologies
As discussed above, the Java non-blocking IO works on Channels and buffers. In this section, we will try to understand these terminologies along with the additional term selectors. These terms are important in order to follow the further tutorial.
3.1 Buffers
A buffer is a fixed piece of memory used to store that data before it is being read into a channel. A buffer ensures that a defined size of data is preloaded to speed up the reading of the files, inputs and data streams. A buffer is configureable in size in the blocks of 2 to the power n.
The various types of buffers that can be used depending on the type of input are:
- ByteBuffer: Used for reading character streams or files byte wise
- CharBuffer: Used for reading characters within the complete ASCII set
- DoubleBuffer: Used specifically for double data values like the readings from sensors
- FloatBuffer: Used to read constant data streams for purposes like analytics
- LongBuffer: Used to read values of long data type
- IntBuffer: Used to read integer values for scores or results
- ShortBuffer: Used to read short integer values
Each buffer is designated for its specific use. The buffers generally used for files are the ByteBuffer and CharBuffer. A short example of creating a ByteBuffer has been shown below.
RandomAccessFile aFile = new RandomAccessFile("src/data.txt", "rw");
FileChannel inChannel = aFile.getChannel();
ByteBuffer buf = ByteBuffer.allocate(48);
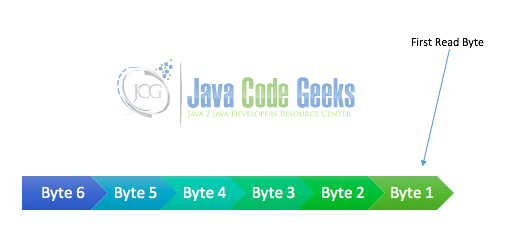
In the above code, a buffer of 48 bytes is being created. A buffer size is mandatory to be specified. The 3rd line allocates the memory space of 48 bytes to the buffer buf. This ensures that the necessary memory is pre-allocated to the buffer. The buffer read and write process is necessary to understand before we proceed to using them for channel read and write. The below image shows a typical buffer reading bytes from a file.
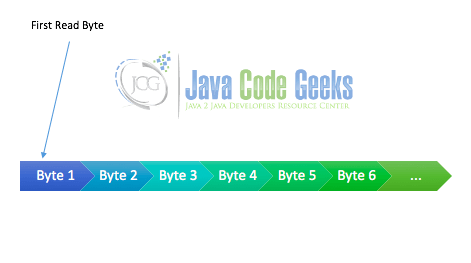
As it can be seen, a buffer reads and pushes the first byte to the left. A buffer is a Last In First Out type memory allocation. Hence, when you wish to read a file using a buffer, it is necessary to flip it before you could read the file. Without a flip, the data would come out in a reverse order. In order to flip the buffer, a simple line of code needs to be executed as shown below:
buf.flip();
Once the data has been read into the buffer, it is time to actually get the data that has been read. In order to read the data, the function buf.get() is used. This function call reads a single byte/character/packet on every call depending on the type of buffer. Once we have read the available data, it is also necessary to clean up the buffer before the next read. A clean up is necessary to ensure that the space is freed to read more data. In order to clean the buffer, there are two feasible ways – Clear the buffer or compact the buffer.
To clear the buffer, execute the command buf.clear(). To compact the buffer, use the command buf.compact(). Both these commands ultimately do the same thing. However, compact() only clears the data that has been read using the function call buf.get(). Thus, it is used when we need to keep optimising the amount of memory being used by the buffer.
3.1.1 Buffer properties
A buffer essentially has 3 properties:
- Buffer Position
- Buffer Limit
- Buffer Capacity
During the buffer write, buffer position is the position where current byte is being written. During the buffer read process, the buffer position is the position from which the byte is being read. The buffer position keeps changing dynamically as we proceed with the read or write.
During the buffer write, a buffer limit is the maximum size of data that can be written to the buffer. Essentially, buffer limit and buffer capacity are synonymous during a buffer write. However, during buffer read, the buffer limit is the number of available bytes for reading from the buffer. Hence, the buffer limit keeps on reducing as the bytes are popped out.
The buffer capacity is the maximum data that can be written into the buffer or read from the buffer at any point of time. Thus, the size 48 allocated above is also called as the buffer capacity.
3.1.2 Reading from and Writing to the buffer
A buffer is essentially a medium to hold the data until the thread reads the data from it and asks for new data. The primary step towards reading data from an input source is to read the data into the buffer. In order to read the data into the buffer, the code snippet shown below is used.
FileChannel inChannel = aFile.getChannel();
System.out.println("Created file Channel..");
ByteBuffer buf = ByteBuffer.allocate(48);
int bytesRead = inChannel.read(buf);
In the above code, we create a FileChannel to read the data from a file and a buffer buf to hold the data. The buffer is then used to read data for the channel using the statement inChannel.read(buf). On execution of this statement, the buffer would now hold upto 48 bytes of data as available.
In order to start reading the data, you use a simple statement buf.get().
3.1.3 Mark and reset buffer
During the read process, there are often situations where you need to read the data from particular position repeatedly. In a normal scenario, once you get the data from buffer, it is considered as gone. However, it is possible to mark the buffer at a specific index to make it possible to read it from a specific position again. The code below demonstrates how this is done.
buffer.mark();

char x = buffer.get();
char y = buffer.get();
char z = buffer.get();
char a = buffer.get();
//Do something with above data

buffer.reset();  //set position back to mark.
The major applications of mark and reset are parsing of data repeatedly, repeating an information repeatedly, sending a command for specific number of times and lots more.
3.2 Channels
Channels are the primary medium for non-blocking IO. Channels are analogous to streams available for blocking IO. These channels support data over networks as well as file data IO. Channels read the data from the buffers as and when requested for. The buffers hold the data until read from them.
The channels have multiple implementations depending on the data to be read. The standard implementations available for the Channels are listed below:
- FileChannel: Used to read and write data from and to the files
- DatagramChannel: Used for data exchange over network using UDP packets
- SocketChannel: TCP channel to exchange data over TCP sockets
- ServerSocketChannel: An implementation similar to a web server listening to requests over a specific TCP port. It creates a new
SocketChannelinstance for every new connection
As it could be understood from the channel names, they also cover UDP + TCP network IO traffic as well in addition to the file IO. Unlike Streams that can either read or write at a particular moment, the same Channel can read as well as write to a resource seamlessly. Channels support asynchronous read and write which ensures that the data is read without hindering the execution of the code. The buffers, discussed above, support this asynchronous operation of the channels.

3.2.1 Channel Scatter and Gather
Java NIO inherently supports data scattering and gathering for reading data from and writing data into multiple buffers. Java NIO is smart enough to be able to manage the read and write in multiple buffers.
A Java NIO scatter is used to scatter the read from the channel into multiple buffers. The code implementation of it is quite simple. All you need to do is add a buffer array as an argument for the read. A code snippet for the same has been shown below.
ByteBuffer buffer1 = ByteBuffer.allocate(128);
ByteBuffer buffer2   = ByteBuffer.allocate(128);
ByteBuffer[] buffers = {buffer1,buffer2};

channel.read(buffers);
In the above code, we created two buffers of 128 bytes each. Notice here that we created an array of two buffers. This array is further passed as an argument to the channel for the read. The channel reads the data into the first buffer until the buffer capacity is reached. Once the buffer capacity is reached, the channel automatically switches to the next buffer. Thus, the channel read is being scattered without any impact on the thread.
The Java NIO gathering also works in quite a similar way. The data read into multiple buffers can be gathered and written into a single channel too. The code snippet below does a similar thing.
ByteBuffer buffer1 = ByteBuffer.allocate(128);
ByteBuffer buffer2   = ByteBuffer.allocate(128);
ByteBuffer[] buffers = {buffer1,buffer2};

channel.write(buffers);
The code is similar to scattering read. What needs to be understood is the order of information being written. The information is written into the channel starting from the first buffer. The channel automatically switches to the next buffer once the limit for the first is reached. It is important to note that there is no flip taking place during this write. If you need to flip the buffer before writing, it needs to be done before assigning them to the array.
3.2.2 Channel Transfers
A channel transfer as the name suggests is the process of transferring the data from one channel to the other. A channel transfer can take place from a specific position of channel buffer. However, with position value set to zero, it is possible to copy or replicate a complete input source to a specified output destination. For instance, establishing a channel between keyword and a text editor, will allow you to continuously transfer the inputs from the keyboard to the text editor.
In order to facilitate channel transfer, Java NIO is equipped with two functions namely – transferFrom() and transferTo(). The purpose of these functions is pretty clear from their identifiers. Let us take an example to understand these functions better.
We would be using the file data.txt created above as the input source. We would transfer the data from this file to a new file output.txt. The code below does the same using transferFrom() method call.
ChannelTransfer.java
import java.io.RandomAccessFile;
import java.nio.channels.FileChannel;

public class ChannelTransfer {
	public static void main(String[] args) {
		try {
			RandomAccessFile copyFrom = new RandomAccessFile("src/data.txt", "rw");
			FileChannel fromChannel = copyFrom.getChannel();

			RandomAccessFile copyTo = new RandomAccessFile("src/output.txt", "rw");
			FileChannel toChannel = copyTo.getChannel();

			long count = fromChannel.size();

			toChannel.transferFrom(fromChannel, 0, count);
		} catch (Exception e) {
			System.out.println("Error: " + e);
		}
	}
}
As it can be seen in the above code, the channel fromChannel is used to read the data from data.txt. The toChannel is used to get the data from the fromChannel starting from position 0. It is important to note that the entire file gets copied using the FileChannel. However, in certain implementations of the SocketChannel, this might not be the case. In such a case, only the data that is available to read in the buffer at the time of transfer, gets copied. This behaviour is due to the dynamic nature of the SocketChannel implementations.
The implementation of transferTo is quite similar. The only change that would be required is that the method call will be done using the source object and the destination channel object will be an argument in the method call.
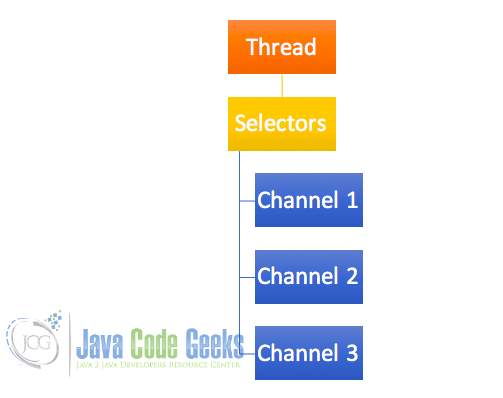
3.3 Selectors
A selector, as the name suggests, is used to select a channel out of multiple channels. A selector in Java NIO is useful specifically when you are planning to use a single thread to manage multiple resources in parallel. A selector acts as a bridge between the thread and the open channels. Selectors are generally used when a thread is expected to have low traffic but requires to use multiple resources. A schematic design of what role selectors might play is depicted below.
The creation of a Selector is quite straightforward. The code snippet below explains how to create a selector and how to register a channel with the selector.
Selector myFirstSelector = Selector.open(); //opens the selector
SocketChannel channel = SocketChannel.open();
channel.configureBlocking(false);
SelectionKey selectorKey = channel.register(myFirstSelector, SelectionKey.OP_READ);
The above code creates a SocketChannel, configures it to be non-blocking and registers it with the selector. Notice carefully that we used a SocketChannel. A Selector requires a channel that can be configured to be non-blocking. Hence, a selector cannot be used with FileChannel.
Another point to notice is the second argument while registering the SocketChannel. The argument specifies the events of the channel that we are interested in monitoring. The selector waits for the events and changes its status as the events are fired. The events are listed below:
- Connect
- Accept
- Read
- Write
These events can be configured using the static constants shown below:
- SelectionKey.OP_CONNECT
- SelectionKey.OP_ACCEPT
- SelectionKey.OP_READ
- SelectionKey.OP_WRITE
The selector provides us with pre-defined functions to check the occurrence of these events. The below method calls are self explanatory and can be used to monitor the occurrence of these events.
key.isAcceptable();
key.isConnectable();
key.isReadable();
key.isWritable();
Thus, a selector is extremely useful when we plan to manage multiple resources with lesser threads.
4. NIO Channels
4.1 FileChannel
This type of channel is generally used to read and write files. A sample code for the creation of channel and using it for the read and write is shown below
ChannelRW.java
import java.io.RandomAccessFile;
import java.nio.ByteBuffer;
import java.nio.channels.FileChannel;

public class ChannelRW {
	public static void main(String[] args) {
		System.out.println("Starting the file read..");
		try {
		RandomAccessFile aFile = new RandomAccessFile("src/data.txt", "rw");
	    FileChannel inChannel = aFile.getChannel();
	    System.out.println("Created file Channel..");
	    ByteBuffer buf = ByteBuffer.allocate(48);

	    int bytesRead = inChannel.read(buf);
	    while (bytesRead != -1) {

	      System.out.println("\nRead " + bytesRead);
	      buf.flip();

	      while(buf.hasRemaining()){
	          System.out.print((char) buf.get());
	      }

	      buf.clear();
	      bytesRead = inChannel.read(buf);
	    }
	    aFile.close();
		}catch(Exception e) {
			System.out.println("Error:"+e);
		}
	}
}
data.txt
Hello,
This is my first NIO read. I am reading multiple lines.
The code is implemented for Javacodegeeks by Abhishek Kothari
In the above code, we are trying to read the data.txt file created as shown above. The file is being read using the Java NIO libraries. The file read process involves multiple steps. A step wise code explanation for the same is shown below.
- Open the file using a
RandomAccessFileobject. This ensures that the file is not blocked for access. Ås the class name suggests, the file is allowed to be accessed randomly only when needed. Hence, the IO is non-blocking in nature - Get a
FileChannelobject from the above created object. The channel helps in reading the data from the file as needed. A channel is a sort of tunnel setup between the file and the buffer - Create a buffer to store the bytes read from the channel. Notice that we have specified the buffer size. Thus, the data will be read in chunks of 48 bytes always.
- Read the data from the buffer until the number of read bytes turn out to be negative.
- Print the data that has been read after flipping the buffer. The reason for the flipping of the buffer is already explained above.
- Close the file objects to prevent memory leak of any sort
The output of the above code is as shown below:
Starting the file read..
Created file Channel..

Read 48
Hello,
This is my first NIO read. I am reading m
Read 48
ultiple lines.
The code is implemented for Javac
Read 28
odegeeks by Abhishek Kothari
As visible, the data is read in chunks of 48 bytes and each time a statement Read 48 appears to show the count of bytes that have been read. As it can be seen, when it reaches the end of the file, only 28 bytes are available to read and hence it returns the count 28.
4.2 SocketChannel
This type of channel is used to connect to http sockets. A simple code to connect to a socket has been shown below:
SocketChannel sc = SocketChannel.open();
sc.connect(new InetSocketAddress("https://javacodegeeks.com", 8080));
The socket channel connects to the specified URL on executing the method call. In order to close an open channel, just execute the respective method call as shown below.
sc.close();
The process to read data from a SocketChannel is similar to the FileChannel.
4.3 ServerSocketChannel
A server socket channel is used to read socket data coming in from socket clients. This channel can be configured to read using the below code snippet.
ServerSocketChannel ssc = ServerSocketChannel.open();

ssc.socket().bind(new InetSocketAddress(8080));

while(true){
    SocketChannel sc =
            ssc.accept();
    //do something with sc...
}
The above code opens a server side socket and allows socket connections from external SocketChannel clients. As it can be understood from the code above, the ServerSocketChannel requires just the port number to start a socket server. Once started, it can create a SocketChannel of its own to accept the data from other sockets. This is how a non-blocking Socket IO connection would be possible using Java NIO.
5. Conclusion
The article discussed in details about various terminologies of Java NIO. It explained the process of reading and writing data in a non-blocking manner using various NIO channels. There is yet more to explore in terms of Java NIO libraries like the DatagramChannel, Pipes, Async channels and others.
