In today’s world internet has changed the way we live our lives and one of the major reasons for that is the usage of internet for most of the daily chores. This lead to huge amount of data available for processing.
Some of the examples where huge data is involved are processing payslips, bank statements, interest calculation, etc. So imagine if all these jobs had to be done manually, it will take ages to finish these jobs.
How is it done in current age? The answer is Batch Processing.
1. Introduction
Batch processing is performed on bulk data, without manual intervention, and long-running. It might be data or computation-intensive. Batch jobs can be run on predefined schedule or can be initiated on demand. Also, since batch jobs are usually long-running jobs, constant checks and restarting from a certain failure are common features found in batch jobs.
1.1 History of Java Batch Processing
Batch processing for Java Platform was introduced as part of JSR 352 specification, part of the Java EE 7 platform, defines the programming model for batch applications plus a runtime to run and manage batch jobs.
1.2 Architecture of Java Batch
Below diagram shows the basic components for batch processing.
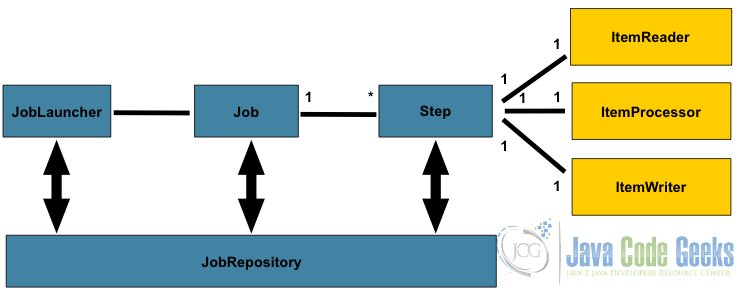
The architecture for batch applications solves batch processing concerns like jobs, steps, repositories, reader processor writer patterns, chunks, checkpoints, parallel processing, flow, retries, sequencing, partitioning, etc.
Let’s understand the flow of architecture.
- Job repository contains the jobs that need to be run.
JobLauncherpulls out a job from Job repository.- Every job contains steps. The steps are
ItemReader,ItemProcessorandItemWriter. - Item Reader is the one which read the data.
- Item Process is the one that will process the data based on business logic.
- The Item writer will write the data back to the defined source.
1.3 Batch Processing Components.
We will now try to understand the batch processing components in detail.
- Job: A job comprises the entire batch process. It contains one or more steps. A job is put together using a Job Specification Language (JSL) that specifies the order in which the steps must be executed. In JSR 352, JSL is specified in an XML file known as the job XML file. A job is basically a container holding steps.
- Step: A step is a domain object that contains an independent, sequential phase of the job. A step contains all the necessary logic and data to perform the actual processing. The definition of a step is kept vague as per the batch specification because the content of a step is purely application-specific and can be as complex or simple as the developer wants. There are two kinds of steps: chunk and task oriented.
- Job Operator: It provides an interface to manage all aspects of job processing, which includes operational commands, such as start, restart, and stop, as well as job repository commands, like retrieval of job and step executions.
- Job Repository: It contains information about jobs currently running and historical data about the job.
JobOperatorprovides APIs to access this repository. AJobRepositorycould be implemented using, a database or a file system.
The following section will help in understanding some common characters of a batch architecture.
1.3 Steps in Job
A Step is an independent phase of a Job. As discussed above, there are two types of steps in a Job. We will try to understand both the types in detail below.
1.3.1 Chunk-Oriented Steps
Chunk steps will read and process one item at a time and group the results into a chunk. The results are then stored when the chunk reaches a predefined size. Chunk-oriented processing makes storing results more efficient when the data set is huge. It contains three parts.
- The item reader reads the input one after the other from a data source which can be a database, flat file, log file, etc.
- The processor will process the data one by one based on the business logic defined.
- A writer writes the data in chunks. Size of the chunk is predefined and is configurable
As part of chunk steps, there are checkpoints which provide information to the framework for the completion of chunks. If there is an error during a chunk processing the process can restart based on the last checkpoint.
1.3.2 Task-Oriented Steps
It executes task other than processing items from a data source. Which includes creation or removal of directories, moving files, creating or deletion of database tables, etc. Task steps are not usually long-running compared to chunk steps.
In a normal scenario, task-oriented steps are used after chunk-oriented steps where there is a clean-up needed. For example, we get log files as an output of an application. The chunk steps are used for processing the data and get meaningful information out of the log files.
The task step is then used to clean-up older log files which are no more needed.
1.3.3 Parallel Processing
Batch jobs often perform expensive computational operations and process large amounts of data. Batch applications can benefit from parallel processing in two scenarios.
- Steps that are independent in nature can run on different threads.
- Chunk-oriented steps where the processing of each item is independent of the results of processing previous items can run on more than one thread.
Batch processing helps to finish tasks and perform operations faster for huge data.
2. Tools and Technologies
Let us look at the technologies and tool used for building the program.
- Eclipse Oxygen.2 Release (4.7.2)
- Java – version 9.0.4
- Gradle– 4.3
- Spring boot – 2.0.1-Release
- HSQL Database
3. Project Structure
The project structure will look as shown in the image below.
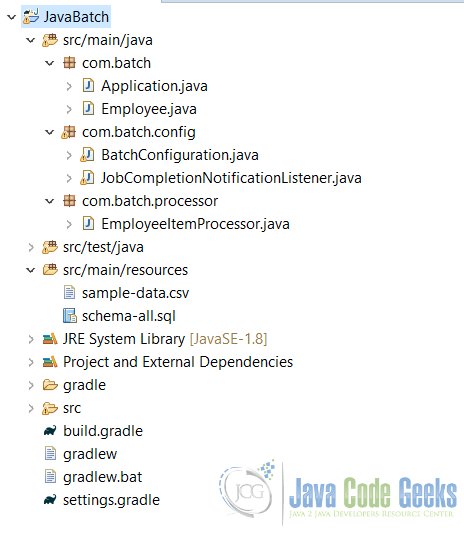
The above project structure is using Gradle. This project can also be created using maven and the build.gralde will get replaced with pom.xml file. The structure of the project will defer slightly with the usage of Maven for the build.
4. An objective of the Program
As part of the program, we will try to create a simple java batch application using spring boot. This application will perform the following tasks.
- Read: – Read employee data from a CSV file.
- Process the data: – Convert the employee data into all upper case.
- Write: – Write the processed employee data back in the database.
4.1 Gradle build
We are using Gradle for the build as part of the program. The build.gradle file will look as shown below.
build.gradle
buildscript {
    repositories {
        mavenCentral()
    }
    dependencies {
        classpath("org.springframework.boot:spring-boot-gradle-plugin:2.0.1.RELEASE")
    }
}

apply plugin: 'java'
apply plugin: 'eclipse'
apply plugin: 'idea'
apply plugin: 'org.springframework.boot'
apply plugin: 'io.spring.dependency-management'

bootJar {
    baseName = 'java-batch'
    version =  '1.0'
}

repositories {
    mavenCentral()
}

sourceCompatibility = 1.8
targetCompatibility = 1.8

dependencies {
    compile("org.springframework.boot:spring-boot-starter-batch")
    compile("org.hsqldb:hsqldb")
    testCompile("junit:junit")
}
In the above build.gradle file apply plugin: 'java' tells us the plugin that needs to be set. For us, it is Java plugin.
repositories{} lets us know the repository from which the dependency should be pulled. We have chosen mavenCentral to pull the dependency jars. We can use jcenter also for pulling the respective dependency jars.
dependencies {} tag is used to provide necessary jar file details that should be pulled for the project. apply plugin: 'org.springframework.boot' this plugin is used for specifying a spring-boot project. boot jar{} will specify the properties of the jar that will get generated from the build.
4.2 Sample data file
In order to provide data for the read phase, we will use a CSV file containing employee data.
The file will look as shown below.
Sample CSV file
John,Foster
Joe,Toy
Justin,Taylor
Jane,Clark
John,Steve
The sample data file contains the first and last name of the employee. We will use the same data for processing and then insertion in the database.
4.3 SQL scripts
We are using HSQL database which is a memory based database. The script will look as shown below.
SQL script
DROP TABLE employee IF EXISTS;

CREATE TABLE employee  (
    person_id BIGINT IDENTITY NOT NULL PRIMARY KEY,
    first_name VARCHAR(20),
    last_name VARCHAR(20)
);
Spring Boot runs schema-@@platform@@.sql automatically when it starts. -all is the default for all platforms. So the table creation will happen on its own when the application starts and it will be available until the application is up and running.
4.4 Model Class
We are going to create an Employee.java class as the model class. The class will look as shown below.
Model Class for the Program
package com.batch;

public class Employee {
	    private String lastName;
	    private String firstName;

	    public Employee() {
	    }

	    public Employee(String firstName, String lastName) {
	        this.firstName = firstName;
	        this.lastName = lastName;
	    }

	    public void setFirstName(String firstName) {
	        this.firstName = firstName;
	    }

	    public String getFirstName() {
	        return firstName;
	    }

	    public String getLastName() {
	        return lastName;
	    }

	    public void setLastName(String lastName) {
	        this.lastName = lastName;
	    }

	    @Override
	    public String toString() {
	        return "firstName: " + firstName + ", lastName: " + lastName;
	    }

	}
@Override is used for overriding the default implementation of the toString() method.
4.5 Configuration Class
We will create a BatchConfiguration.java class which will be the configuration class for batch processing. The java file will look as shown below.
BatchConfiguration.java
package com.batch.config;

import javax.sql.DataSource;

import org.springframework.batch.core.Job;
import org.springframework.batch.core.JobExecutionListener;
import org.springframework.batch.core.Step;
import org.springframework.batch.core.configuration.annotation.EnableBatchProcessing;
import org.springframework.batch.core.configuration.annotation.JobBuilderFactory;
import org.springframework.batch.core.configuration.annotation.StepBuilderFactory;
import org.springframework.batch.core.launch.support.RunIdIncrementer;
import org.springframework.batch.item.database.BeanPropertyItemSqlParameterSourceProvider;
import org.springframework.batch.item.database.JdbcBatchItemWriter;
import org.springframework.batch.item.database.builder.JdbcBatchItemWriterBuilder;
import org.springframework.batch.item.file.FlatFileItemReader;
import org.springframework.batch.item.file.builder.FlatFileItemReaderBuilder;
import org.springframework.batch.item.file.mapping.BeanWrapperFieldSetMapper;
import org.springframework.batch.item.file.mapping.DefaultLineMapper;
import org.springframework.batch.item.file.transform.DelimitedLineTokenizer;
import org.springframework.beans.factory.annotation.Autowired;
import org.springframework.context.annotation.Bean;
import org.springframework.context.annotation.Configuration;
import org.springframework.core.io.ClassPathResource;
import org.springframework.jdbc.core.JdbcTemplate;

import com.batch.Employee;
import com.batch.processor.EmployeeItemProcessor;

@Configuration
@EnableBatchProcessing
public class BatchConfiguration {

    @Autowired
    public JobBuilderFactory jobBuilderFactory;

    @Autowired
    public StepBuilderFactory stepBuilderFactory;

    // tag::readerwriterprocessor[]
    @Bean
    public FlatFileItemReader reader() {
        return new FlatFileItemReaderBuilder()
            .name("EmployeeItemReader")
            .resource(new ClassPathResource("sample-data.csv"))
            .delimited()
            .names(new String[]{"firstName", "lastName"})
            .fieldSetMapper(new BeanWrapperFieldSetMapper() {{
                setTargetType(Employee.class);
            }})
            .build();
    }

    @Bean
    public EmployeeItemProcessor processor() {
        return new EmployeeItemProcessor();
    }

    @Bean
    public JdbcBatchItemWriter writer(DataSource dataSource) {
        return new JdbcBatchItemWriterBuilder()
            .itemSqlParameterSourceProvider(new BeanPropertyItemSqlParameterSourceProvider<>())
            .sql("INSERT INTO employee (first_name, last_name) VALUES (:firstName, :lastName)")
            .dataSource(dataSource)
            .build();
    }
    // end::readerwriterprocessor[]

    // tag::jobstep[]
    @Bean
    public Job importUserJob(JobCompletionNotificationListener listener, Step step1) {
        return jobBuilderFactory.get("importUserJob")
            .incrementer(new RunIdIncrementer())
            .listener(listener)
            .flow(step1)
            .end()
            .build();
    }

    @Bean
    public Step step1(JdbcBatchItemWriter writer) {
        return stepBuilderFactory.get("step1")
            .<Employee, Employee> chunk(10)
            .reader(reader())
            .processor(processor())
            .writer(writer)
            .build();
    }
    // end::jobstep[]
}
@EnableBatchProcessing annotation is used for enabling batch processing.
JobBuilderFactory is the factory which is used for building a job.
StepBuilderFactory is used for step creation.
The method step1() has a property chunk(). This is the property used for chunking the input into a defined size. For us, the size is 10.
4.6 Item Processor
Item processor is an interface which will be responsible for processing the data. We will implement the interface in EmployeeItemProcessor.java. The java class will look as shown below.
EmployeeItemProcessor.java
package com.batch.processor;

import org.slf4j.Logger;
import org.slf4j.LoggerFactory;
import org.springframework.batch.item.ItemProcessor;

import com.batch.Employee;

public class EmployeeItemProcessor implements ItemProcessor<Employee, Employee> {

    private static final Logger log = LoggerFactory.getLogger(EmployeeItemProcessor.class);

    @Override
    public Employee process(Employee emp) throws Exception {
        final String firstName = emp.getFirstName().toUpperCase();
        final String lastName = emp.getLastName().toUpperCase();

        final Employee transformedEmployee = new Employee(firstName, lastName);

        log.info("Converting (" + emp + ") into (" + transformedEmployee + ")");

        return transformedEmployee;
    }

}
In the process() method we will be getting the data and we will be transforming it into the uppercase name.
4.7 JobExecutionSupportListener class
JobExecutionListenerSupport is the interface that will notify when the job is completed. As part of the interface, we have afterJob method. This method is used to post the completion of the job.
JobCompletionNotificationListener.java
package com.batch.config;
import java.util.List;

import org.slf4j.Logger;
import org.slf4j.LoggerFactory;
import org.springframework.batch.core.BatchStatus;
import org.springframework.batch.core.JobExecution;
import org.springframework.batch.core.listener.JobExecutionListenerSupport;
import org.springframework.beans.factory.annotation.Autowired;
import org.springframework.jdbc.core.JdbcTemplate;
import org.springframework.jdbc.core.RowMapper;
import org.springframework.stereotype.Component;

import com.batch.Employee;

@Component
public class JobCompletionNotificationListener extends JobExecutionListenerSupport {

	private static final Logger log = LoggerFactory.getLogger(JobCompletionNotificationListener.class);

	private final JdbcTemplate jdbcTemplate;

	@Autowired
	public JobCompletionNotificationListener(JdbcTemplate jdbcTemplate) {
		this.jdbcTemplate = jdbcTemplate;
	}

	@Override
	public void afterJob(JobExecution jobExecution) {
		RowMapper rowMapper = (rs, rowNum) -> {

			Employee e = new Employee();

			e.setFirstName(rs.getString(1));
			e.setLastName(rs.getString(2));
			return e;
		};
		if(jobExecution.getStatus() == BatchStatus.COMPLETED) {
			log.info("!!! JOB FINISHED! Time to verify the results");

		List empList= jdbcTemplate.query("SELECT first_name, last_name FROM employee",rowMapper);
		log.info("Size of List "+empList.size());
		for (Employee emp: empList) {
			log.info("Found: "+emp.getFirstName()+" "+emp.getLastName());

		}
		}
	}
}
In this method, we are getting the data from the database post completion of the job and we are printing the result on the console to verify the processing that was performed on the data.
4.8 Application class
We will create an application class which will contain the main method responsible for triggering the java batch program. The class will look as shown below.
Application.java
package com.batch;
import org.springframework.boot.SpringApplication;
import org.springframework.boot.autoconfigure.SpringBootApplication;

@SpringBootApplication
public class Application {

    public static void main(String[] args) throws Exception {
        SpringApplication.run(Application.class, args);
    }
}
@SpringBootApplication is the annotation used for specifying a program as a spring boot program.
5. Output
Let’s execute the application as a Java application. We will get the following output on the console.
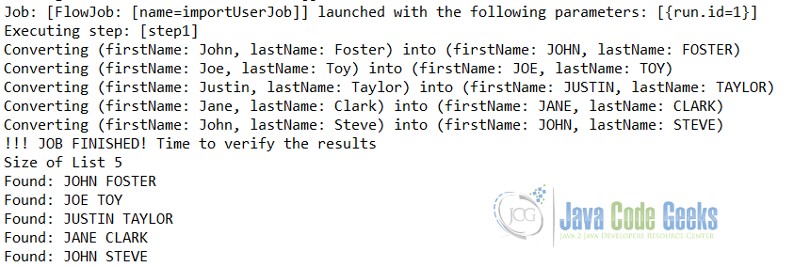
The workflow of the batch program is very clearly available in the output. The Job starts with importUserJob, then step-1 execution starts where it converts the read data into uppercase.
Post-processing of step, we can see the uppercase result on the console.
6. Summary
In this tutorial, we learnt the following things:
- Java batch contains Jobs which can contain multiple steps.
- Every step is a combination of reading, process, write.
- We can chunk out the data into different size for processing.
7. Download the Eclipse project
This was a tutorial for JavaBatch with SpringBoot.

hello, I am a fresh developper in java, I want to get a link to build small project in java to strong project, your batch tutorial is to advanced for me, thanks