This tutorial provides a step-by-step guide on how to build a restfull web service using Spring Boot.
Prerequisites:
- Eclipse IDE (neon release)
- Maven 4
- Java 1.8
1. Create maven web project
Open eclipse then create a new maven web project and name it as SpringBootRest.
The structure of the generated project looks like the following: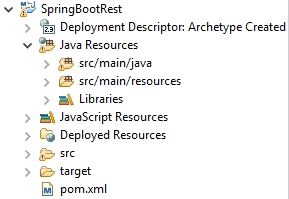
2. pom.xml
After creating the web project, the first step is to configure Spring Boot inside pom.xml, so we add the following as a parent dependency:
<parent>
        <groupId>org.springframework.boot</groupId>
        <artifactId>spring-boot-starter-parent</artifactId>
        <version>1.5.10.RELEASE</version>
</parent>
Spring Boot exposes a starter dependency called spring-boot-starter-web which automatically imports all the required jars needed to develop and expose REST controllers. So we add it as a dependency:
<dependency>
    <groupId>org.springframework.boot</groupId>
    <artifactId>spring-boot-starter-web</artifactId>
</dependency>
In this tutorial, we use the embedded tomcat provided by Spring Boot, so we’re gonna build our application as a runnable jar file by setting the packaging attribute as jar:
<packaging>jar</packaging>
P.S: in case you want to use external tomcat refer to “Deploy Spring Boot application on external tomcat”.
The final configuration step is add the Spring Boot plugin:
<build>
        <plugins>
            <plugin>
                <groupId>org.springframework.boot</groupId>
                <artifactId>spring-boot-maven-plugin</artifactId>
            </plugin>
        </plugins>
</build>
Literally, that’s all we need to start developing our REST controllers.
Following are the jars automatically imported by Spring Boot: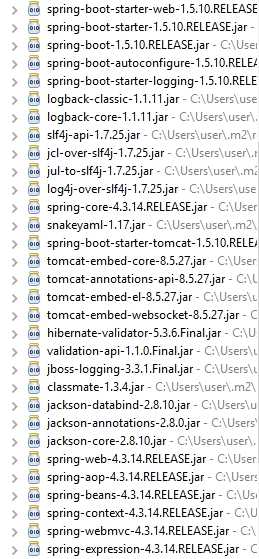
This is the whole pom.xml for reference:
<project xmlns="http://maven.apache.org/POM/4.0.0" xmlns:xsi="http://www.w3.org/2001/XMLSchema-instance"
  xsi:schemaLocation="http://maven.apache.org/POM/4.0.0 http://maven.apache.org/maven-v4_0_0.xsd">
  <modelVersion>4.0.0</modelVersion>
  <groupId>com.programmer.gate</groupId>
  <artifactId>SpringBootRest</artifactId>
  <packaging>jar</packaging>
  <version>0.0.1-SNAPSHOT</version>
  <name>SpringBootRest</name>

   <properties>
       <maven.compiler.source>1.8</maven.compiler.source>
       <maven.compiler.target>1.8</maven.compiler.target>
    </properties>

    <parent>
        <groupId>org.springframework.boot</groupId>
        <artifactId>spring-boot-starter-parent</artifactId>
        <version>1.5.10.RELEASE</version>
    </parent>

  <dependencies>
        <dependency>
                <groupId>org.springframework.boot</groupId>
                <artifactId>spring-boot-starter-web</artifactId>
        </dependency>
  </dependencies>

  <build>
        <plugins>
            <plugin>
                <groupId>org.springframework.boot</groupId>
                <artifactId>spring-boot-maven-plugin</artifactId>
            </plugin>
        </plugins>
    </build>
</project>
3. Application.java
The second step is to create the Spring Boot initializer class, this is the entry point of our application. Annotating a class with @SpringBootApplication is equivalent to using @Configuration, @EnableAutoConfiguration and @ComponentScan with their default attributes in the traditional Spring applications.
package com.programmer.gate;

import org.springframework.boot.SpringApplication;
import org.springframework.boot.autoconfigure.SpringBootApplication;

@SpringBootApplication
public class Application{

    public static void main(String[] args) {
        SpringApplication.run(Application.class, args);
    }
}
P.S: By default, the servlet container automatically scans for REST controllers defined in the same package of the initializer, any controllers defined outside the package would be ignored.
4. Implement REST resources
We’re going to implement a very basic payment API which charges customers for buying items.
Our API would only accept JSON requests and respond back with JSON responses, thanks to jackson library which allows us to deal with requests and responses as POJO classes without worrying about JSON/POJOconversions.
Following is the payment request class which should be submitted by clients on each payment request:
package com.programmer.gate;

public class PaymentRequest {

    private int userId;
    private String itemId;
    private double discount;

    public String getItemId() {
        return itemId;
    }

    public void setItemId(String itemId) {
        this.itemId = itemId;
    }

    public double getDiscount() {
        return discount;
    }

    public void setDiscount(double discount) {
        this.discount = discount;
    }

    public int getUserId() {
        return userId;
    }

    public void setUserId(int userId) {
        this.userId = userId;
    }

}
And this is the base response returned back from our service:
package com.programmer.gate;

public class BaseResponse {

    private String status;
    private Integer code;

    public String getStatus() {
        return status;
    }

    public void setStatus(String status) {
        this.status = status;
    }

    public Integer getCode() {
        return code;
    }

    public void setCode(Integer code) {
        this.code = code;
    }

}
Now we define our controller named as PaymentController under com.programmer.gate:
package com.programmer.gate;

import org.springframework.web.bind.annotation.RequestBody;
import org.springframework.web.bind.annotation.RequestMapping;
import org.springframework.web.bind.annotation.RequestMethod;
import org.springframework.web.bind.annotation.RequestParam;
import org.springframework.web.bind.annotation.RestController;

@RestController
@RequestMapping("/payment")
public class PaymentController {

    private final String sharedKey = "SHARED_KEY";

    private static final String SUCCESS_STATUS = "success";
    private static final String ERROR_STATUS = "error";
    private static final int CODE_SUCCESS = 100;
    private static final int AUTH_FAILURE = 102;

    @RequestMapping(value = "/pay", method = RequestMethod.POST)
    public BaseResponse pay(@RequestParam(value = "key") String key, @RequestBody PaymentRequest request) {

        BaseResponse response = new BaseResponse();
        if(sharedKey.equalsIgnoreCase(key))
        {
            int userId = request.getUserId();
            String itemId = request.getItemId();
            double discount = request.getDiscount();

            // Process the request
            // ....
            // Return success response to the client.

            response.setStatus(SUCCESS_STATUS);
            response.setCode(CODE_SUCCESS);
        }
        else
        {
            response.setStatus(ERROR_STATUS);
            response.setCode(AUTH_FAILURE);
        }
        return response;
    }
}
The only service exposed by our controller is the pay() method which looks very straightforward, it validates the client request using a predefined shared key, processes the request and respond back with the operation status.
Following are the common annotations used by our controller:
- @RestController: this annotation marks the class as a Resource, it defines implicitly both @Controller and @ResponseBody mvc annotations, when annotating a class with @RestController, it’s not necessary to write @ResponseBody beside the POJO classes returned from your methods.
- @RequestMapping: this annotation defines the url of the resource in addition to the method type: GET/POST, in our example we expose the payment service as POST which is accessed through/payment/pay.
- @RequestParam: this annotation represents a specific request parameter, in our example, we map a request parameter called key to an argument key of type String.
- @RequestBody: this annotation represents the body of the request, in our example, we map the body of the request to a POJO class of type PaymentRequest (jackson handles the JSON/POJO conversion)
As noticed the response is represented as BaseResponse and there is no need to annotate it, jackson converts it implicitly to JSON.
5. Deploy the application
Following are the steps to deploy our application:
- Right click pom.xml -> run-as -> Maven install
- Maven generates a jar file called SpringBootRest-0.0.1-SNAPSHOT.jar inside target folder
- Open cmd, then run the jar using: java -jar SpringBootRest-0.0.1-SNAPSHOT.jar
Here we go, our application is up and ready to serve requests at the default port 8080.
6. Test the service
In order to test our API, we use Advanced REST client plugin from chrome and we initiate 2 different requests:
Successful request: in this request we pass a valid shared key as a request parameter along with item details in the request body. This is how it looks like: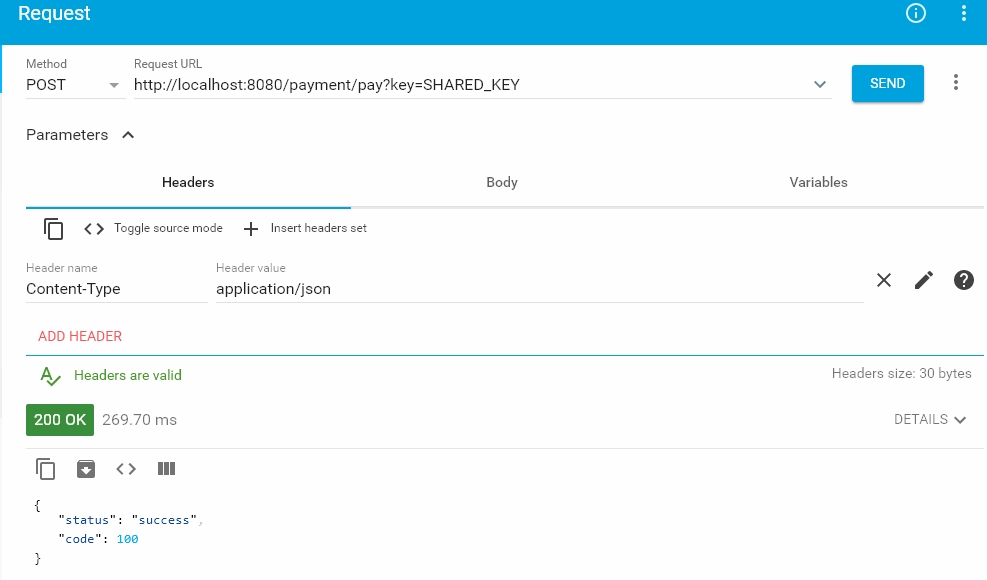
And this is our response:
{
      "status": "success",
      "code": 100
}
Failure request: this request looks similar to the above but with invalid shared key, this is what we get from our API:
{
     "status": "error",
     "code": 102
}
That’s it, hope you find it useful.
| Published on Java Code Geeks with permission by Hussein Terek, partner at our JCG program. See the original article here: Build REST Web Service using Spring Boot Opinions expressed by Java Code Geeks contributors are their own. |

can you please share an example for using DB2 connection in springboot rest?
this is very good article for beginners. Could you please also share springboot application with DB2 connection?
Hi vinod,
Thanks for your comment, this should be published in the next couple of days, just register to programmergate.com to stay notified whenever it’s released
It’s a good article to give developers a start to using REST web services. It might be good to note that the annotation @PostMapping(value = “/pay”) can be used in place of @RequestMapping(value = “/pay”, method = RequestMethod.POST).
Good tip, thank you.