Introduction
Working with a team of developers often poses challenges and causes frustrations with managing the development database. There are many good approaches to solving the problems of interfering with each others’ code, but my preferred solution has become the SQL Server Database Project in Visual Studio.
This article will show you how to take an existing SQL database and create a database project from it, complete with seed data so that you can wipe and restore your local database at the click of a button.
Some benefits of the database project include:
- Quickly reverse-engineer an existing database into a database project, data and all.
- Database code is treated like any other code in your version control system and can be merged and rolled-back.
- The database can be deployed quickly on each developer’s machine to reduce interference between team members.
- The order of changes you see in migration-based solutions is irrelevant so you no longer have collisions in migrations done by two or more developers at the same time.
- Consistent data can be seeded so that data integrity bugs that sneak in during development can be erased and can be used to create a consistent dataset for integration tests.
- You can create a hands-off deployment process for each environment so that your build server runs all change scripts including data motion scripts – I’ll show you how in an upcoming article.
Some drawbacks of the database project include:
- In the beginning of a project, the database might change so often that keeping the database project up to date feels like more work than it’s worth. If so, wait until things settle down a bit and then create a database project from your database.
- With microservice architecture you may have a database project for each domain and if they have dependencies on each other you may find managing those relationships or dependencies can get tricky.
- Some organizations have a process in place for database changes and administration that does not fit well into the model of allowing developers to control the database and its deployments.
If you would like to follow along with this blog, you’ll need these free tools:
Creating a Database Project
For this article you will see how to convert an existing database to a database project using the Northwind database.
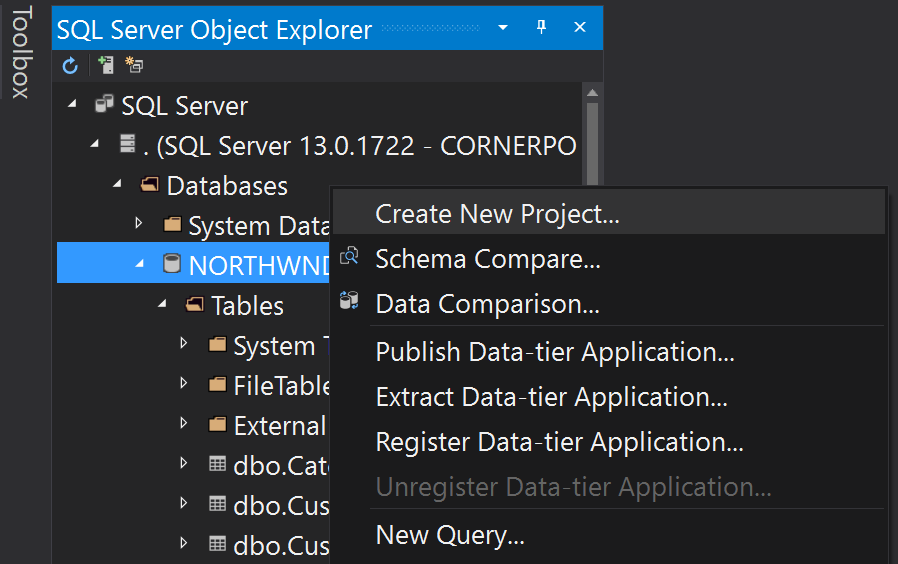
In Visual Studio, add your SQL server to the SQL Server Object Explorer and connect to your target database. Then, right-click on the database and choose “Create New Project.”
After selecting where to save the new project, you can leave all the other options as defaulted and click through the wizard to finish.
This will add the database project with all of the tables, views, and stored procedures, but not include any of the seed data.
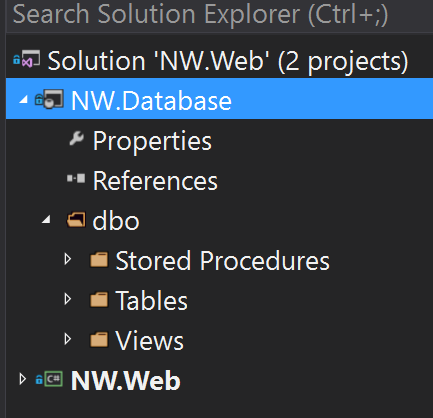
If you have schemas other than dbo, you will see a folder created for each schema and the associated tables, views, etc. will be nested underneath.
Next, add a folder named PostDeploy to the database project to store the data load scripts and the post-deploy script.
Generate Seed Data Scripts
One of the benefits to the database project is that you can quickly publish a set of test data for local development purposes. The best way I have found to do this is to put the data into the database first, and then generate scripts from SQL Management Studio or a tool like SQL Compare by Redgate. I’ll show you how to use SQL Management Studio here because it does a good job and it’s free.
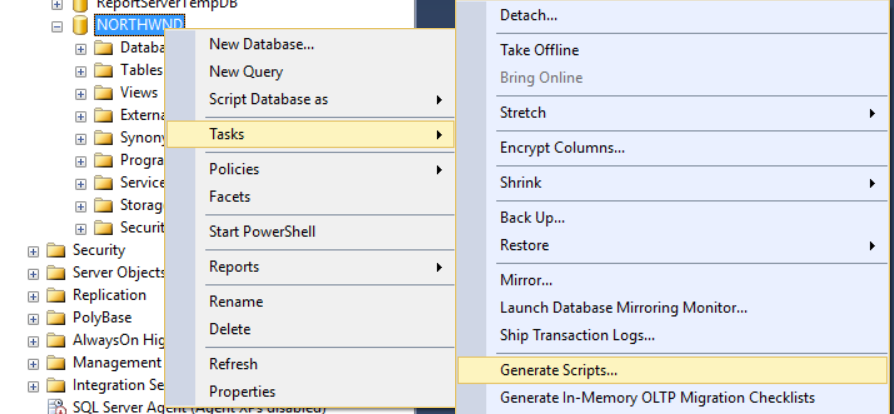
From SQL Management Studio, right-click on your database and choose Tasks, then Generate Scripts. Select just the tables from the objects to script and click Next.
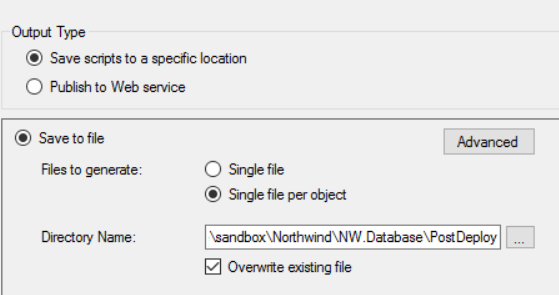
Change the settings to use a “Single file per object” and then select the PostDeploy folder that you created earlier.
Next, click the “Advanced” button and set the “Script USE DATABASE” to “False” and the “Types of data to script” to “Data Only”.

This will export the data for each of the tables into a separate file and saves them in our post deploy folder. Finish the wizard, and return to Visual Studio so we can add those files to the project.
In Visual Studio’s Solution Explorer, click on the database project name and then on the tool bar button for “Show All Files” so that you can see the files in the post deploy folder. Select all of these files, then right-click and select “Include in Project” to add them to the project. You can then turn off the “Show All Files”.
With all of the post deploy files selected, right-click on them and select “Properties” and then change the property for “Build Action” to “None” so that they aren’t included in the publish process and so that the project will build without errors.
Create a Post-Deployment Script
Each database project can have only one post-deployment script because the publish process looks for a file with the “PostDeploy” build action to complete the database deployment. To add one to this project, right-click on the post deploy folder and select “Add”, then “Script”, and select the “Post-Deployment Script”. You can name it anything you want, so for this tutorial name it “PostDeployment.sql”.
Much like it sounds, the post-deployment script will run after the tables, views, and stored procedures are created. It is generally used to load seed data, but you can execute any other commands using SQLCMD syntax.
Open the post-deployment script and enable the SQLCMD mode by clicking on the toolbar button for “SQLCMD Mode” at the top of the window.

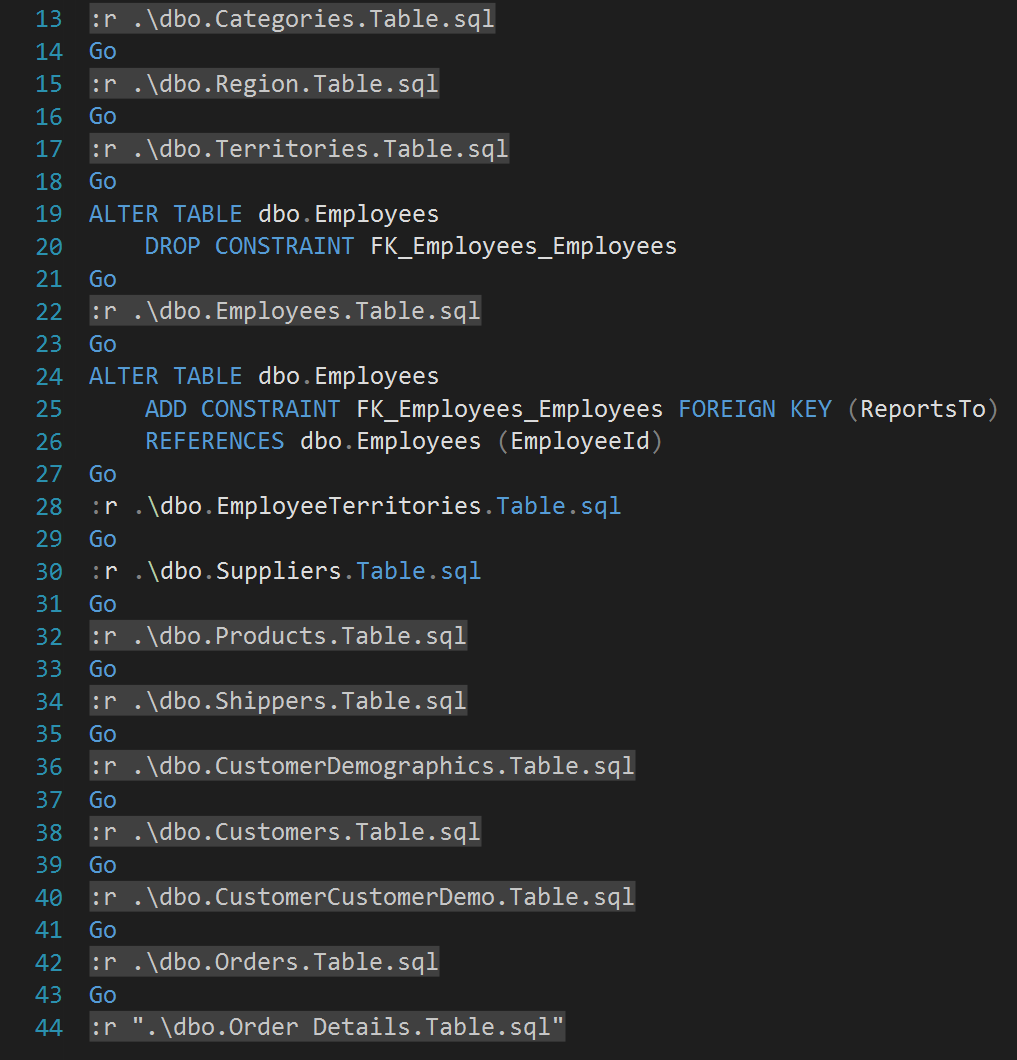
Next add in the commands to run the data load scripts in each of the files that we exported to this folder. These need to execute in the correct order to avoid foreign key violations, and in the case of a self-referential key you will need to drop the key first, load the data, and then re-add the key. Also note that on line 44 you will need to add quotes around the order details table because the command syntax does not like the space in the table name.
Publishing the Database
The database project is now ready to deploy locally and will contain all the tables and the data. Right-click on the database project name and choose “Publish” from the menu. Set the target database connection to your local server and the Northwind database, or choose a different database name to preserve the original for now. In the Advanced settings check the “Always re-create database” and leave the other settings as their defaults; this will drop and re-create the database each time to ensure a clean slate.
You can alternatively change your post deployment scripts to merge scripts and not check the re-create database each time, which can help if you have a lot of seed data or when you are publishing to an environment other than your local server. I haven’t found a tool that will automatically generate merge scripts, so I generally use a combination of Excel and Notepad++ to change the exported insert statements into merge scripts. I’ll show you how I do this in an upcoming article.
Back in the Publish Database wizard, click on the “Save Profile As…” button to save these settings as “local.publish.xml” and then click the “Publish” button. If you have any errors, use the “View Results” link to investigate the problem; the logging is fairly robust and you can generally find the issue. If everything worked as expected, you should now have the Northwind database and data published locally, and a publish file that you can simply double-click anytime you want to wipe and re-create your database!
Summary
In this article you saw how to create a database project that will let you quickly and consistently deploy a database to your local environment. Hopefully this will help you solve some issues on your team from team members interfering with each other’s work on a shared development database.
In an upcoming article, I will show you how to take the next step to include this database project in your continuous integration process and deploy it to each environment up the chain to production so that you can eliminate the need for any direct interaction with database updates.
| Reference: | Creating a SQL Database Project for Isolated Development from our JCG partner Rusty Divine at the Keyhole Software blog. |
