Docker just published a new Docker Engine v1.12. It is the most significant release since v1.9. Back then, we got Docker networking that, finally, made containers ready for use in clusters. With v1.12, Docker is reinventing itself with a whole new approach to cluster orchestration. Say goodbye to Swarm as a separate container that depends on an external data registry and welcome the new Docker Swarm. Everything you’ll need to manage your cluster is now incorporated into Docker Engine. Swarm is there. Service discovery is there. Improved networking is there.
The old Swarm (before Docker v1.12) used fire-and-forget principle. We would send a command to Swarm master, and it would execute that command. For example, if we would send it something like docker-compose scale go-demo=5, the old Swarm would evaluate the current state of the cluster, discover that, for example, only one instance is currently running, and decide that it should run four more. Once such a decision is made, the old Swarm would send commands to Docker Engines. As a result, we would have five containers running inside the cluster. For all that to work, we were required to set up Swarm agents (as separate containers) on all the nodes that form the cluster and hook them into one of the supported data registries (Consul, etcd, and Zookeeper). The problem was that Swarm was executing commands we send it. It was not maintaining the desired state. We were, effectively, telling it what we want to happen (e.g. scale up), not the state we desired (make sure that five instances are running). Later on, the old Swarm got the feature that would reschedule containers from failed nodes. However, that feature had a few problems that prevented it from being a reliable solution (e.g. failed containers were not removed from the overlay network).
Now we got a brand new Swarm. It is part of Docker Engine (no need to run it as separate containers), it has incorporated service discovery (no need to set up Consul or whatever is your data registry of choice), it is designed from the ground up to accept and maintain the desired state, and so on. It is a truly major change in how we deal with cluster orchestration.
In the past, I was inclined towards the old Swarm more than Kubernetes. However, that inclination was only slight. There were pros and cons for using either solution. Kubernetes had a few features Swarm was missing (e.g. the concept of the desired state), the old Swarm shined with its simplicity and low usage of resources. With the new Swarm (the one that comes with v1.12), I have no more doubts which one to use. The new Swarm is a better choice than Kubernetes. It is part of Docker Engine, so the whole setup is a single command that tells an engine to join the cluster. The new networking works like a charm. The bundle that can be used to define services can be created from Docker Compose files, so there is no need maintain two sets of configurations (Docker Compose for development and a different one for orchestration). Most importantly, the new Docker Swarm continues being simple to use. From the very beginning, Docker community pledged that they are committed to simplicity and, with this release, they, once again, proved that to be true.
And that’s not all. The new release comes with a lot of other features that are not directly related with Swarm. However, the exploration of those features would require much more than one article. Therefore, today I’ll focus on Swarm and leave the rest for one of the next articles.
Since I believe that code (or in this case commands), explain things better than words, we’ll start with a demo of some of the new features introduced in version 1.12. Specifically, we’ll explore the new command service.
Environment Setup
The examples that follow assume that you have Docker Machine version v0.8+ that includes Docker Engine v1.12+. The easiest way to get them is through Docker Toolbox.
If you are a Windows user, please run all the examples from Git Bash (installed through Docker Toolbox).
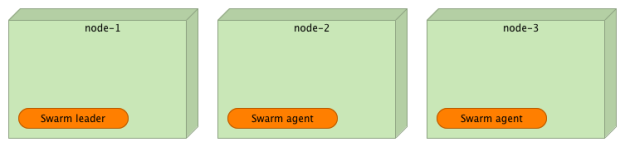
We’ll start by creating three machines that will simulate a cluster.
docker-machine create -d virtualbox node-1

docker-machine create -d virtualbox node-2

docker-machine create -d virtualbox node-3

docker-machine ls
The output of the ls command is as follows.
NAME     ACTIVE   DRIVER       STATE     URL                         SWARM   DOCKER    ERRORS
node-1   -        virtualbox   Running   tcp://192.168.99.100:2376           v1.12.0
node-2   -        virtualbox   Running   tcp://192.168.99.101:2376           v1.12.0
node-3   -        virtualbox   Running   tcp://192.168.99.102:2376           v1.12.0
Please note that Docker version MUST be 1.12 or higher. If it isn’t, please update your Docker Machine version, destroy the VMs, and start over.

With the machines up and running we can proceed and set up the Swarm cluster.
eval $(docker-machine env node-1)

docker swarm init \
    --advertise-addr $(docker-machine ip node-1) \
    --listen-addr $(docker-machine ip node-1):2377
The first command set environment variables so that local Docker Engine is pointing to the node-1. The second initialized Swarm on that machine. Right now, our Swarm cluster consists of only one VM.
Let’s add the other two nodes to the cluster.
As a way to increase security, a new node can be added to the cluster only if it contains the token generated when Swarm was initialized. The token was printed as a result of the docker swarm init commmand. You can copy and paste the code from the output or use the join-token command.
docker swarm join-token -q worker
The output is as follows.
SWMTKN-1-24hd6kvr8ihzu7mtklhwj6p6hi1mv1uw6ohf2axtw9ada02hot-6ttad3td76xwvnctjnt3m0u41
Please note that this token was generated on my machine and, in your case, it will be different.
Let’s put the token into an environment variable and add the other two nodes as workers.
TOKEN=$(docker swarm join-token -q worker)

eval $(docker-machine env node-2)

docker swarm join \
    --token $TOKEN \
    $(docker-machine ip node-1):2377

eval $(docker-machine env node-3)

docker swarm join \
    --token $TOKEN \
    $(docker-machine ip node-1):2377
The other two machines joined the cluster as agents. We can confirm that by sending the node ls command to the Leader node (node-1).
eval $(docker-machine env node-1)

docker node ls
The output of the node ls command is as follows.
ID                           HOSTNAME  MEMBERSHIP  STATUS  AVAILABILITY  MANAGER STATUS
92ho364xtsdaq2u0189tna8oj *  node-1    Accepted    Ready   Active        Leader
c2tykql7a2zd8tj0b88geu45i    node-2    Accepted    Ready   Active
ejsjwyw5y92560179pk5drid4    node-3    Accepted    Ready   Active
The star tells us which node we can currently using. The manager status indicates that the node-1 is the leader.
In a production environment, we would probably set more than one node to be a leader and, thus, avoid deployment downtime if one of them fails. For the purpose of this demo, having one leader should suffice.
Deploying Container To The Cluster
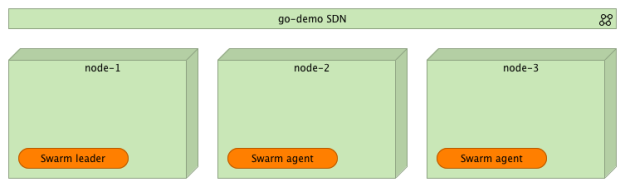
Before we deploy a demo service, we should create a new network so that all containers that constitute the service can communicate with each other no matter on which nodes they are deployed.
docker network create --driver overlay go-demo
We can check the status of all networks with the command that follows.
docker network ls
The output of the network ls command is as follows.
NETWORK ID          NAME                DRIVER              SCOPE
e263fb34287a        bridge              bridge              local
c5b60cff0f83        docker_gwbridge     bridge              local
8d3gs95h5c5q        go-demo             overlay             swarm
4d0719f20d24        host                host                local
eafx9zd0czuu        ingress             overlay             swarm
81d392ce8717        none                null                local
As you can see, we have two networks that have the swarm scope. The one named ingress was created by default when we set up the cluster. The second (go-demo) was created with the network create command. We’ll assign all containers that constitute the go-demo service to that network.
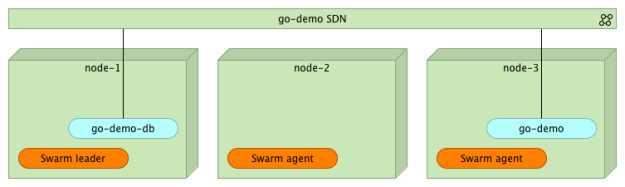
The go-demo service requires two containers. Data will be stored in MongoDB. The back-end that uses that DB is defined as vfarcic/go-demo container.
Let’s start by deploying the mongo container somewhere within the cluster. Usually, we’d use constraints to specify the requirements for the container (e.g. HD type, the amount of memory and CPU, and so on). We’ll skip that and, simply, tell Swarm to deploy it anywhere within the cluster.
docker service create --name go-demo-db \
  -p 27017 \
  --network go-demo \
  mongo
The -p argument sets the port to 27017. Please note that, when it contains only a single value, the port will be reachable only through networks the container belongs to. In this case, we set the network to be go-demo (the one we created earlier). As you can see, the way we use service create is similar to the Docker run command you are, probably, already used to.
We can list all the running services.
docker service ls
Depending on how much time passed between service create and service ls commands, you’ll see the value of the Replicas column being zero or one. Immediately after creating the service, the value should be 0/1, meaning that zero replicas are running and the objective is to have one. Once the mongo image is downloaded, and the container is running, the value should change to 1/1.
The final output of the service ls command should be as follows.
ID            NAME        REPLICAS  IMAGE  COMMAND
c8tjeq1hofjp  go-demo-db  1/1       mongo
If we need more information about the go-demo-db service, we can run the service inspect command.
docker service inspect go-demo-db
Now that the database is running, we can deploy the go-demo container.
docker service create --name go-demo \
  -p 8080 \
  -e DB=go-demo-db \
  --network go-demo \
  vfarcic/go-demo
There’s nothing new about that command. Internally, it exposes port 8080 and it belongs to the network go-demo. The environment variable DB is an internal requirement of the go-demo service that tells the code the address of the database.
At this point, we have two containers (mongo and go-demo) running inside the cluster and communicating with each other through the go-demo network. Please note that none of them is (yet) accessible from outside the network. At this point, your users do not have access to the service API. We’ll discuss this in more details in the next article. Until then, I’ll give you only a hint: you need a proxy capable of utilizing the new Swarm networking.
What happens if we want to scale one of the containers?
Scaling Services
We can, for example, tell Swarm that we want to run five replicas of the go-demo service.
docker service update --replicas 5 go-demo
With the service update command, we scheduled five replicas. After a short some time, Swarm will make sure that five instances of go-demo are running somewhere inside the cluster.
We can confirm that, indeed, five replicas are running through the, already familiar, service ls command.
docker service ls
The output is as follows.
ID            NAME        REPLICAS  IMAGE            COMMAND
1hzeaz2jxs5e  go-demo     5/5       vfarcic/go-demo
c8tjeq1hofjp  go-demo-db  1/1       mongo
As we can see, five out of five replicas of the go-demo container are running.
The service ps command provides more detailed information about a single service.
docker service ps go-demo
The output is as follows.
ID                         NAME       IMAGE            NODE    DESIRED STATE  CURRENT STATE               ERROR
40jasxwg45kg0p1ulht39904o  go-demo.1  vfarcic/go-demo  node-3  Running        Running about a minute ago
08mghas13b99e9bb4rsols77o  go-demo.2  vfarcic/go-demo  node-2  Running        Running 51 seconds ago
bus2hm8y6a113lnemrz5ke0yn  go-demo.3  vfarcic/go-demo  node-2  Running        Running 51 seconds ago
8vae12ugrrrakevey74p7hhsq  go-demo.4  vfarcic/go-demo  node-1  Running        Running 53 seconds ago
99uura8n1tgjtjk4tqp49mszz  go-demo.5  vfarcic/go-demo  node-3  Running        Running about a minute ago
We can see that the go-demo service is running five instances distributed across the three nodes. Since they all belong to the same go-demo network, they can communicate with each other no matter where they run inside the cluster. At the same time, none of them is accessible from “outside”.

What happens if one of the containers is stopped or if the entire node fails? After all, processes and nodes do fail sooner or later. Nothing is perfect, and we need to be prepared for such situations.
Failover
Fortunately, failover strategies are part of Docker Swarm. Remember, when we execute a service command, we are not telling Swarm what to do but the state we desire. In turn, Swarm will do it’s best to maintain the specified state no matter what happens.
To test a failure scenario, we’ll destroy one of the nodes.
docker-machine rm -f node-3
Swarm needs a bit of time until it detects that the node is down. Once it does, it will reschedule containers. We can monitor the situation through the service ps command.
docker service ps go-demo
The output (after rescheduling) is as follows.
ID                         NAME       SERVICE  IMAGE            LAST STATE              DESIRED STATE  NODE
czbpu8lrhds1wx0ml4vhv65s1  go-demo.1      vfarcic/go-demo  node-2  Running        Running 13 seconds ago
40jasxwg45kg0p1ulht39904o   \_ go-demo.1  vfarcic/go-demo  node-3  Shutdown       Running about a minute ago
08mghas13b99e9bb4rsols77o  go-demo.2      vfarcic/go-demo  node-2  Running        Running about a minute ago
bus2hm8y6a113lnemrz5ke0yn  go-demo.3      vfarcic/go-demo  node-2  Running        Running about a minute ago
8vae12ugrrrakevey74p7hhsq  go-demo.4      vfarcic/go-demo  node-1  Running        Running about a minute ago
cnbwfraw6jbkfzf9ufdv970bg  go-demo.5      vfarcic/go-demo  node-1  Running        Running 13 seconds ago
99uura8n1tgjtjk4tqp49mszz   \_ go-demo.5  vfarcic/go-demo  node-3  Shutdown       Running about a minute ago
As you can see, after a short period of time, Swarm rescheduled containers among healthy nodes (node-1 and node-2) and changed the state of those that were running inside the failed node to Shutdown. If, your output still shows that some instances are running on the node-3, please wait for a few moments and repeat the service ps command.
What Now?
That concludes the exploration of basic concepts of the new Swarm features we got with Docker v1.12. Is this everything there is to know to run a Swarm cluster successfully? Not even close! What we explored by now is only the beginning. There are quite a few questions to waiting to be answered. How do we expose our services to the public? How do we deploy new releases without downtime? Are there any additional tools we should use? I’ll try to give answers to those and quite a few other questions in future articles. The next one will be dedicated to the exploration of the ways we can expose our services to the public. We’ll try to integrate a proxy with a Swarm cluster.
| Reference: | Docker Swarm Introduction (Tour Around Docker 1.12 Series) from our JCG partner Viktor Farcic at the Technology conversations blog. |

