This is an example list application built using JSF 2.0 (JavaServer Faces). The app is a list of todo (to do) items. This app has functions to add, edit or delete items in the list. The todo item has name and description properties.
The completed app’s JSF page has:
- A todo list implemented using
h:selectOneListboxhtml tag. - The data for the list is populated using the
f:selectItemscore tag . - The todo name and description fields implemented using
h:inputTextandh:inputTextareatags respectively. - The functions new, edit, save, delete and cancel are implemented with
h:commandButtontags. - A status message implemented using an
h:outputTexttag.
Classes used in the app:
- Todo: this represents a todo, and has name and description properties.
- TodosBean: this is a managed bean; this has code to run the application including listeners and accessor methods for the components.
- TodoConverter: this is a custom converter, converts the string todo name to a Todo object and vice-versa.
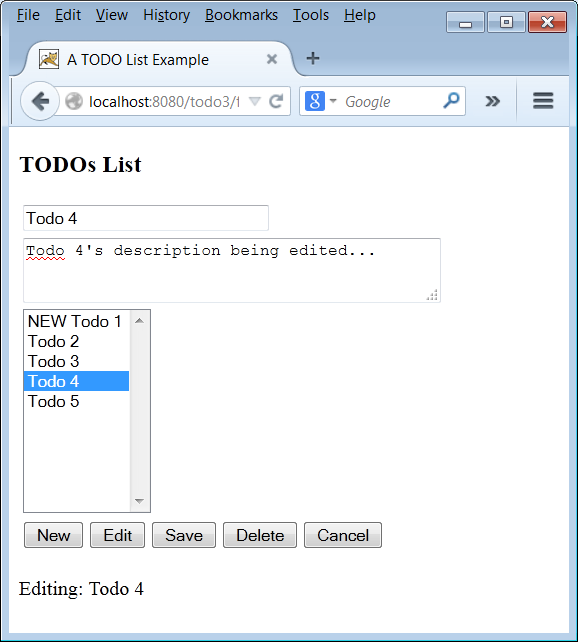
The following figure shows the completed app’s user interface:
This example app is explained in three steps. The first step explains the basic list implementation. The app’s function is enhanced over the next steps. The steps are:
- Step 1: The todo list displays items, and on select displays the selected todo item properties.
- Step 2: List with todos and function to add items to the list.
- Step 3: List with todos and functions to add, edit and delete list items.
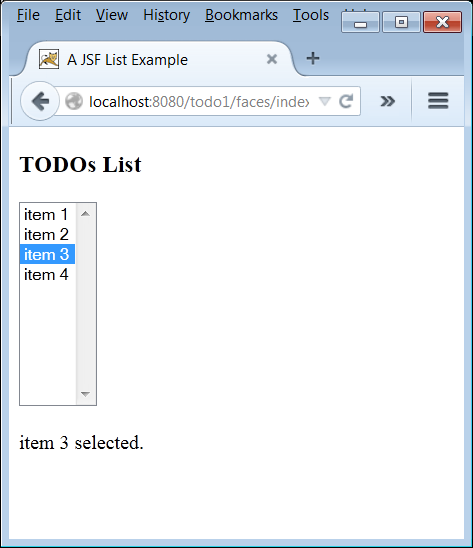
Step 1: The todo list displays items, and on select displays the selected todo item properties.
The following are the code components for this application:
- The
Todo.javaclass represents the todo. - The
index.xhtmlis the JSF page with a listbox, and a status message that displays the selected item in the list. - The
TodosBean.javamanaged bean has functions to get the list data, run the list’s value change listener and to display the status message.
Todo.java:
This class represents the todo item. This has two attributes – name and description. Note the Object class’s overridden toString() method.
Package com.javaquizplayer.example;
public class Todo {
	private String name;
	private String desc;
	public Todo() {
	}
	public Todo(String name, String desc) {
		this.name = name;
		this.desc = desc;
	}
	public String getName() {
		return name;
	}
	public void setName(String name) {
		this.name = name;
	}
	public String getDesc() {
		return desc;
	}
	public void setDesc(String desc) {
		this.desc = desc;
	}
	@Override
	public String toString() {
		return this.name;
	}
}
index.xhtml:
This JSF page displays the todos list. The list can be scrolled and an item can be selected. The selected item name is displayed in the status message.
The listbox is implemented with the h:selectOneListbox html tag. The listbox’s current selected item value is specified with the attribute: value="#{bean.todo}". The selection items are specified with the f:selectItems core tag:
<f:selectItems value="#{bean.data}"/>
This tag is placed within the h:selectOneListbox tag. The listbox’s items are populated from the TodosBean‘s getData() method which returns a List collection. The listbox displays the labels – todo’s name values, i.e., the Todo object’s String value from the toString() method.
The listbox’s value change listener is specified with the attribute:
valueChangeListener=""#{bean.valueChanged}"
When a list item is selected, the form is submitted and this listener code is executed. In this example, when a list item is selected, the todo’s name is displayed in the status message as “todo_item_name selected.”.
The form is submitted each time an item is selected in the listbox. This is specified with the listbox’s attribute: onchange="submit()".
The status message is displayed with the output component:
<h:outputText id="msg" value="#{bean.message}" />
.
<?xml version="1.0" encoding="UTF-8"?>
<!DOCTYPE html PUBLIC "-//W3C//DTD XHTML 1.0 Transitional//EN"
"http://www.w3.org/TR/xhtml1/DTD/xhtml1-transitional.dtd">
<html xmlns="http://www.w3.org/1999/xhtml"
	xmlns:f="http://java.sun.com/jsf/core"
	xmlns:h="http://java.sun.com/jsf/html">
<h:head>
	<title>A JSF List Example</title>
</h:head>
<h:body>
	<h:form>
		<h3>TODOs List</h3>
		<h:selectOneListbox id="list" size="10"
				value="#{bean.todo}"
				valueChangeListener="#{bean.valueChanged}"
				onchange="submit()">
			<f:selectItems value="#{bean.data}"/>
		</h:selectOneListbox>
		<h:outputText id="msg" value="#{bean.message}" />
	</h:form>
</h:body>
</html>
TodosBean:
This managed bean class has functions:
- To create initial todo data and populate the todo list.
- A value change listener to get the currently selected list item.
- To capture the currently selected item value in the list.
- Set the status message.
package com.javaquizplayer.example;
import javax.faces.bean.SessionScoped;
import javax.faces.bean.ManagedBean;
import javax.faces.event.ValueChangeEvent;
import java.io.Serializable;
import java.util.List;
import java.util.ArrayList;
@ManagedBean(name="bean")
@SessionScoped
public class TodosBean implements Serializable {
	private List<Todo> data; // todo list data
	private String todo; // the currently selected item value
	private String msg; // status message
	public TodosBean() {
		loadData();
		// select the first item in the list
		Todo t = data.get(0);
		setTodo(t.getName());
		setMessage(t.getName() + " selected.");
	}
	private void loadData() {
		data = new ArrayList<>();
		Todo t = new Todo("item 1", "item 1 description");
		data.add(t);
		t = new Todo("item 2", "item 2 description");
		data.add(t);
		t = new Todo("item 3", "item 3 description");
		data.add(t);
		t = new Todo("item 4", "item 4 description");
		data.add(t);
	}
	public List<Todo> getData() {
		return data;
	}
	public String getTodo() {
		return todo;
	}
	public void setTodo(String t) {
		todo = t;
	}
	// value change listener for list item selection
	public void valueChanged(ValueChangeEvent e) {
		String t = (String) e.getNewValue();
		setMessage(t + " selected.");
	}
	public void setMessage(String s) {
		msg = s;
	}
	public String getMessage() {
		return msg;
	}
}
Step 2: List with todo items and function to add items to the list.
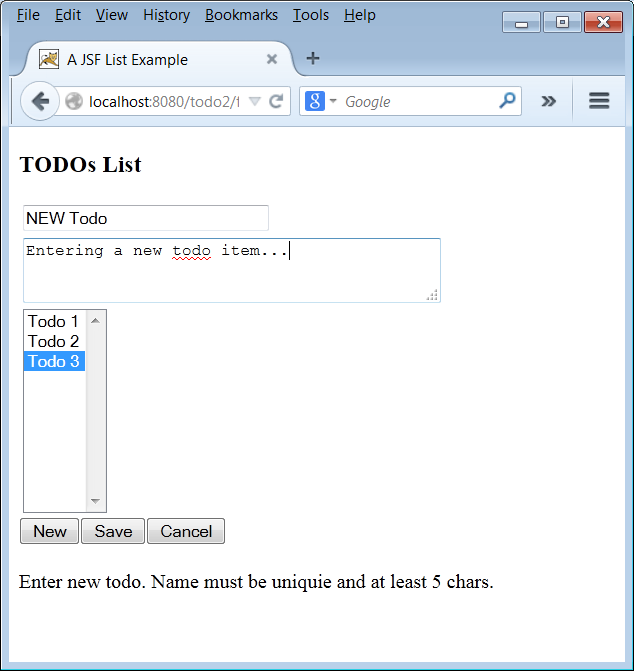
In this step, the app has function to add a new todo item. Click the New button, enter the todo data in the name and description text fields and save. Cancel the new todo data entry by clicking the cancel button, or by selecting another item in the list.
The code components are the same as that of the previous step, but are enhanced with new functions. A new custom converter class is added to the app.
- The
Todo.javaclass represents the todo, is not changed. - The
index.xhtmlis the JSF page with the listbox, and the status message that displays the selected item in the list. In addition there are widgets to enter new todo items and save. - The
TodosBean.javamanaged bean has the code to get the list data, run the lists value change listener and to display a message. In addition there are action listeners for new, save and cancel actions. - A converter,
TodoConverter.javaconverts data from todo string value to Todo object, and vice-versa.
Todo.java:
This class remains unchanged.
index.xhtml:
The following are the changes:
The listbox’s currently selected item value is specified as: value="#{bean.todo}". In the previous step 1, the item value resolved to todo’s name string. Now, the value resolves to an instance of Todo.
The following are newly added:
The todo’s name and description fields are implemented with h:inputText and h:inputTextarea tags respectively. Note that these fields are editable only when the todo data is being edited (i.e., the New todo function): readonly="#{not bean.editable}". When the list is in select mode these fields are read only.
A converter is attached to the list to convert the selected item name to a Todo object, and vice-versa using a f:converter core tag:
<f:converter converterId="todoConvertor"/>
Note that an attribute is set for the converter:
<f:attribute name="beanattr" value="#{bean}"/>
; this is used to access the Todo data within the converter class.
Three command buttons are added for the new, save and cancel actions using the h:commandButton tag. Each button has its respective action listener. For example:
<h:commandButton value="New" actionListener="#{bean.newListener}"/>
.
Finally, the listbox’s submit is changed to an Ajax call using the f:ajax core tag: onchange="submit()" is replaced with
<f:ajax execute="@this" render="msg name desc" />
Why is this change?
With the submit option, when the New action is cancelled by selecting another list item, the text and textarea fields will not be populated with the selected item; the values will remain as edited. This is because the edited text values are also submitted with the form; these values will not change to the selected item values. But, with Ajax, the form is not submitted, only the text values are updated (the render attribute of the f:ajax tag specifies the fields to be updated: the status message, todo name and description).
NOTE: In the following code, the newly added and removed code lines from the previous step 1 are highlighted.
<!DOCTYPE html PUBLIC "-//W3C//DTD XHTML 1.0 Transitional//EN"
"http://www.w3.org/TR/xhtml1/DTD/xhtml1-transitional.dtd">
<html xmlns="http://www.w3.org/1999/xhtml"
	xmlns:f="http://java.sun.com/jsf/core"
	xmlns:h="http://java.sun.com/jsf/html">
<h:head>
	<title>A JSF List Example</title>
</h:head>
<h:body>
	<h:form>
		<h3>TODOs List</h3>
        	<h:panelGrid>
			<h:inputText id="name" value="#{bean.todoName}" size="30"
					readonly="#{not bean.editable}"/>
			<h:inputTextarea id="desc" value="#{bean.todoDesc}"
					rows="2" cols="40"
					readonly="#{not bean.editable}"/>
			<h:selectOneListbox id="list" size="10" value="#{bean.todo}"
					valueChangeListener="#{bean.valueChanged}"
					onchange="submit()">
				<f:ajax execute="@this" render="msg name desc"/>
				<f:selectItems value="#{bean.data}"/>
				<f:attribute name="beanattr" value="#{bean}"/>
				<f:converter converterId="todoConvertor"/>
			</h:selectOneListbox>
        		</h:panelGrid>
		<h:commandButton value="New" actionListener="#{bean.newListener}"/>
		<h:commandButton value="Save" actionListener="#{bean.saveListener}"/>
		<h:commandButton value="Cancel" actionListener="#{bean.cancelListener}"/>
		<h:outputText id="msg" value="#{bean.message}" />
	</h:form>
</h:body>
</html>
TodoConverter.java:
This is a custom converter class, converts the Todo objects to string (todo name) and vice-versa.
package com.javaquizplayer.example;
import javax.faces.component.UIComponent;
import javax.faces.context.FacesContext;
import javax.faces.convert.Converter;
import javax.faces.convert.ConverterException;
import javax.faces.convert.FacesConverter;
import java.util.Map;
@FacesConverter(value="todoConvertor")
public class TodoConverter implements Converter {
	private static final long serialVersionUID = 1L;
	@Override
	public Object getAsObject(FacesContext context, UIComponent component,String value)
			throws ConverterException {
		if (value == null) {
			return null;
		}
		Map<String, Object> attrs = component.getAttributes();
		TodosBean bean = (TodosBean) attrs.get("beanattr");
		Todo todo = bean.getTodoForName(value);
		return todo;
	}
	@Override
	public String getAsString(FacesContext context, UIComponent component,Object value)
			throws ConverterException {
		if (value == null) {
			return null;
		}
		Todo todo = (Todo) value;
		return todo.getName();
	}
}
TodosBean.java:
This managed bean class has functions:
- To populate the todo list.
- A value change listener to get the currently selected list item.
- To capture the currently selected item value in the list.
- Set the status message.
These are the changes:
- Capture the currently selected item value in the list as a Todo object (instead of the todo name string used earlier).
- The value change listener is changed to get the Todo object rather than the string value todo name.
These are newly added:
- Accessor methods for the todo name, description and their editability.
- Action listeners for the new, save and cancel actions.
package com.javaquizplayer.example;
import javax.faces.bean.SessionScoped;
import javax.faces.bean.ManagedBean;
import javax.faces.event.ValueChangeEvent;
import javax.faces.event.ActionEvent;
import java.io.Serializable;
import java.util.List;
import java.util.ArrayList;
@ManagedBean(name="bean")
@SessionScoped
public class TodosBean implements Serializable {
	private List<Todo> data;
	private Todo todo; // selected item value
	private String msg;
	private String name; // text field value
	private String desc;
	private String actionFlag = "NONE"; // specifies the current action (NEW, NONE)
	private boolean editable;
	public TodosBean() {
		loadData();
		if (data.size() == 0) {
			return;
		}
		Todo t = data.get(0);
		selectRow(t); // select the first item in the list
	}
	private void selectRow(Todo t) {
		setTodo(t);
		setTodoName(t.getName());
		setTodoDesc(t.getDesc());
		setMessage(t.getName() + " selected."););
	}
	private void loadData() {
		data = new ArrayList<>();
	}
	public List<Todo> getData() {
		return data;
	}
	public Todo getTodo() {
		return todo;
	}
	public void setTodo(Todo t) {
		todo = t;
	}
	public void valueChanged(ValueChangeEvent e) {
		if (! actionFlag.equals("NONE")) {
			setEditable(false);
			actionFlag = "NONE";
		}
		Todo t = (Todo) e.getNewValue();
		setMessage(t.getName() + " selected."););
		setTodoName(t.getName());
		setTodoDesc(t.getDesc());
	}
	public void setMessage(String msg) {
		this.msg = msg;
	}
	public String getMessage() {
		return msg;
	}
	public String getTodoName() {
		return name;
	}
	public void setTodoName(String n) {
		name = n;
	}
	public String getTodoDesc() {
		return desc;
	}
	public void setTodoDesc(String d) {
		desc = d;
	}
	// returns the Todo object for a given todo name
	// method used in converter
	public Todo getTodoForName(String name) {
		for (Todo t : data) {
			if (name.equals(t.getName())) {
				return t;
			}
		}
		return null;
	}
	public void setEditable(boolean b) {
		editable = b;
	}
	public boolean getEditable() {
		return editable;
	}
	public void newListener(ActionEvent e) {
		setEditable(true);
		setMessage("Enter new todo. Name must be uniquie and at least 5 chars.");
		setTodoName("NEW Todo");
		setTodoDesc("");
		actionFlag = "NEW";
	}
	public void saveListener(ActionEvent e) {
		if (! actionFlag.equals("NEW")) {
			return;
		}
		String name = getTodoName();
		String desc = getTodoDesc();
		if (name.length() < 5) {
			setMessage("Name must be at least 5 chars long.");
			return;
		}
		if (duplicateName(name)) {
			setMessage("Name must be unique.");
			return;
		}
		Todo t = new Todo(name, desc);
		data.add(t);
		setMessage(name + " saved.");
		setTodo(t); // select the saved item
		setEditable(false);
		actionFlag = "NONE";
	}
	private boolean duplicateName(String name) {
		for (Todo t : data) {
			if (t.getName().equals(name)) {
				return true;
			}
		}
		return false;
	}
	public void cancelListener(ActionEvent e) {
		if (actionFlag.equals("NONE")) {
			return;
		}
		actionFlag = "NONE";
		setMessage(actionFlag + " action cancelled");
		if (data.size() == 0) {
			setTodoName("");
			setTodoDesc("");
			setEditable(false);
			return;
		}
		// populate text fields with selected item
		setTodoName(todo.getName());
		setTodoDesc(todo.getDesc());
		setEditable(false);
	}
}
Step 3: List with todos and functions to add, edit and delete list items.
This is the completed app. This has functions to select, add, edit and delete a list item.
In this step, two new functions are added – edit, delete a list item. To edit, select a todo list item, and click the Edit button. This allows change the name and description values, and save. The editing may be cancelled, either by clicking the cancel button or by selecting another list item. The delete functions allows delete a selected todo list item.
The code components are the same as that of the previous step 2, but are enhanced with new functions.
- The
Todo.javaclass represents the todo. This is not changed. - A converter,
TodoConverter.javaconverts data from todo string value to Todo object, and vice-versa. This is not changed. - The
index.xhtmlis the JSF page with the listbox, todo properties, and the status message that displays the selected item in the list. In addition there are widgets to add, edit a selected item or delete it. - The
TodosBean.javamanaged bean has the code to get the list data, run the list’s value change listener and to display a message. In addition, there are action listeners for the new, edit, delete, save and cancel actions.
Todo.java:
This class remains unchanged.
TodoConverter.java:
This class remains unchanged.
index.xhtml:
The following are newly added:
Two command buttons are added for the edit and delete actions. Each button has its respective action listener.
TodoBean.java:
This managed bean class has functions:
- To populate the todo list.
- A value change listener to get the currently selected list item.
- To capture the currently selected item value in the list.
- Set the status message.
- Accessor methods for the todo name, description and their editability.
- Action listeners for the new, save and cancel actions. These are enhanced to accommodate the edit and delete functions.
These are newly added:
- Action listeners for the edit and delete actions.
Code Download:
These are links to download the completed app’s WAR file and the source code.
Notes and References:
This app is developed using the Apache MyFaces 2.0 (MyFaces 2.0 implements JavaServer Faces 2.0). The app is tested on Tomcat 6 webserver and GlassFish 3 application server (GlassFish 3 implements Java EE 6).

But the list is not populated from the textarea like in the picture. Could you please make it fully functional like in final picture with a function edit and delete button.
Hi Sagun Kumar,
Thanks for reading my post and trying the example. When you create a TODO – enter the Todo-name and the Todo-description (you have to type in the description text area box).
To try the example, click the “New” button and enter in the name and description fields, and then click “Save”. The newly entered TODO will be added to the list. Then add some more TODO items. Then try selecting any TODO from the list. The selected TODOs name and description will show in the respective fields.