A common requirement for enterprise applications is to have all JSF pages protected behind a login page. Sometimes you even want to have protected areas inside the application that are only accessible by users that own a specific role. The Java EE standards come with all the means you need to implement a web application that is protected by some security constraints. In this blog post we want to develop a simple application that demonstrates the usage of these means and shows how you can build a complete JSF application for two different roles. As the solution might look straight forward at first glance, there are a few pitfalls one has to pay attention to.
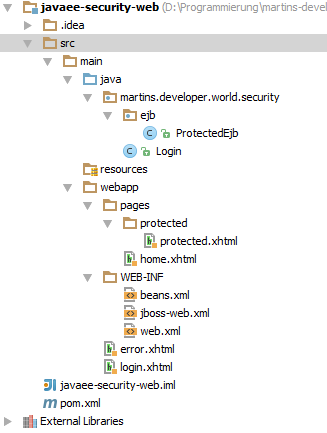
The first point we have to care about, is the folder layout of our application. We have three different kinds of pages:
- The login page and the error page for the login should be accessible by all users.
- We have a home page that should only be accessible for authenticated users.
- We have a protected page that should only be visible for users of the role protected-role.
These three types of pages are therefore put into three different folders: the root folder src/main/webapp, the folder src/main/webapp/pages and the protected page resides in src/main/webapp/pages/protected:
The web.xml file is the place to define which roles we want to use and how to map the accessibility of some URL pattern to these roles:
<security-constraint>
    <web-resource-collection>
        <web-resource-name>pages</web-resource-name>
        <url-pattern>/pages/*</url-pattern>
        <http-method>PUT</http-method>
        <http-method>DELETE</http-method>
        <http-method>GET</http-method>
        <http-method>POST</http-method>
    </web-resource-collection>
    <auth-constraint>
        <role-name>security-role</role-name>
        <role-name>protected-role</role-name>
    </auth-constraint>
</security-constraint>
<security-constraint>
    <web-resource-collection>
        <web-resource-name>protected</web-resource-name>
        <url-pattern>/pages/protected/*</url-pattern>
        <http-method>PUT</http-method>
        <http-method>DELETE</http-method>
        <http-method>GET</http-method>
        <http-method>POST</http-method>
    </web-resource-collection>
    <auth-constraint>
        <role-name>protected-role</role-name>
    </auth-constraint>
</security-constraint>

<security-role>
    <role-name>security-role</role-name>
</security-role>
<security-role>
    <role-name>protected-role</role-name>
</security-role>
As you can see we define two roles: security-role and protected-role. URLs matching the pattern /pages/* are only accessible by users that own the roles security-role and protected-role, whereas the pages under /pages/protected/* are restricted to users with the role protected-role.
Another point you may stumble upon is the welcome page. At first guess you would want to the specify the login page as welcome page. But this does not work, as the login module of the servlet container automatically redirects all unauthorized accesses to the login page. Therefore we specify the home page of our application as welcome page. This is already a protected page, but the user will get redirected to the login page automatically when he calls its URL directly.
<welcome-file-list>
    <welcome-file>pages/home.xhtml</welcome-file>
</welcome-file-list>
Now we are nearly done with the web.xml page. All we to do is to define the authentication method as well as the login page and the error page, which is shown in case the user enters invalid credentials. One has to page attention that both pages don’t include protected URLs (e.g. CSS or JavaScript files), otherwise even the access to these two pages is forbidden and the user gets an Application Server specific error page to see.
<login-config>
    <auth-method>FORM</auth-method>
    <form-login-config>
        <form-login-page>/login.xhtml</form-login-page>
        <form-error-page>/error.xhtml</form-error-page>
    </form-login-config>
</login-config>
As we are going to deploy the application to the JBoss Application Server, we provide a file named jboss-web.xml that connects our application to a security-domain:
<?xml version="1.0" encoding="UTF-8"?>
<jboss-web>
    <security-domain>java:/jaas/other</security-domain>
</jboss-web>
The “other” security-domain is configured inside the standalone.xml. The default configuration requires that the user passes the “RealmUsersRoles” login module, which gets its user and role definitions from the two files application-users.properties and application-roles.properties inside the configuration folder. You can use the provided add-user script to add a new user to this realm:
What type of user do you wish to add?
 a) Management User (mgmt-users.properties)
 b) Application User (application-users.properties)
(a): b

Enter the details of the new user to add.
Realm (ApplicationRealm) :
Username : bart
Password :
Re-enter Password :
What roles do you want this user to belong to? (Please enter a comma separated list, or leave blank for none) : security-role,protected-role
About to add user 'bart' for realm 'ApplicationRealm'
Is this correct yes/no? yes
Here it is important to choose the correct realm (ApplicationRealm), as this realm is configured by default in the standalone.xml for the “other” login module. This is also the place where you provide the roles the user possesses as a comma separated list.
<form method="POST" action="j_security_check" id="">
	<h:panelGrid id="panel" columns="2" border="1" cellpadding="4" cellspacing="4">
		<h:outputLabel for="j_username" value="Username:" />
		<input type="text" name="j_username"/>
		<h:outputLabel for="j_password" value="Password:" />
		<input type="password" name="j_password"/>
		<h:panelGroup>
			<input type="submit" value="Login"/>
		</h:panelGroup>
	</h:panelGrid>
</form>
The next step is to implement a simple login form that submits its data to the login module. Note the ids of the input fields as well as the action of the form. This way the form is posted to the login module, which extracts the entered username and password from the request. JSF developers may wonder why we use a standard HTML form instead of the element. The reason for this is that the JSF form elements spans its own namespace and therefore the ids of the input fields are prefixed with the id of the form (and this form id cannot be empty).
If the user has passed the login form, we present him a home page. But the link to the protected page should only be accessible for users that own the role protected-role. This can be accomplished by the following rendered condition:
<h:link value="Protected page" outcome="protected/protected" rendered="#{facesContext.externalContext.isUserInRole('protected-role')}"/>Last but not least we need the logout functionality. For this case we implement a simple backing bean like the following one that invalidates the user’s session and redirects him back to the login page:
@Named(value = "login")
public class Login {

    public String logout() {
        FacesContext.getCurrentInstance().getExternalContext().invalidateSession();
        return "/login";
    }
}- As usual the complete source code can be found on github.

If you want to logout without destroying the session you can use HttpServletRequest.logout().
((HttpServletRequest) FacesContext.getCurrentInstance().getExternalContext().getRequest()).logout();
What is the IDE you are using in the picture above?
Its IntelliJ IDEA, this IDE is rising up so fast!, Take a brief introduction about it.
I am new in Java EE. Can you send me the link of java EE tutorial.