It’s hard to imagine a web-application which doesn’t has some validation logic for an user data. Almost all user’s data has some constraints, e.g. date of birth should consist of day, month, year etc. Spring MVC has its own solution for the data validation, and it’s become available with the help of Validator interface.
Usage of Spring MVC Validator
A validation make sense in time when you receive some kind of data from users. An obvious way to do this is to use web forms. The Validator interface it is a means to implement the validation logic of entire Spring MVC application. Sounds promising.
There are three things which you need to do in order to start using the Validator:
- Create a validator class for some domain model and implment the Validator interface.
- Overload supports(Class clazz) method.
- Overload validate(Object target, Errors errors) method.
Now you know the basics of the Validator interface usage. Enough of theory let’s go ahead with practice.
Exapmle of Vlidator Spring MVC
I want to demonstrate the Validator interface in action on one of my previous tutorials where a validation will not be redundant. I mean the sample application with Spring Data. First you need to update the pom.xml file, add the following dependency:
...
		<dependency>
			<groupid>javax.validation</groupid>
			<artifactid>validation-api</artifactid>
			<version>1.0.0.GA</version>
		</dependency>
		<dependency>
			<groupid>org.hibernate</groupid>
			<artifactid>hibernate-validator</artifactid>
			<version>4.3.0.Final</version>
		</dependency>
...
In the project I have the one POJO:
@Entity
    @Table(name = "shops")
    public class Shop {

        @Id
        @GeneratedValue
        private Integer id;

        private String name;

        @Column(name = "employees_number")
        private Integer emplNumber;

        public Integer getId() {
            return id;
        }

        public void setId(Integer id) {
            this.id = id;
        }

        public String getName() {
            return name;
        }

        public void setName(String name) {
            this.name = name;
        }

        public Integer getEmplNumber() {
            return emplNumber;
        }

        public void setEmplNumber(Integer emplNumber) {
            this.emplNumber = emplNumber;
        }
    }
So let’s create the validation rules for it:
- The “name” can’t be empty.
- The “emplNumber” can’t be empty.
- The “emplNumber” can’t be less then 1.
The validation class for these purposes will look like:
import org.springframework.stereotype.Component;
import org.springframework.validation.Errors;
import org.springframework.validation.ValidationUtils;
import org.springframework.validation.Validator;

import com.spr.model.Shop;

@Component
public class ShopValidator implements Validator {

	private final static String EMPLOYEES_NUMBER = "emplNumber";

	@Override
	public boolean supports(Class clazz) {
		return Shop.class.isAssignableFrom(clazz);
	}

	@Override
	public void validate(Object target, Errors errors) {
		Shop shop = (Shop) target;

		Integer emplNumber = shop.getEmplNumber();

		ValidationUtils.rejectIfEmpty(errors, "name", "shop.name.empty");
		ValidationUtils.rejectIfEmpty(errors, EMPLOYEES_NUMBER, "shop.emplNumber.empty");

		if (emplNumber != null && emplNumber < 1)
			errors.rejectValue(EMPLOYEES_NUMBER, "shop.emplNumber.lessThenOne");

	}

}
Notice that I applied @Component annotation to the class because I’m planning to inject it later into the ShopController. Here are an explanation of the Validator’s methods:
supports(Class) – Can this Validator validate instances of the supplied Class? validate(Object, org.springframework.validation.Errors) – validates the given object and in case of validation errors, registers those with the given Errors object. For the additional information look at the javadoc of ValidationUtils class. The messages which will be shown during validation should be placed in the “messages.properties” file:
shop.name.empty = The "Shop name" field can't be empty.
shop.emplNumber.empty = The "Employees number" field can't be empty.
shop.emplNumber.lessThenOne = The number of employees can't be less then 1.
Let’s move to the controller’s code:
...
	@Autowired
	private ShopValidator shopValidator;

	@InitBinder
	private void initBinder(WebDataBinder binder) {
		binder.setValidator(shopValidator);
	}
...
	@RequestMapping(value="/create", method=RequestMethod.POST)
	public ModelAndView createNewShop(@ModelAttribute @Valid Shop shop,
			BindingResult result,
			final RedirectAttributes redirectAttributes) {

		if (result.hasErrors())
			return new ModelAndView("shop-new");

		ModelAndView mav = new ModelAndView();
		String message = "New shop "+shop.getName()+" was successfully created.";

		shopService.create(shop);
		mav.setViewName("redirect:/index.html");

		redirectAttributes.addFlashAttribute("message", message);
		return mav;
	}
...
The code snippet above demonstrates the main things which you need to perform in a controller layer in order to implement the validation:
- Autowiring of the validator.
- Adding of the validator to the InitBinder.
- Apply @Valid annotation to the model in the concrete controller.
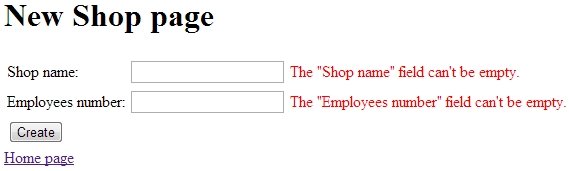
And finally let’s look at the JSP:
<%@taglib uri="http://www.springframework.org/tags/form" prefix="form"%>
...
<h1>New Shop page</h1>
<form:form method="POST" commandname="shop" action="${pageContext.request.contextPath}/shop/create.html">
<table>
<tbody>
<tr>
<td>Shop name:</td>
<td><form:input path="name"></form:input></td>
<td><form:errors path="name" cssstyle="color: red;"></form:errors></td>
</tr>
<tr>
<td>Employees number:</td>
<td><form:input path="emplNumber"></form:input></td>
<td><form:errors path="emplNumber" cssstyle="color: red;"></form:errors></td>
</tr>
<tr>
<td><input value="Create" type="submit"></td>
<td></td>
<td></td>
</tr>
</tbody>
</table>
</form:form>
...
Pay your attention on the form:errors tags, they are responsible for the displaying of the error messages.
Summary
The Validator interface allows creation of the flexible validation layer for each domain model object in your application. It’s a good alternative for the standard JSR-303 validation annotations such as @Min, @Max, @NotNull, @Size etc. You can find the full version of the example on GitHub.

I think it is worth mentioning that the above validation could have been achieved far more easily using JSR-303 annotations like @NotNull and @Min.
I recommend you use Validator and @InitBinder if you have complex validation requirements such as inter-dependent fields etc.
Sure you can use JSR-303, but only for the most simple validations. If you want more or less custom validation you have to use approach which I have explained in the article
Hello,
It’s an interesting article but how could I solve the uniqueness issue.
There are many threads on stackedoverflow as: http://stackoverflow.com/questions/4613055/hibernate-unique-key-validation so How do you solve this kind of problem on a single or on a multiple columns?
Thank you for your article
Exapmle of Vlidator ?? please check typo
I know this is an old post but I need to use both: a validator with @InitBinder and also JSR-303 validation(using @Valid annotation). Now, I need the JSR-303 validation to be triggered before the @InitBinder validation, otherwise my validator will throw errors such nullpointer exceptions. Is there any way to achieve this? I could add more validation to my validator to prevent those errors but that just means I am validating the same thing twice.
sure, just use addValidator instead of setValidator. See https://stackoverflow.com/a/32066557/878361