This is the first tutorial explaining the basics of javafx-ik, a library for inverse kinematics with JavaFX. The sources of the library can be downloaded from GitHub.
What is a Bone object ?
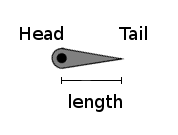
A bone is the fundamental building block for inverse kinematics with the library javafx-ik. A bone has a length and a joint around which it can be rotated. The end with the joint is called the head of the bone, the other end is called the tail. Figure 1 shows a single bone, its head, tail, and length.
In the library javafx-ik, a bone is resembled by the class Bone. To initialize it, the length has to be passed as a minimum, but usually also the angle is set during construction. The code sample above sets up a bone with a length of 50 and a rotation of 0, which means it will point horizontally to the right.
// Adding bone b2 to the children of bone b1
b1.getChildren().add(b2);
View the code on Gist.
Assembling bones
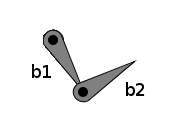
Bones can be assembled to define the skeleton of an animated object. Two bones are linked by attaching the tail of one bone b1 to the head of another bone b2. Bone b1 is called the parent of bone b2, bone b2 is called a child of bone b1. Figure 2 shows two connected bones b1 and b2.
The class Bone offers two properties for the structure. The read-only property parent stores the parent of a bone, the property children is an ObservableList of all child-bones. The following snippet shows how two bones b1 and b2 can be connected:
// Adding bone b2 to the children of bone b1
b1.getChildren().add(b2);
View the code on Gist.
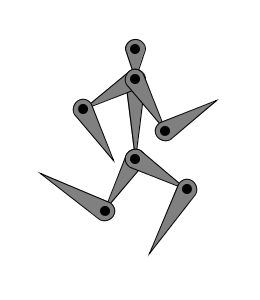
The read-only property angle defines the rotation between a bone and the extension of its parent bone. A value of 0 results in a straight line, a value of 180 results in the child bone overlapping its parent, but pointing in the opposite direction. Although having parents and children imposes an order on the bones in a skeleton, it usually makes no difference, which bone is the parent and which is the child. By repeatedly linking heads and tails of Bone objects, it is possible to create a chain. This simple structure is used in the caterpillar sample. Complex objects are defined using a tree of bones. The exact position of a bone depends on the position of the parent and the rotation. The bone at the top of the tree, which does not have a parent, is called the root bone. The root bone is treated slightly different during initialization. The property angle of a root bone defines its rotation in the overall scene. You can think of it as having a parent bone which points horizontally to the right. Now we are able to define the structure of our dummy, as shown in Figure 3. The code to generate the skeleton of the dummy can be seen in the code sample below.
// Definition of head
final Bone head = new Bone(30, 90);

// Definition of torso
final Bone torso = new Bone(80, 0);
head.getChildren().add(torso);

final Bone[] upperArm = new Bone[2];
final Bone[] upperLeg = new Bone[2];

for (int i=0; i<2; i++) {

    // Definition upper arms
    upperArm[i] = new Bone(60, 60 - 90 * i);

    // Definition of lower arms
    final Bone lowerArm = new Bone(60, -90);
    upperArm[i].getChildren().add(lowerArm);

    // Definition of upper legs
    upperLeg[i] = new Bone(60, 30 - 90*i);

    // Definition of lower legs
    final Bone lowerLeg = new Bone(75, 90);
    upperLeg[i].getChildren().add(lowerLeg);
}

// Connect arms and legs to head and torso
head.getChildren().addAll(upperArm);
torso.getChildren().addAll(upperLeg);
View the code on Gist.
Attaching Visual Components
Bones themselves are not visible. They are only defining the structure. The property content, which is an ObservableList of Node objects, can be used to attach visible elements to a bone.
// Attaching visual elements to a bone
final Bone bone = new Bone(50, 30);
bone.getContent().addAll(
new Circle(20),
new Ellipse(45, 0, 25, 15),
new Circle(80, 0, 10)
);
View the code on Gist.
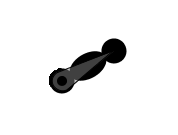
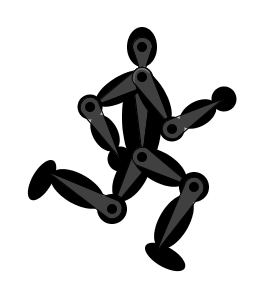
The position and rotation of the attached Node objects is determined by the underlying bone. The origin of the local coordinate system for all attached nodes is the head position of the bone. If the head position is moved, so are all its nodes. The rotation of a bone is also passed to the nodes. If the bone is not rotated at all and angle has the value 0, it is pointing horizontally to the right. In the code sample above a bone is defined with two circles and an ellipse attached. This bone is shown in Figure 4. The code sample below shows the required changes that define the appearance of our dummy by attaching circles and ellipses. The resulting dummy can be seen in Figure 5. In the picture, I added symbols for the bones to make them visible. Note that none of the visual components are rotated themselves and all positions are local to the bone. The final positions and rotations in the scene are calculated from the positions and rotations of the bones only.
// Definition of head
final Bone head = new Bone(30, 90);
head.getContent().add(new Ellipse(20, 15));

// Definition of torso
final Bone torso = new Bone(80, 0);
torso.getContent().add(new Ellipse(40, 0, 50, 20));
head.getChildren().add(torso);

final Bone[] upperArm = new Bone[2];
final Bone[] upperLeg = new Bone[2];

for (int i=0; i<2; i++) {

    // Definition upper arms
    upperArm[i] = new Bone(60, 60 - 90 * i);
    upperArm[i].getContent().add(new Ellipse(22.5, 0, 30, 12.5));

    // Definition of lower arms
    final Bone lowerArm = new Bone(60, -90);
    lowerArm.getContent().addAll(
            new Circle(12.5),
            new Ellipse(30, 0, 20, 12.5),
            new Circle(60, 0, 12.5)
    );
    upperArm[i].getChildren().add(lowerArm);

    // Definition of upper legs
    upperLeg[i] = new Bone(60, 30 - 90*i);
    upperLeg[i].getContent().add(new Ellipse(20, 0, 30, 15));

    // Definition of lower legs
    final Bone lowerLeg = new Bone(75, 90);
    lowerLeg.getContent().addAll(
            new Circle(15),
            new Ellipse(40, 0, 30, 15),
            new Ellipse(75, -10, 10, 22.5)
    );
    upperLeg[i].getChildren().add(lowerLeg);
}

// Connect arms and legs to head and torso
head.getChildren().addAll(upperArm);
torso.getChildren().addAll(upperLeg);
View the code on Gist.
Adding everything to the scenegraph
Now there is just one final piece missing to be able to render the dummy on the screen: the class Skeleton. The class Skeleton is the bridge between the Scenegraph and the bones with the attached Node objects. It extends Parent and can therefore be added anywhere in the Scenegraph. It can be translated, rotated, scaled and transformed like any other node in the Scenegraph.
A Skeleton object and the bones of an animated object are linked by setting the property skeleton of any bone. You will notice that the property skeleton of all bones in the same structure will be updated to point to the same Skeleton object afterwards. It is not possible that two bones in the same structure point to different Skeleton objects.
To see the result, download the full Dummy.java file. To compile the script, you need to add the library javafx-ik to your classpath. You can download the sources from GitHub.
What’s next?
The first part of this tutorial showed how to define the static structure – or skeleton – of an animated object and how to attach visible components. The second part will explain how this structure can be animated to create naturally looking animations.
Reference: JavaFX Library for Inverse Kinematics 2.0 from our JCG partner Michael Heinrichs at the Mike’s Blog blog.
