This is the first article on my blog related to Spring MVC. The beginning is always exciting, so I will try to be concise and informative. Spring MVC allows creation of web-applications in the most convenient, straightforward and fast way. Start working with this technology implies knowledge of Spring CORE. In the post you will read about creation of a simple Spring MVC Controller. I prefer Java-based configuration of application, so the example will contain this approach.
The main aim is a creation of the controller which will process the request. Hence, after a click on the link you will be redirected to a concrete page with the help of Spring controller.
Preparation
Create in Eclipse a new Dynamic Web Project, then convert it to the Maven project. Verify that your web.xml file looks like this:
<!--?xml version="1.0" encoding="UTF-8"?-->
<web-app xmlns:xsi="http://www.w3.org/2001/XMLSchema-instance" xmlns="http://java.sun.com/xml/ns/javaee" xmlns:web="http://java.sun.com/xml/ns/javaee/web-app_2_5.xsd" xsi:schemalocation="http://java.sun.com/xml/ns/javaee
http://java.sun.com/xml/ns/javaee/web-app_3_0.xsd" id="WebApp_ID" version="3.0">
  <display-name>SimpleController</display-name>

  <welcome-file-list>
    <welcome-file>index.jsp</welcome-file>
  </welcome-file-list>

</web-app>
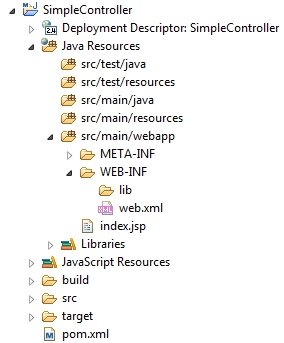
index.jsp will play the role of Home Page in the application, place it into src/main/webapp/index.jsp; Here is the code of index.jsp:
<%@ page language="java" contentType="text/html; charset=ISO-8859-1"
    pageEncoding="ISO-8859-1"%>
...
<h1>Home page</h1>
<p>This is a Home Page.</p>
...
As the result, project’s structure will be like this:
Setting up dependencies
What I need to do next is to add some dependencies into pom.xml file. I’m not going to speak about dependencies anymore, I will comment the code below:
	<properties>
		<spring.version>3.1.1.RELEASE</spring.version>
	</properties>

	<dependencies>
		<!-- Spring -->
		<dependency>
			<groupid>org.springframework</groupid>
			<artifactid>spring-context</artifactid>
			<version>${spring.version}</version>
		</dependency>
		<dependency>
			<groupid>org.springframework</groupid>
			<artifactid>spring-webmvc</artifactid>
			<version>${spring.version}</version>
		</dependency>
		<dependency>
			<groupid>org.springframework</groupid>
			<artifactid>spring-beans</artifactid>
			<version>${spring.version}</version>
		</dependency>
		<dependency>
			<groupid>org.springframework</groupid>
			<artifactid>spring-web</artifactid>
			<version>${spring.version}</version>
		</dependency>
		<!-- CGLIB is required to process @Configuration classes -->
		<dependency>
			<groupid>cglib</groupid>
			<artifactid>cglib</artifactid>
			<version>2.2.2</version>
		</dependency>
		<!-- Servlet API, JSTL -->
		<dependency>
			<groupid>javax.servlet</groupid>
			<artifactid>javax.servlet-api</artifactid>
			<version>3.0.1</version>
			<scope>provided</scope>
		</dependency>
		<dependency>
			<groupid>jstl</groupid>
			<artifactid>jstl</artifactid>
			<version>1.2</version>
		</dependency>
	</dependencies>
More information about the Spring dependencies you can find on the official blog.
Java-based configuration
It’s time to create a configuration for the application. As I mentioned above this approach is convenient, and one of the reasons is the annotation usage. Firstly I’m going to create WebAppConfig class
package com.sprmvc.init;

import org.springframework.context.annotation.Bean;
import org.springframework.context.annotation.ComponentScan;
import org.springframework.context.annotation.Configuration;
import org.springframework.web.servlet.config.annotation.EnableWebMvc;
import org.springframework.web.servlet.view.JstlView;
import org.springframework.web.servlet.view.UrlBasedViewResolver;

@Configuration //Specifies the class as configuration
@ComponentScan('com.sprmvc') //Specifies which package to scan
@EnableWebMvc //Enables to use Spring's annotations in the code
public class WebAppConfig {

	@Bean
	public UrlBasedViewResolver setupViewResolver() {
		UrlBasedViewResolver resolver = new UrlBasedViewResolver();
		resolver.setPrefix('/WEB-INF/pages/');
		resolver.setSuffix('.jsp');
		resolver.setViewClass(JstlView.class);
		return resolver;
	}

}
It’s done to point out the path where all JSPs are stored. This is required in order to use further readable URLs.
Now is the turn of Initializer class to be overviewed:
package com.sprmvc.init;

import javax.servlet.ServletContext;
import javax.servlet.ServletException;
import javax.servlet.ServletRegistration.Dynamic;

import org.springframework.web.WebApplicationInitializer;
import org.springframework.web.context.support.AnnotationConfigWebApplicationContext;
import org.springframework.web.servlet.DispatcherServlet;

public class Initializer implements WebApplicationInitializer {

	@Override
	public void onStartup(ServletContext servletContext) throws ServletException {

		AnnotationConfigWebApplicationContext ctx = new AnnotationConfigWebApplicationContext();
		ctx.register(WebAppConfig.class);

		ctx.setServletContext(servletContext);

		Dynamic servlet = servletContext.addServlet('dispatcher', new DispatcherServlet(ctx));
		servlet.addMapping('/');
		servlet.setLoadOnStartup(1);

	}

}
Notice that Initializer class implements WebApplicationInitializer interface. This is required to avoid XML-configuration of web-application.
JSP for the Controller
Before I show you how to create a simple controller, I need to create a JSP file to which controller will lead us.
<%@ page language="java" contentType="text/html; charset=ISO-8859-1"
    pageEncoding="ISO-8859-1"%>

...
    <p>Hello world: ${message}</p>
    <p>Well done!</p>
...
Here is the path to the JSP-file: src/main/webapp/WEB-INF/pages/hello.jsp
Notice that in the WebAppConfig class I have specified such path parts like sufix and prefix.
Controller
And finally the code of the LinkController class
package com.sprmvc.controller;

import org.springframework.stereotype.Controller;
import org.springframework.web.bind.annotation.RequestMapping;
import org.springframework.web.servlet.ModelAndView;

@Controller
public class LinkController {

	@RequestMapping(value='/hello-page')
	public ModelAndView goToHelloPage() {
		ModelAndView view = new ModelAndView();
		view.setViewName('hello'); //name of the jsp-file in the 'page' folder

		String str = 'MVC Spring is here!';
		view.addObject('message', str); //adding of str object as 'message' parameter

		return view;
	}

}
Now you need to update index.jsp file by adding there the link to the Hello Page:
<%@ page language="java" contentType="text/html; charset=ISO-8859-1"
    pageEncoding="ISO-8859-1"%>
...
<h1>Home page</h1>
<p>This is a Home Page.</p>
<p><a href="hello-page.html">Hello world link</a></p>
...
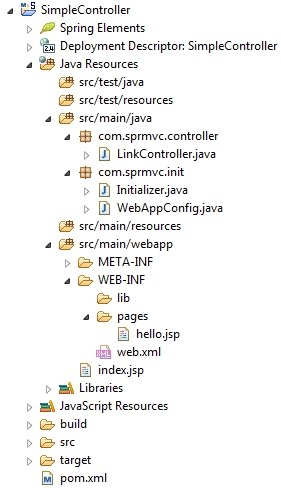
The final project structure is:
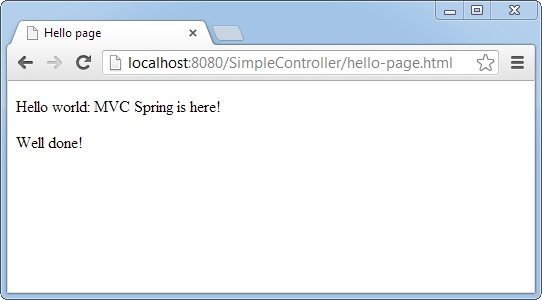
Launch the project, open index.jsp and click on the link and you will get:
Summary
At times tutorials are really helpful but the best way to learn how to use Spring is to read official documentation, so I recommend you dig deeper on the Spring blog.
Reference: Spring MVC: Creation of a simple Controller with Java based config from our JCG partner Alex Fruzenshtein at the Fruzenshtein’s notes blog.

nice one for beginners
You can config just one Spring dependence into pom.xml: “spring-webmvc”. :)
You right =)
still prefer using xml for this simple configuration, maybe someday i will use it :D
I tried this with Spring 3.2 and it seems to have a problem with the new configuration.
how to create a controller with java code !
check new features in MVC http://mvc4all.com/mvc/top-10-new-features-in-asp-net-5-and-mvc-6/
check new features @ http://mvc4all.com/mvc/top-10-new-features-in-asp-net-5-and-mvc-6/
Nice blog written on “Spring MVC” which described information on the Creation of a simple Controller with Java based config. The information contained in the blog is very helpful for Java developers. Here is an another informative blog published on Spring MVC & MongoDB http://findnerd.com/list/view/Spring-MVC-and-MongoDB/2240/ , hope this will help developers too to understand the Spring MVC in a detailed way. While learning from this blog developers can also post & view java questions and answers to enhance the tech knowledge among the developers community.
Regards
Manoj
how to create controller with java codes??