In recent times, I came repeatedly upon the term mutation testing. Since the word is that this approach is able to detect test safety net gaps in a way which goes beyond code coverage, I took my time to catch up on the topic and gave it a try. This post summarizes my findings as a quick introduction to the subject.
What is Mutation Testing?
Mutation testing evaluates the quality of existing software tests. The idea is to modify (mutate) code covered by tests in a small way and check whether the existing test set will detect and reject the change [MUTTES]. If it doesn’t, it means the tests do not match the code’s complexity and leave one or more of its aspects untested.
In Java, think of a mutant as an additional class with a single modification compared to the original code. This might be the change of a logical operator in an if clause as shown below.
if( a && b ) {...} => if( a || b ) {...}Detecting and rejecting such a modification by the existing tests is denoted as killing a mutant. With a perfect test suite in place, no class mutant would survive, of course. But creating all possible mutants is very costly, which is why it’s not feasible to carry out this approach manually in real world scenarios.
Luckily, there are tools available to create mutants on the fly and run all tests against each of these automatically. Mutation creation is based on a set of so-called mutation operators that are geared to reveal typical programming errors. The one which would be employed for the example above is denoted as condition mutation operator.
Testing with JUnit
Testing with JUnit is one of the most valuable skills a Java developer can learn. No matter what your specific background, whether you’re simply interested in building up a safety net to reduce regressions of your desktop application or in improving your server-side reliability based on robust and reusable components, unit testing is the way to go.
Frank has written a book that gives a profound entry point in the essentials of testing with JUnit and prepares you for test-related daily work challenges.

How Does It Relate to Code Coverage?
‘Test coverage is a useful tool for finding untested parts of a codebase‘ as Martin Fowler puts it [TESCOV]. This means poor coverage numbers indicate worrisome holes in the safety net of a test suite. However, full coverage alone testifies nothing about the quality of the underlying tests! The only reasonable conclusion to draw is that there are obviously no uncovered spots.
To clarify this point, consider a set of tests which omit the verify phase completely, for example. Although such a bundle might achieve full code coverage, it would be apparently pretty useless from the quality assurance point of view. This is where mutation testing comes into play.
The more mutants a test suite kills, the better are the chances that the behavior of the production code has been well-conceived and thoroughly covered by solid tests. Sounds alluring? Then let’s continue and have a look at an example to get an impression of the practical application.
How Is It Used?
We start with a listing I’ve borrowed from the first chapter of my book Testing with JUnit and modify it a bit for the actual context. Think of a timeline as the model component of a UI control that shows list entries in chronological order like the Twitter interface, for example, does. At this stage, we only care about a state variable fetchCount, whose initial value can be adjusted by positive integers.
public class Timeline {

  static final int DEFAULT_FETCH_COUNT = 10;

  private int fetchCount;

  public Timeline() {
    fetchCount = DEFAULT_FETCH_COUNT;
  }

  public void setFetchCount( int fetchCount ) {
    if( fetchCount <= 0 ) {
      String msg = "Argument 'fetchCount' must be a positive value.";
      throw new IllegalArgumentException( msg );
    }
    this.fetchCount = fetchCount;
  }

  public int getFetchCount() {
    return fetchCount;
  }
}
While there’s nothing complicated in here, we feel reassured with the following test case in place (let’s resort to on the various assert methods of the JUnit built-in org.junit.Assert class for verification in this post, applied with static imports for brevity).
public class TimelineTest {

  private Timeline timeline;

  @Before
  public void setUp() {
    timeline = new Timeline();
  }

  @Test
  public void setFetchCount() {
    int expected = 5;

    timeline.setFetchCount( expected );
    int actual = timeline.getFetchCount();

    assertEquals( expected, actual );
  }

  @Test( expected = IllegalArgumentException.class )
  public void setFetchCountWithNonPositiveValue() {
    timeline.setFetchCount( 0 );
  }
}
Indeed, running the tests while collecting coverage data with EclEmma leads to a full coverage report as shown by the next picture.
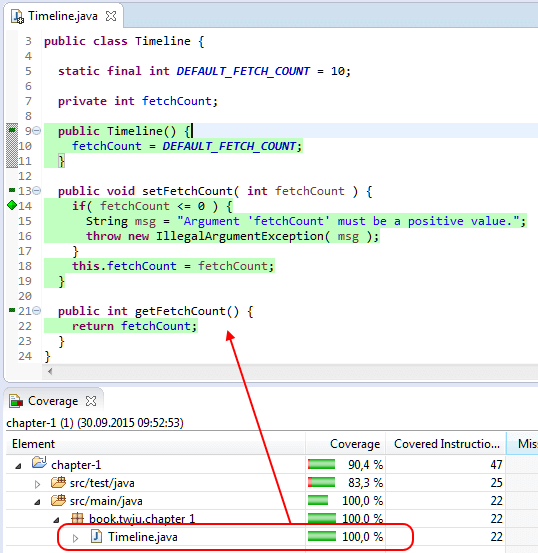
Probably you’ve detected the weak spot already. But let’s play naive, ignore the clouds on the horizon, and continue with a mutation test run. We use PIT for this purpose since it seems to be the most popular and the most actively maintained tool in this area. Other possibilities would be µJava and Jumble.
PIT supports command line execution, Ant and Maven build integration, as well as IDE and reporting integration by third-party offerings. For more detail on the various usage scenarios, please refer to the respective online documentation.
The generated HTML report of a mutation testing run for a particular project contains a package breakdown and can be drilled down to class level. The next picture shows the class listing report of our timeline component. Below, the same report is shown as a structured tree in the Eclipse IDE.
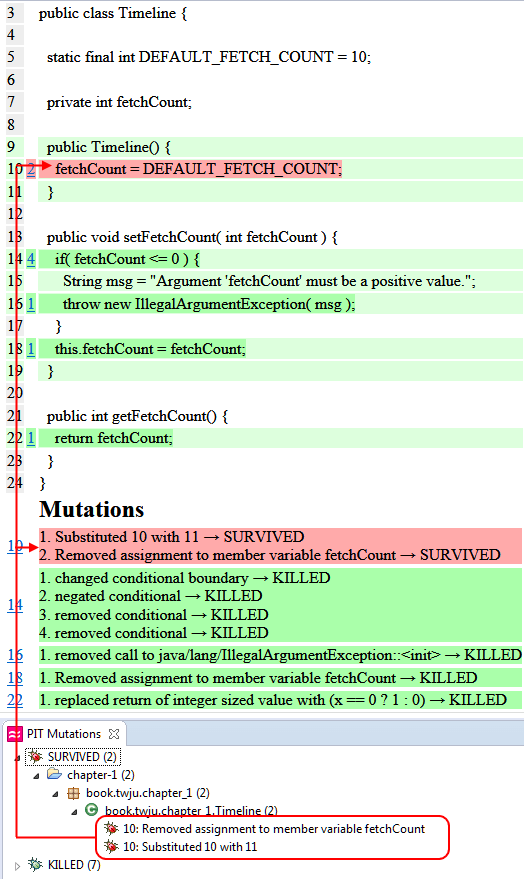
What a shock! Our confidence in the high coverage numbers was a delusion. As you can see, the report lists which mutations were applied to which line. Again, remember that for each mutation a separate test run, including all tests, gets executed! Green underlined list entries denote the killed mutants, but the red ones represent the survivors.
On closer examination, it gets pretty soon clear what we’ve missed. We take care of the problem by adding an initial state verification to our test case as shown in the following snippet (Note the static import of Timeline.DEFAULT_FETCH_COUNT).
public class TimelineTest {

  [...]

  @Test
  public void initialState() {
    assertEquals( DEFAULT_FETCH_COUNT, timeline.getFetchCount() );
  }

  [...]
}
This is it! Now the mutation testing run kills every mutant. The next picture shows a report which lists them all.

Hard to believe the amount of mutations created for such a small class. 9 mutants for only 22 instructions! Which leads us to the last section of this post.
What Are the Drawbacks?
Upstream coverage analysis, on the fly mutant creation, and all the necessary test runs consume quite some time. I incorporated mutation testing into a build run of the complete timeline sample app, which contains a suite with about 350 tests. This increased the execution time by a factor of 4 compared to a usual run.
Given these numbers, it’s clear that, for practical reasons, mutation test runs cannot be executed as frequently as unit test runs. Hence, it is important to find an appropriate workflow which provides the best compromise with respect to early feedback and efficiency. For large software systems, this could mean that mutation test runs might be better restricted to nightly builds or the like.
Another problem appeared in the field test, revealing that PIT can run into trouble with the underlying technology stack [STAPIT]. In my case, it seemed that the Burst JUnit test runner, used for enumeration based parameterized tests, is not supported. Because of this, all of the mutations of the particular class under test survived. But manual reproduction verified that these results were wrong. So, you either go without the troublesome piece of technology or configure PIT to exclude the troublesome test cases.
Summary
This post gave a quick introduction to mutation testing. We’ve learned what test mutants are, how the mutant-killing rate makes a point about the quality of an existing test suite, and how this testing technique relates to code coverage. Furthermore, we’ve seen how to work with PIT, the most popular tool in this field, and conducted the evaluation of some execution reports. The topic was concluded considering some drawbacks deducted from a field test.
Altogether, mutation testing seems to be an interesting supplement for a quality assurance toolset based on automated tests. As mentioned in the beginning, I’m quite new to this topic, so it would be interesting to hear from more advanced users about their experiences and aspects that I might have missed or misstated.
References
- [MUTTES]: Mutation Testing, Wikipedia, https://en.wikipedia.org/wiki/Mutation_testing
- [STAPIT]: JUnit tests pass but …, Stackoverflow, http://stackoverflow.com/questions/30789480/
- [TESCOV]: TestCoverage, Fowler, http://martinfowler.com/bliki/TestCoverage.html
| Reference: | What the Heck Is Mutation Testing? from our JCG partner Frank Appel at the Code Affine blog. |

I am very glad to see an article introducing mutation testing. Dick Lipton came up with the idea in the early 70’s and only now, thanks to PIT, it’s making its way in industry. Only Jeff Offutt’s muJava existed before as an academic prototype. There has been a lot of academic research but little attention in industry. Adoption and understanding of mutation testing are still slow, however. PIT still has trouble working with many classes so it still needs a lot more effort to not discourage users. Explaining mutation in a natural, non-intimidating way with a simple example as you… Read more »
Thanks Raul for your valuable supplementals to this post. I’ll take the liberty and add your comment to the original post at codeaffine.com as well. Please contact me, if you have any concerns.