I was recently asked by an associate of mine to deploy a Spring application to a CentOS server running cPanel/WHM and Apache. As this build requirement is not entirely obvious I thought I’d share the experience as a simple how-to guide. Note, this is simply a how-to… not a best-practices guide so if you require a security hardened solution I recommend checking out TomcatExpert for an authoritative how-to. That being said, let’s begin.
Personal Tools of Choice
As I favor using GNU tools and I’m running Windows locally, I’m using a Cygwin-derived toolkit based on Arch Linux called MSYS2, and ConEmu – a superb console emulator for Windows.
Skills and Dependency Punch-Out List
To get this build working I’m assuming you are at least casually familiar with basic Linux commands, shell access and a understanding of the Vim editor. If not I’ll show the commands as I go along but those skills are beyond the scope of this guide. If you’re not comfortable using Vim you might delegate this task to someone more confident with their skills or using another editor such as Nano or Emacs. For more info you can get a pretty good bootstrap lesson on each technology from the StackOverflow wikis… respectively, SSH , Linux and Vim. Furthermore, we’re obviously going to need Java and Tomcat so let’s get started by installing or updating to the latest versions. (Currently Java 8 1.8.0_45, Tomcat v8.0.21).
Installing / Updating to the Latest Java 8 Version
In order to install the binaries we’re going to SSH into the server as root and use GNU Wget to download the dependencies. I’m installing Java to /usr/local but if you want you can substitute for another location such as /opt or /usr/share. Note that when you see a command-line with a # hash sign at the beginning this is a unix standard indicating that you are logged in ‘as the root user.’ However, if you are not logged in as root, all of the commands displaying a hash sign, # will require ‘sudo’ permissions. Respectively a $ dollar sign indicates you are a normal user. For more about the sudo command and running as root you can checkout the man pages or the CentOS Wiki.
So let’s cd into your target directory as root and grab the latest java version…
Please note this entry was originally posted in April of 2015 so you may want to download the latest versions of Java and Tomcat and updated the requirements accordingly.
cd /usr/local/ && wget --no-check-certificate -c \
--header "Cookie: oraclelicense=accept-securebackup-cookie" \
http://download.oracle.com/otn-pub/java/jdk/8u45-b14/jdk-8u45-linux-x64.tar.gz

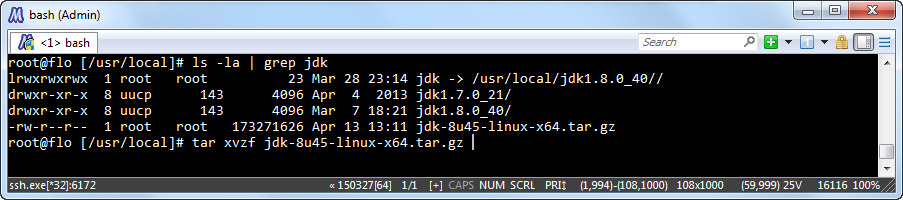
After the archive downloads it may have been saved with the query string AuthParam appended. If so just rename the archive so it ends with a tar.gz extension.
ls -l | grep jdk


Note: To rename the file you can simply type
jdkand presstabtwice to complete the filename in lieu of having to type out the entire filename.
mv jdk-8u45-linux-x64.tar.gz\?AuthParam\=1429150407_03533c0686909067456bf8c408ad56c9 jdk-8u45-linux-x64.tar.gz

Next we need to extract the archive into the target directory using tar. Again, if you’re not installing into /usr/local update your paths accordingly.
tar xvzf jdk-8u45-linux-x64.tar.gz
ln -s /opt/apache-tomcat-8.0.21 tomcat
To make future JDK updates easier, I like to create a Symlink referencing the current JDK so all the Java binaries are automatically repointed to the current JDK via the Linux Alternatives binary version manager. Below I’m simply making the symlink reference the newly extracted JDK.
ln -s /usr/local/jdk1.8.0_45 jdk

This next series of commands isn’t strictly required. However, if you don’t currently have Java installed on your system it sure makes future updates easier so I recommend just following along so all you have to do is swap out the JDK symlink next time you update your JDK. If however you need to update the current Java version, the Alternatives How-To on the CentOS wiki can get you up to speed pretty quick on the task.
Assuming you don’t have alternatives setup for Java, the next commands will install the alternatives links for the JDK binaries.
update-alternatives --install /usr/bin/java java /usr/local/jdk/bin/java 1
update-alternatives --install /usr/bin/javac javac /usr/local/jdk/bin/javac 1
update-alternatives --install /usr/bin/javaws javaws /usr/local/jdk/bin/javaws 1
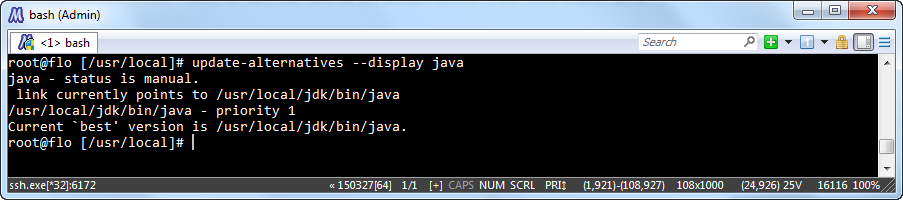
Once you’ve issued those commands you can verify the versions by passing the --display argument to the alternatives system.
update-alternatives --display java
update-alternatives --display javac
update-alternatives --display javaws
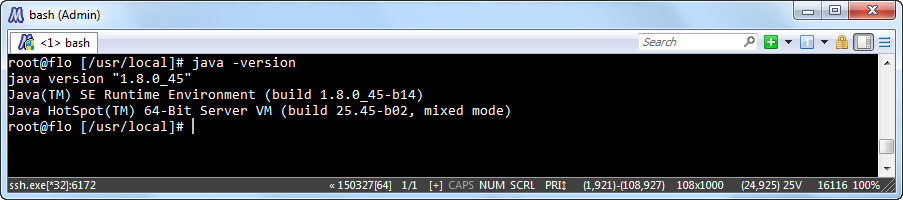
After you’ve installed and confirmed the alternatives simply issue java -version to confirm the system is finding the JDK.
If you don’t get a valid response, start back at the beginning and verify you’ve followed each step correctly. It’s very easy to make simple mistakes for both installing Java and working in a Linux environment.
java -version
If you’ve made it this far Congratulations! You’re halfway to having a production Java server, but don’t celebrate just yet, installing the JDK was easy, now we have to install and configure Tomcat.
Installing Tomcat 8
I personally like to install Tomcat to the
/optdirectory. So just as with the location for the JDK, if you’re not installing into/optupdate your path accordingly.
First and foremost we need to think about what we’re currently planning to do. It is a well-known generally accepted best-practice to run Tomcat on a non-privileged account, so we are going to be creating a Tomcat user without a login shell. Also, for this build I’m planning on running multiple instances of Tomcat Behind Apache 2.2 and leaving all static HTTP requests for Apache. Tomcat won’t be running HTTP at all. As such we’re going to proxy to Tomcat via AJP. The workflow will essentially look like the depiction below.
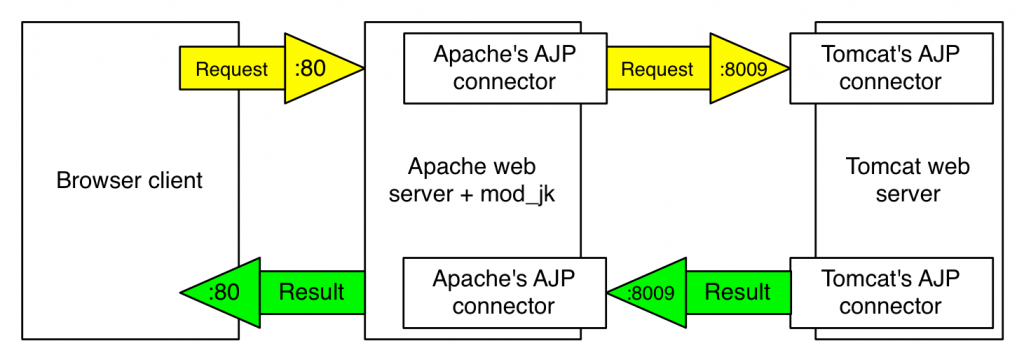
AJP isn’t the only solution, We ‘could’ use Mod Proxy HTTP to proxy all requests to Tomcat on a different port. However, that is not an ideal solution as then you will be essentially using two HTTP servers and your site will be visible on both ports. Again, there are workarounds but for the sake of simplicity I like to disable the Tomcat HTTP server completely and use the AJP connector from Apache to pass requests to and from Tomcat via AJP and let Apache handle HTTP.
So let’s get started by downloading Tomcat. I’m using the Apache download directly from the site but if you want a closer mirror you can find one on the Tomcat Site
cd /opt && wget http://archive.apache.org/dist/tomcat/tomcat-8/v8.0.21/bin/apache-tomcat-8.0.21.tar.gz

Before we move forward we need to verify the integrity of the md5 of the binary release. For this version the sum follows but you can also find the md5 link next to the tar.gz download link on the Tomcat Site. If the md5 doesn’t match, download another archive as the binaries can easily become corrupted during the transfer.
md5sum apache-tomcat-8.0.21.tar.gz

If the md5sum matches, extract the archive and symlink tomcat in the /opt directory similarly as we did previously with the JDK.
tar xvzf apache-tomcat-8.0.21.tar.gz
ln -s /opt/apache-tomcat-8.0.21 tomcat
Next we need to set-up our tomcat user, group and change ownership of the binaries to the new tomcat user.
groupadd tomcat
useradd -g tomcat -s /usr/sbin/nologin -m -d /opt/tomcat tomcat
chown -R tomcat.tomcat /opt/tomcat
Now let’s verify that the Tomcat user has been added to the system…
cat /etc/passwd | grep tomcat
If you have output displaying your tomcat user then you can safely move on to building the Tomcat APR Native Library
Build the Tomcat APR Native Library
Next we are going to build out the Tomcat Native Library for optimal performance. The Native APR Library provides performance improvements by adding support for Non-blocking I/O for keep-alive requests. So here’s the gist, taken straight from the Tomcat Native Library site on how Tomcat Native improves performance.
“The Apache Tomcat Native Library is an optional component for use with Apache Tomcat that allows Tomcat to use certain native resources for performance, compatibility, etc.
Specifically, the Apache Tomcat Native Library gives Tomcat access to the Apache Portable Runtime (APR) library network connection (socket) implementation and random-number generator. See the Apache Tomcat documentation for more information on how to configure Tomcat to use the APR connector.”
Though this step isn’t required it makes Tomcat performance much better and we love performance so let’s get to it.
Being on CentOS, an RPM based distro, we’ll be using Yum to install two of the required dependencies we need for Tomcat Native – OpenSSL and the APR library. If your using a Debian based distro (Ubuntu, Linux Mint, etc) you can just as easily use Aptitude or Apt, etc.
yum install -y apr-devel openssl-devel
Once Yum finishes installing the libraries ,cd into the base Tomcat binary directory and extract the tomcat native archive.
cd /opt/tomcat/bin && tar xvzf tomcat-native.tar.gz
Next cd into the tomcat-native-{version}-src/jni directory, and issue the following commands exactly as you see. Note, the ./configure script is pretty good at picking up most standard OpenSSL implementations so you shouldn’t need to explicitly set the path for ssl.
cd /opt/tomcat/bin/tomcat-native-1.1.33-src/jni
./configure --with-apr=/usr/local/apr \
--with-java-home=/usr/local/jdk \
--with-ssl=yes \
--prefix=/opt/tomcat
After configuring the build run make and make install.
make && make install
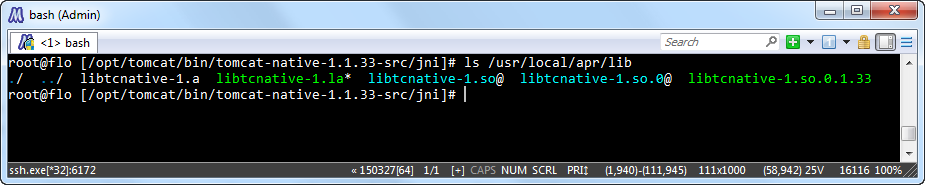
Now you should have the libtcnative binaries built in the /usr/local/apr/lib directory. To confirm simply ls the directory. If you ran into troubles building the tomcat native binaries, check your install to make sure all of the required dependencies were correctly found. Most often difficulties arise with finding the APR library.
ls /usr/local/apr/lib
To confirm the APR library is loading correctly let’s run a quick test by setting an environmental variable adding the APR library path and testing the configuration.
export LD_LIBRARY_PATH=$LD_LIBRARY_PATH:/usr/local/apr/lib
export JAVA_HOME=/usr/local/jdk
cd /opt/tomcat/bin && ./configtest.sh
After issuing ./configtest.sh you want to scroll through the output to confirm the APR library is being loaded correctly.
INFO: Loaded APR based Apache Tomcat Native library 1.1.33 using APR version 1.2.7.

If you’re still with me this far, you’re doing great! So now let’s move on and configure the separate instances.
Note: If you have any problems at this point, such as “The APR based Apache Tomcat Native library was not found”, then check under /opt/tomcat/lib or /usr/local/apr/lib to determine whether you actually have the tcnative binaries.
Configuring Multiple Instances of Tomcat
Currently we have our Tomcat runtime files under /opt/tomcat. However, for this build we want the ability to manage multiple instances – giving each instance a separate JVM. This way, if an application crashes on one instance it won’t bring down the applications on the other. Though an ideal situation, it does however takes a good deal of configuration to setup. So lets get to it.
The Tomcat documentation shows the basics for installing multiple instances but it’s not very intuitive without a walkthrough.
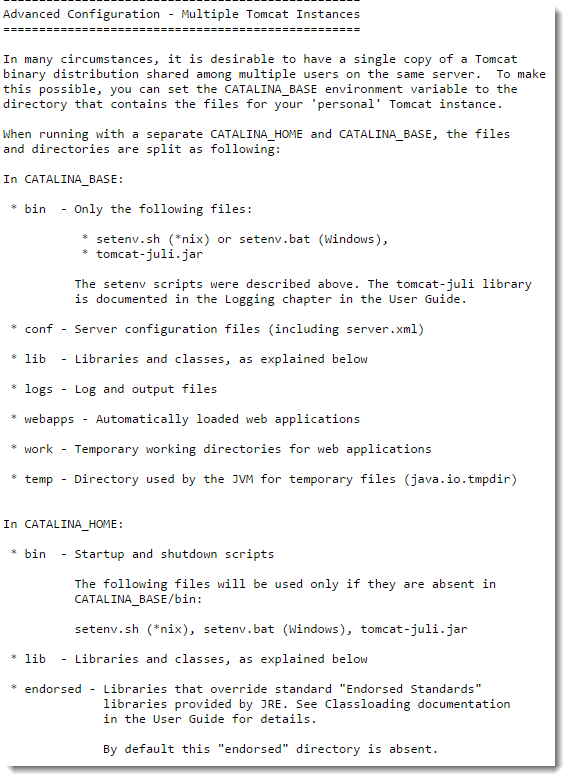
In a nutshell the basic directions suggest keeping a core install $CATALINA_HOME and creating separate instance directories $CATALINA_BASE containing the assets required for each instance. So that’s what we’ll do.
So let’s now create the separate instances, copy the required files to each instance and remove the extraneous files from $CATALINA_HOME.
cd /opt/tomcat && mkdir tomcat_1 tomcat_2
cp -R bin conf logs temp webapps work tomcat_1
cp -R bin conf logs temp webapps work tomcat_2
rm -rf conf logs temp webapps work
You should now have the following directory structure for the /opt/tomcat directory.
ls -l /opt/tomcat

For the sake of abstraction, I’m going to use example1.com and example2.com as a reference but of course you’ll have to update those with with your actual host domains. In order to configure our instances were going to make some modifications to a few elements in each instance’s server.xml file. Two variables you will need to provide are your domains network I.P. address and your domain name. Otherwise, there are seven items required for each server instance.
- A dedicated Server shutdown port.
- Disable the HTTP connector.
- A dedicated Server AJP connector port.
- The AJP connector address defined.
- The default host defined.
- The Host element defined.
- The Valve element’s logging prefix defined.
Optionally you can also update the UserDatabaseRealm to use digest authentication if you wish by adding a digest attribute with an algorithm value. I personally prefer working with SHA-256.
So let’s get to it… Open up vim and make the changes to /opt/tomcat/tomcat_1/conf/server.xml updating the items with your domain network I.P. address for item 4 and your domain for items 5,6,7. The server.xml should resemble the following absent your own variables.
cd /opt/tomcat/tomcat_1/conf && vim server.xml

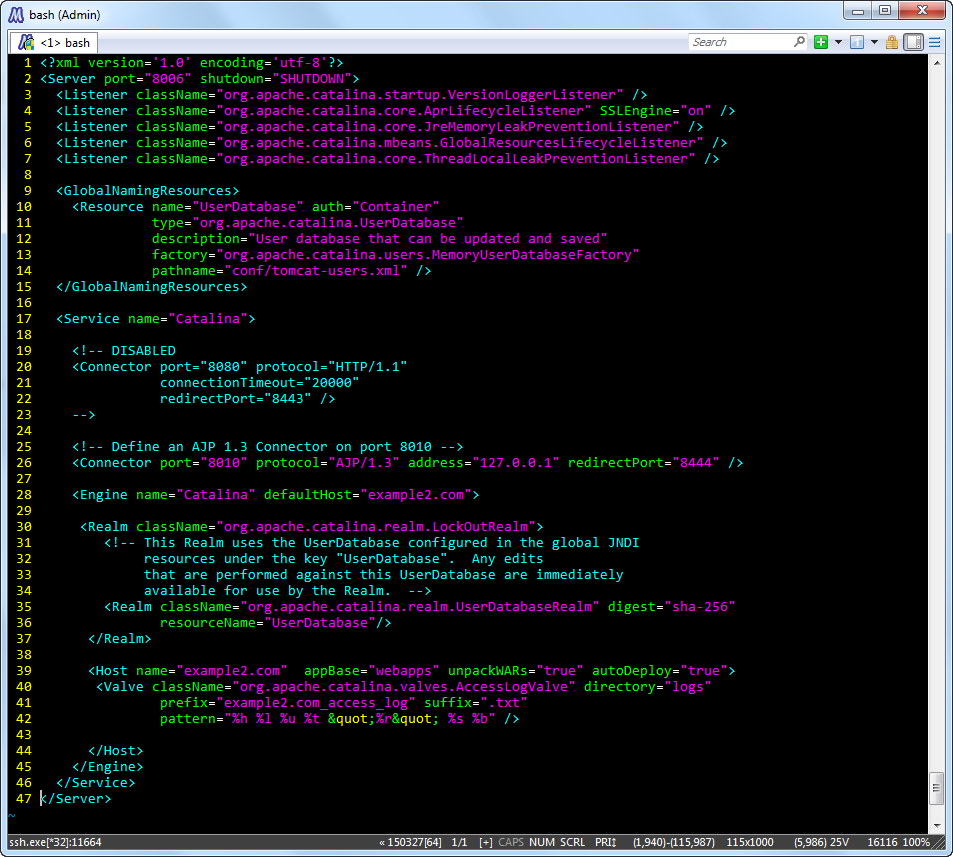
After saving the first instances server.xml lets move on to updating the second. This time we will be making the same changes as we did for the first server.xml with a few extra changes for items 1 and 3. As both instances cannot share the same shutdown port, update the Server element port attribute to use a different port than the first instance. In this example I’m using 8006, incrementing one from the first instances shutdown port. Following suit for item 3, I’m also updating the AJP Connector element port attribute to use port 8010, again simply incrementing one from the first instances AJP port.
cd /opt/tomcat/tomcat_2/conf && vim server.xml
The second instance’s server.xml should look like the following.
While we’re working in the conf directories let’s go ahead and update the tomcat-users.xml file for each instance. Starting with /opt/tomcat/tomcat_1/conf/tomcat-users.xml add the following roles and user tags at the end of the file before the closing tomcat-users tag. Update the username and password values with whatever you wish now.
<role rolename="manager-gui"/>
<role rolename="manager-script"/>
<role rolename="manager-jmx"/>
<role rolename="manager-status"/>
<role rolename="admin-gui"/>
<role rolename="admin-script"/>
<user username="admin" password="admin" roles="manager-gui,manager-script,manager-jmx,manager-
status,admin-gui,admin-script"/>
Now we need to configure each instances initialization by creating an environment file located under the instance bin directory. Respectively, /opt/tomcat/{instance}/bin/setenv.sh
I’ve made a custom one especially suited for this purpose so you can simply copy mine if you wish. Though obvious, you need to update the $CATALINA_BASE and $CATALINA_PID for instance_2. Moreover, if you’re installing more than two instances, follow suit. Note, the options below are for my own server configuration. YMMV.
#!/bin/sh
# Edit this file to set custom options
#
# Notes:
#
# * Tomcat accepts the JAVA_OPTS and CATALINA_OPTS parameters
# * JAVA_OPTS are used during START/STOP/RUN
# Edit this file to set custom options
# Edit this file to set custom options
#
# Notes:
#
# * Tomcat accepts the JAVA_OPTS and CATALINA_OPTS parameters
# * JAVA_OPTS are used during START/STOP/RUN
# * CATALINA_OPTS are used during START/RUN
# * This script is sourced by catalina.sh when it placed inside
# * $CATALINA_BASE/bin (instance specify setup) or $CATALINA_HOME/bin directories.
# ------------------------------------------------------------

JAVA_HOME="/usr/local/jdk"
CATALINA_HOME="/opt/tomcat"
CATALINA_BASE="/opt/tomcat/tomcat_1"
CATALINA_PID="$CATALINA_BASE/temp/tomcat_1.pid"

#################################
# *** JAVA OPTIONS SETTINGS *** #
#################################

JVM_MODE="-server"
HEADLESS_MODE="-Djava.awt.headless=true"
BIT_MODE="-d64"
HEAP_OPTS="-Xms128m -Xmx768m"
GC_OPTS="-XX:+AlwaysPreTouch -XX:+AggressiveOpts -XX:+UseG1GC -XX:ReservedCodeCacheSize=256m -XX:+UseCompressedOops -Dsun.io.useCanonCaches=false -Djava.net.preferIPv4Stack=true -Djsse.enableSNIExtension=false -XX:SoftRefLRUPolicyMSPerMB=50"

#
# Example:
# conf/jmxremote.access
# john readwrite
# conf/jmxremote.password
# john johnpasswd
# Make sure both jmxremote.{access,passsword} files only readable/writeable (600) by the owner, and
# jxmremote.port must be unique for each server instance.
#
#JMXREMOTE_OPTS="-Dcom.sun.management.jmxremote -Dcom.sun.management.jmxremote.port=1099 -Dcom.sun.management.jmxremote.ssl=false
#-Dcom.sun.management.jmxremote.authenticate=true -Djava.rmi.server.hostname=localhost -Dcom.sun.management.jmxremote.password.file
#=$CATALINA_BASE/conf/jmxremote.password -Dcom.sun.management.jmxremote.access.file=$CATALINA_BASE/conf/jmxremote.access"

export LD_LIBRARY_PATH=$LD_LIBRARY_PATH:/usr/local/apr/lib
JAVA_OPTS="$JVM_MODE $HEADLESS_MODE $BIT_MODE $HEAP_OPTS $GC_OPTS"
Next, change ownership and set the executable bit for each setenv.sh instance and then we’ll be off to do some Apache configs.
chown tomcat.tomcat /opt/tomcat/tomcat_1/bin/setenv.sh && chmod +x /opt/tomcat/tomcat_1/bin/setenv.sh
chown tomcat.tomcat /opt/tomcat/tomcat_2/bin/setenv.sh && chmod +x /opt/tomcat/tomcat_2/bin/setenv.sh
Configuring The Apache Virtual Hosts Includes
Next we need to make sure Apache is loading both mod_proxy and mod_proxy_ajp as we are proxying to Tomcat. Simply issue the following command to verify both modules are indeed loaded.
httpd -M | grep -i 'proxy'
You should see both modules in the output.
 ...
proxy_module (static)
proxy_ajp_module (static)
...
Though nearly all cPanel/WHM profiles have both modules active by default, if you do not see both modules in the output, you’ll need to refer to the cPanel/WHM documentation for including the modules.
Next we’ll need to include a tomcat configuration file for each domain in a specific way so when modifications are done via cPanel/WHM they won’t overwrite our configurations. To support this we’ll be adding a specific directory structure and the tomcat.conf file for both domains.
We do not need to update the default /usr/local/apache/conf/httpd.conf to include our configurations. If you update the default /usr/local/apache/conf/httpd.conf your changes will be lost after updating updating cPanel/WHM. Consider yourself warned.
To include our configurations the directory structure must reflect the proper user and domain structure for apache to load the configuration files. Again I’m using domain1.com, domain2.com as examples. To illustrate further, to include our new tomcat.conf for user1, domain1.com and user2, domain2.com we need to create the tomcat.conf using the following structure.
/usr/local/apache/conf/userdata/std/2/user1/domain1.com/tomcat.conf
/usr/local/apache/conf/userdata/std/2/user2/domain2.com/tomcat.conf
So let’s get to it. First cd into the correct location for whatever username your user1 is using and create the directories. If you are only using one user and two domains then simply go there now. Otherwise update your path accordingly.
cd /usr/local/apache/conf/userdata/std/2 && mkdir user1/domain1.com && mkdir user2/domain2.com
After creating the directories create a tomcat.conf file for the first user, add the following Proxy statements and save the file.
cd /usr/local/apache/conf/userdata/std/2/user1/domain1.com && \
touch tomcat.conf && vim tomcat.conf
ProxyRequests off
ProxyPreserveHost on

<Proxy *>
Order allow,deny
Allow from all
</Proxy>

ProxyPass / ajp://domain1.com:8009/
ProxyPassReverse / ajp://domain1.com:8009/
Repeat the same for the second user, second domain substituting the necessary values.
cd /usr/local/apache/conf/userdata/std/2/user2/domain2.com && \
touch tomcat.conf && vim tomcat.conf
ProxyRequests off
ProxyPreserveHost on

<Proxy *>
Order allow,deny
Allow from all
</Proxy>

ProxyPass / ajp://domain2.com:8010/
ProxyPassReverse / ajp://domain2.com:8010/
Next we need to invoke the scripts to update the httpd.conf configurations. Execute the following commands below to do just that.
/usr/local/cpanel/bin/apache_conf_distiller --update
/scripts/rebuildhttpdconf
service httpd restart
At this point we should now have Apache proxying requests to Tomcat but we haven’t configured the server to automatically start our Tomcat instances. Again, I’ve created a service script you can use for each instance if you wish. Create a file named tomcat_1 under the /etc/init.d directory with the following content. After creating tomcat_1 simply copy it as tomcat_2 and update the $CATALINA_BASE and $CATALINA_PID values as we did previously with the setenv.sh configurations.
#!/bin/bash
# chkconfig: 2345 20 80
# description: Tomcat 8 start/stop/status init.d script

JAVA_HOME=/usr/local/jdk
export JAVA_HOME

#Add Java binary files to PATH
PATH=$JAVA_HOME/bin:$PATH
export PATH

#CATALINA_HOME is the location of the bin files of Tomcat
CATALINA_HOME=/opt/tomcat
export CATALINA_HOME

#CATALINA_BASE is the location of the configuration files of this instance of Tomcat
CATALINA_BASE=$CATALINA_HOME/tomcat_1
export CATALINA_BASE


#CATALINA_PID is the Tomcat instance process ID.
CATALINA_PID="$CATALINA_BASE/temp/tomcat_1.pid"

export CATALINA_PID

#TOMCAT_USER is the default user of tomcat
TOMCAT_USER=tomcat
export TOMCAT_USER

#TOMCAT_USAGE is the message if this script is called without any options
TOMCAT_USAGE="Usage: $0 {\e[00;32mstart\e[00m|\e[00;31mstop\e[00m|\e[00;31mkill\e[00m|\e[00;32mstatus\e[00m|\e[00;31mrestart\e[00m}"

#SHUTDOWN_WAIT is wait time in seconds for java proccess to stop
SHUTDOWN_WAIT=20

tomcat_pid() {
        echo ps -fe | grep $CATALINA_BASE | grep -v grep | tr -s " "|cut -d" " -f2
}

#USER LEVEL CHECK
if [[ $EUID -ne 0 ]]; then
echo "basename $0 requires root privileges." 1>&2
   exit 1
fi

start() {
  pid=$(tomcat_pid)
  if [ -n "$pid" ]
  then
    echo -e "\e[00;31mTomcat is already running (pid: $pid)\e[00m"
  else
    # Start tomcat
    echo -e "\e[00;32mStarting tomcat\e[00m"
        if [ user_exists $TOMCAT_USER = "1" ]
        then
                /bin/su - $TOMCAT_USER -s /bin/bash -c $CATALINA_BASE/bin/startup.sh
        else
                sh $CATALINA_BASE/bin/startup.sh
        fi
        status
  fi
  return 0
}

status(){
          pid=$(tomcat_pid)
          if [ -n "$pid" ]; then echo -e "\e[00;32mTomcat is running with pid: $pid\e[00m"
          else echo -e "\e[00;31mTomcat is not running\e[00m"
          fi
}

terminate() {
        echo -e "\e[00;31mTerminating Tomcat\e[00m"
        kill -9 $(tomcat_pid)
}

stop() {
  pid=$(tomcat_pid)
  if [ -n "$pid" ]
  then
    echo -e "\e[00;31mStoping Tomcat\e[00m"
          sh $CATALINA_BASE/bin/shutdown.sh

    let kwait=$SHUTDOWN_WAIT
    count=0;
    until [ ps -p $pid | grep -c $pid = '0' ] || [ $count -gt $kwait ]
    do
      echo -n -e "\n\e[00;31mwaiting for processes to exit\e[00m";
      sleep 1
      let count=$count+1;
    done

    if [ $count -gt $kwait ]; then
      echo -n -e "\n\e[00;31mkilling processes didn't stop after $SHUTDOWN_WAIT seconds\e[00m"
      terminate
    fi
  else
    echo -e "\e[00;31mTomcat is not running\e[00m"
  fi

  return 0
}

user_exists(){
        if id -u $1 >/dev/null 2>&1; then
            echo "1"
        else
            echo "0"
        fi
}

case $1 in
        start)
          start
        ;;
        stop)
          stop
        ;;
        restart)
          stop
          start
        ;;
        status)
          status
        ;;
        kill)
          terminate
        ;;
        *)
          echo -e $TOMCAT_USAGE
        ;;
esac
exit 0
Once you’ve created the instance service files, we need to set the execute bit and add the files to the chkconfig application to set the system runlevels Tomcat will operate on.
chmod +x /etc/init.d/tomcat_1 && chmod +x /etc/init.d/tomcat_2
chkconfig --add tomcat_1 && chkconfig --add tomcat_2
chkconfig --level 2345 tomcat_1 on && chkconfig --level 2345 tomcat_2 on
We should now be able to query our Tomcat server instance status by using the system service commands.
service tomcat_1
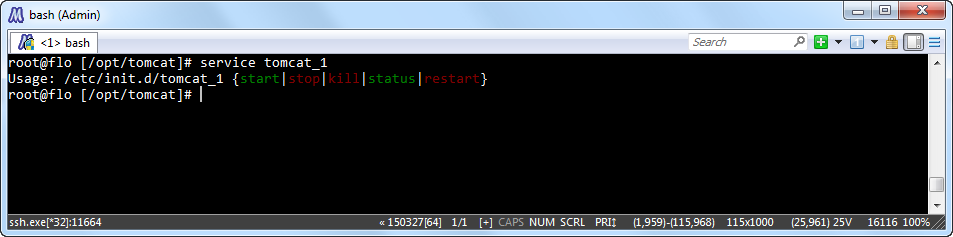
Usage: /etc/init.d/tomcat_1 {start|stop|kill|status|restart}Now we can simply call up each script to initialize the Tomcat instances, restart Apache and each domain will be forwarding to it’s own instance of Tomcat.
service tomcat_1 start && service tomcat_2 start && service httpd restart
Congrats! You now have multiple instances of Tomcat 8 installed on Java 8 running Behind an Apache Web Server on Centos with cPanel/WHM.
Till next time…
| Reference: | Tomcat 8 on Java 8 Behind Apache on CentOS from our JCG partner Edward Beckett at the Design Develop Deliver blog. |


Good post to start with this setup. However you mention this : “leaving all static HTTP requests for Apache”. I don’t see anywhere in the configuration where static http requests are handled by Apache. For instance a request to http://host/app/main.css (static file) would still be served by Tomcat no ?
Thanks in advance for this clarification.
@John Doe ~ If you notice in our connectors (tomcat.conf) we are using ProxyPass to pass all requests from tomcat to apache.
Ok thanks Edward for the answer but still, won’t it be Tomcat’s process which will do the file I/O ? And then forward the bytes read to Apache which will send it to the http client ?
I guess the question here is : which server is more efficient reading and serving static files : Apache or Tomcat ?
Ok I guess I found my answer here : http://serverfault.com/questions/404461/how-can-i-get-apache-to-serve-static-content-in-a-reverse-proxied-setup
Put all static files on the Apache side and exclude them from the ProxyPass directive so that Tomcat only handles dynamic requests.
@John We are using mod_ajp for this example so we’ve disabled Tomcat’s http web server… Carefully review the Configuring Multiple Instances of Tomcat section list items.. In item number two we disable the Tomcat http server port and specify an ajp port …
@John… You don’t have to exclude anything.. :) We disabled Tomcat’s http web server ( re-read the Configuring Multiple Instances of Tomcat section… )
Yeah I noticed http is disabled and Tomcat only speaks AJP (binary) protocol. But still : it’s Tomcat engine which will open & read “main.css” file in my example, and give the result to Apache. Apache won’t see static files unless they are declared in its DocumentRoot directive.
Anyway, in an internet-facing website you could also use a CDN for all your static resources.
Hi,
Regarding the text I want to run below command on a centos 64
$ update-alternatives –install /usr/bin/java java /usr/local/jdk/bin/java 1
But below error returns:
failed to link /usr/bin/java -> /etc/alternatives/java: File exists
I’ve checked /usr/bin/ and there is no ‘java’ file
Please help
I worked around the problem and took below response.
I think my problem resolved:
[centos@ip-172-31-1-119 local]$ alternatives –display java
java – status is manual.
link currently points to /usr/local/jdk/bin/java
/usr/local/jdk/bin/java – priority 1
Current `best’ version is /usr/local/jdk/bin/java.
./configure –with-apr=/usr/local/apr –with-java-home=/usr/java/jdk1.8.0_131 –with-ssl=yes –prefix=/opt/tomcat
Found OPENSSL_VERSION_NUMBER 0x1000105f (OpenSSL 1.0.1e 11 Feb 2013)
Require OPENSSL_VERSION_NUMBER 0x1000200f or greater (1.0.2)
configure: error: Your version of OpenSSL is not compatible with this version of tcnative??