This article is part of our Academy Course titled Redis a NoSQL key-value store.
This is a crash course on Redis. You will learn how to install Redis and start up the server. Additionally, you will mess around with the Redis command line. More advanced topics follow, such as replication, sharding and clustering, while the integration of Redis with Spring Data is also explained. Check it out here!
Table Of Contents
1. Introduction
Redis is probably the most widely known and arguably the best example among a huge pile of NoSQL solutions which came out from the community in recent years. Although thinking about Redis as a key/value store is a valid assumption, Redis does much more, giving away to the hands of the developers the power of complex data structures. To quote http://redis.io:
“Redis is an open source, BSD licensed, advanceds key-value store. It is often referred to as a data structure server since keys can contain strings, hashes, lists, sets and sorted sets.”
Not to mention out-of-the box publish / subscribe support, clustering (experimental), sharding, replication and transactional semantics. The purpose of this tutorial is to provide brief yet comprehensive guide to the world of Redis by walking though its installation, configuration and features.
The good way to think about Redis is as in-memory data store. If your data fits in memory, you will get the maximum from it and that is why Redis quite often is being used as advanced caching solution (instead of Memcached). But once your data stops to fit in memory, you will see a significant performance degradation caused by swapping to disk. Later in tutorial we will get back to this topic and see what other options we have.
The latest version of Redis at the moment of this writing is 2.8.4 and that is the one we will use across whole tutorial.
2. License
Redis is open source software released under the terms of the three clause BSD license. More details on official Redis site.
3. Documentation
Redis team maintains the complete, very well organized and up-to-date documentation for every single feature or command you may need to know. It is a great reference for everyone, at any time, so do not hesitate to look at it if you have any questions or something is not quite clear. General documentation is available at http://redis.io/documentation while commands have own section at http://redis.io/commands (we will refer quite often to it once we start to play with Redis).
4. Installing Redis on Linux
The best (and at the moment the only) way to Install Redis on your Linux box is to build it from source. To do so, the sources of the Redis could be downloaded from http://redis.io/download (please be sure to pick the stable release branch). Once the archive is on your machine, a couple of simple and easy steps separate you from having your own Redis instance ready to use:
- Download
wget http://download.redis.io/releases/redis-2.8.4.tar.gz
- Unpack the archive
tar xfz redis-2.8.4.tar.gz
cd redis-2.8.4
- Make the binaries
make
or (in case you have Linux 32bit installed)
make 32bit
- Run tests (you need
Tcl 8.5+to be installed to run the tests)make test
- Install (as
rootuser or withsudocommand)make install
Worth to mention, Redis does not have any special requirement or dependencies, either runtime or compile time, and is compatible with most Linux distributions. The only preinstalled packages you need are gcc and make.
By default, the aliases for Redis binaries will be created in /usr/local/bin folder. For more insights, the README file is a great place to look in for advanced details (like changing default installation folder, common build errors troubleshooting, etc).
5. Installing Redis on Windows
Redis team does not support official Windows distributions. Luckily, there is an experimental Windows 32/64 port supported by Microsoft Open Tech group and freely available on GitHub: https://github.com/MSOpenTech/redis. One important thing to take into account is that Windows port is always behind latest Redis releases and as such is not as a feature-rich as you may need. At the moment of writing, the latest version of Redis available for Windows was 2.6.12.
- Clone the repository (or download it as a
ZIParchive from https://github.com/MSOpenTech/redis if you do not haveGitinstalled)git clone https://github.com/MSOpenTech/redis
- For your convenience, there are pre-built binaries available in repository already. Just unpack them into convenient location.
- Windows 32 bit:
bin/release/redisbin.zip - Windows 64 bit:
bin/release/redisbin64.zip
- Windows 32 bit:
- However, if you want to, you can build Redis from sources as well. To do that, you need to have Microsoft Visual Studio 2010 or its free available version Microsoft Visual C++ 2010 Express Edition available on Microsoft Visual Studio web site. Once you have it, just open solution file from
msvs/RedisServer.slnand build it. The binaries will be available undermsvs/Debugormsvs/Release, depending on your build configuration and platform (32bit/64bit).
6. Validating the Installation
Once installation has been completed, your Linux box should have following executables located inside /usr/local/bin/ folder:
| Executable file name | Description |
| redis-benchmark | Redis benchmarking tool, very useful to simulate running a set of commands by many clients in parallel so to assess your Redis instance configuration (more details at http://redis.io/topics/benchmarks) |
| redis-check-aof * | Verifies and fixes if corrupted an append only log (AOF log) used by Redis to manage persistence (more details at http://redis.io/topics/persistence) |
| redis-check-dump * | Checks Redis database dump (RDB) file (more details at http://redis.io/topics/quickstart) |
| redis-cli | Command line interface utility to communicate with Redis server (more details at http://redis.io/topics/quickstart and in First look at Redis CLI section) |
| redis-server | Redis server (more details at http://redis.io/topics/quickstart) |
Table 1
* These tools are very useful if you need to recover corrupted data
Windows installation (either built from scratch or extracted from pre-built archive) consists of following executables mirroring the Linux ones:
- redis-benchmark.exe
- redis-check-aof.exe
- redis-check-dump.exe
- redis-cli.exe
- redis-server.exe
It will save you a lot of time if the folder that contains those executables is appended to Windows PATH environment variable.
7. Basic Configuration
Redis supports quite sophisticated configuration settings, including persistence, sharding, clustering, replication, … Some configuration parameters require server to be restarted but some could be tweaked at runtime, using redis-cli tool.
But the good thing (for beginners) about Redis configuration is that there is no configuration at all! Redis could be started without single setting provided and will work perfectly fine.
Nevertheless, it would be very useful to glance over some key options (detailed configuration will be covered as we go along with more advanced topics). As an example, we will look at redis.conf file from Redis distribution, a good starting point to create your own.
daemonize yes | no(default: no)
By default Redis does not run as a daemon. Use ‘yes’ if you need it. Note that Redis will write a pid file inpidfilewhen daemonized.pidfile /var/run/redis.pid(default: /var/run/redis.pid)
When running daemonized, Redis writes a pid file in /var/run/redis.pid by default. You can specify a custom pid file location here.port 6379(default: 6379)
Accept connections on the specified port, default is 6379. If port 0 is specified Redis will not listen on a TCP socket.bind 192.168.1.100 10.0.0.1(default: commented out, all network interfaces)
By default Redis listens for connections from all the network interfaces available on the server. It is possible to listen to just one or multiple interfaces using the “bind” configuration directive, followed by one or more IP addresses.logfile /var/log/redis.log(default: “”)
Specify the log file name. Also the empty string can be used to force. Redis to log on the standard output. Note that if you use standard output for logging but daemonize, logs will be sent to /dev/nulldatabases 16(default: 16)
Set the number of databases. The default database is DB 0, you can select a different one on a per-connection basis using SELECT <dbid> where dbid is a number between 0 and ‘databases’-1timeout 0(default: 0)
Close the connection after a client is idle for N seconds (0 to disable)dbfilename dump.rdb(default: dump.rdb)
The filename where to dump the DBdir /var/redis(default: ./)
The working directory. The DB will be written inside this directory, with the filename specified above using the ‘dbfilename’ configuration directive. The Append Only File will also be created inside this directory.
By and large, those are the most useful configuration settings to start from, continuously tuning your Redis server to get most of it.
8. Starting/Stopping the Server
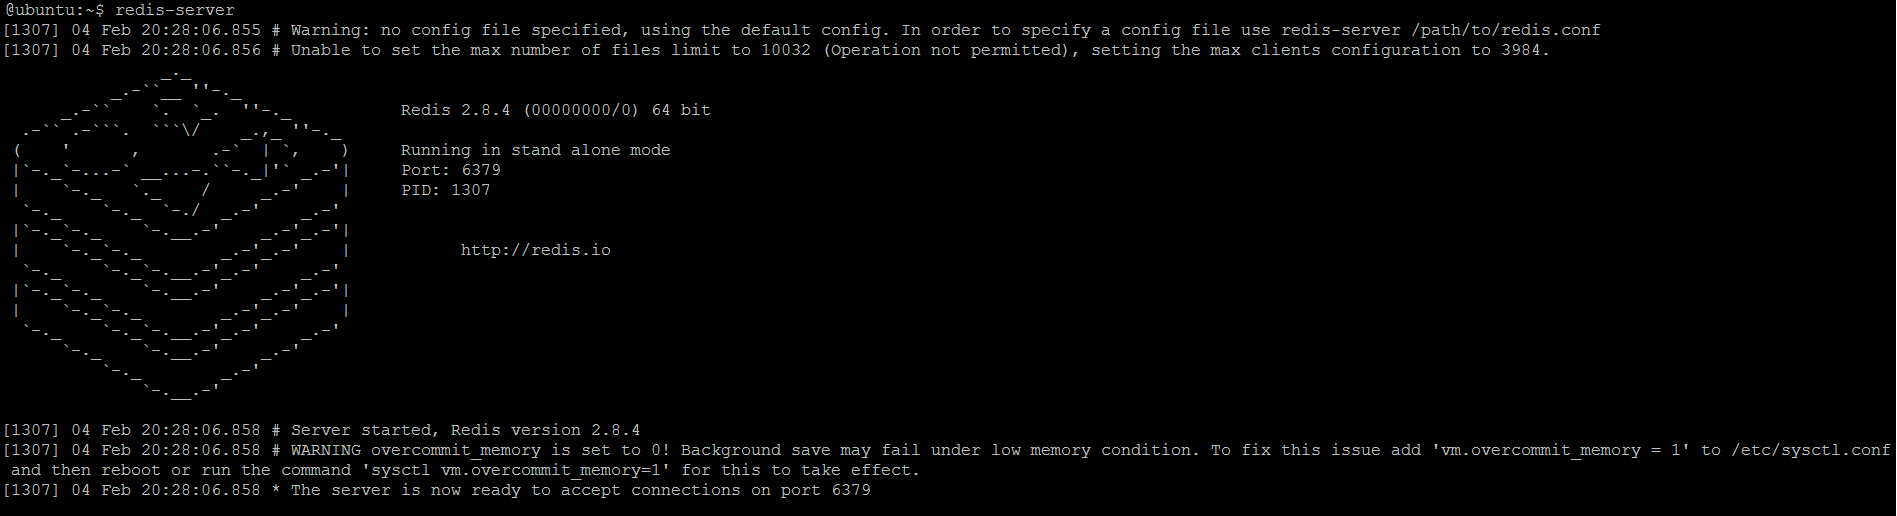
There are several ways to start your Redis server. This simplest one is just by running redis-server (or redis-server.exe on Windows) without lspecifying any configuration. Once it’s started, the full-functional Redis server is ready to handle requests, listening on default port 6379.
The picture below shows a typical output on a Linux console when Redis server starts successfully. The first line warns about absence of the configuration file so the default configuration is talking place. And this is yet another way Redis shines: keeping things as simple as possible makes it really easy to get started, adding more advanced configuration options along the way (when you really need it).
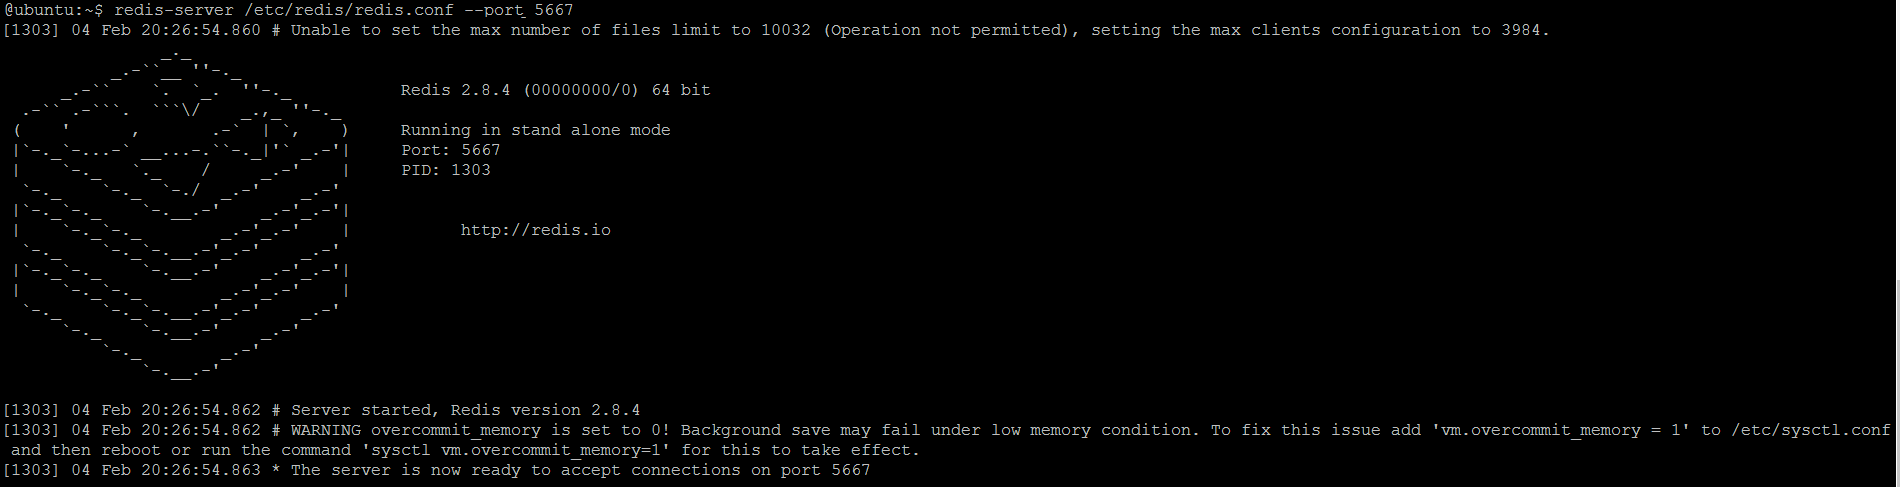
A slight variation of the previous flow includes passing configuration file and desired port to listen for incoming connections:
redis-server <conf> --port <port>
or on Windows
redis-server.exe <conf> --port <port>
The port parameter if specified overrides the one from configuration file. The picture below demonstrates how Redis output may look like in this case.
Redis server started by any of those ways could be stopped by pressing Ctrl+C.
Advanced Linux users are familiar with init scripts and having Redis server started automatically once system is booted up is quite useful. For this purpose, Redis distribution includes startup script template at utils/redis_init_script. This script could be used as-is and should be copied into standard /etc/init.d folder. Please notice that by default startup script will try to look for configuration file at /etc/redis/6379.conf (to get more details about these recommendations and conventions, please look through http://redis.io/topics/quickstart).
If you would like to start Redis this way (using init scripts), the /etc/redis/6379.conf file should be modified a bit in order to have a couple of important configuration options set:
daemonizeshould be set to yes (by default it is set to no)pidfileshould be set to /var/run/redis_6379.pid (which corresponds to the Redis instance port number and configuration file name convention)logfileshould be set to /var/log/redis_6379.log (following the same conventions aspidfile)dirshould be set to /var/redis/6379 (following the same conventions aspidfileandlogfile)
Please refer to Basic configuration section in order to get more detailed explanation what those configuration options mean and their implications.
9. First look at Redis CLI
The best and simplest way to explore Redis in full power is its command line interface, redis-cli (redis-cli.exe on Windows). It’s super easy to use, plus it has brief help for every Redis command and supports navigation over command’s history (by using Up and Down arrows).
When redis-cli starts, it immediately tries to connect to Redis instance guessing it is running on local machine (127.0.0.1) and default port (6379). If it’s not the case, the tool says you that.

redis-cli starts and tries to connect to local Redis instance
Also, redis-cli could be used to connect to remote Redis instances when hostname and port are provided as command line arguments:
redis-cli -h <hostname> -p <port>
Assuming that our Redis server is running on local machine, let us run redis-cli and issue our first command to be sure the server is ready to serve the requests.

redis-cli starts and connects to local Redis instance
The PING command is the most straightforward, side-effects free way to force Redis server to send PONG as a response, confirming it is running and ready. To get a bit more details about what PING command is for, HELP PING shows a quick summary of that.
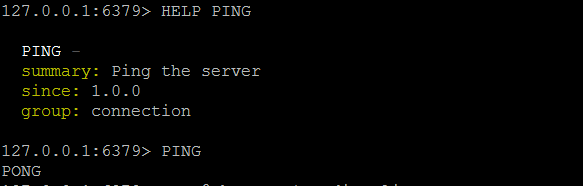
PING command from redis-cli and verifying server responds with PONG
Despite its simplicity, redis-cli is extremely useful. It allows not only sending command to Redis server but also to change configuration, monitor current activity and much, much more.
10. What’s Next
In next section, we will spend much more time with Redis CLI trying all different commands and covering all Redis rich data structures.

Good article. I set up my redis dev environment by it
I used other article to setup my redis dev enviroment: https://www.digitalocean.com/community/tutorials/how-to-install-and-configure-redis-on-ubuntu-16-04, I think that was necessary because I installed a new version.