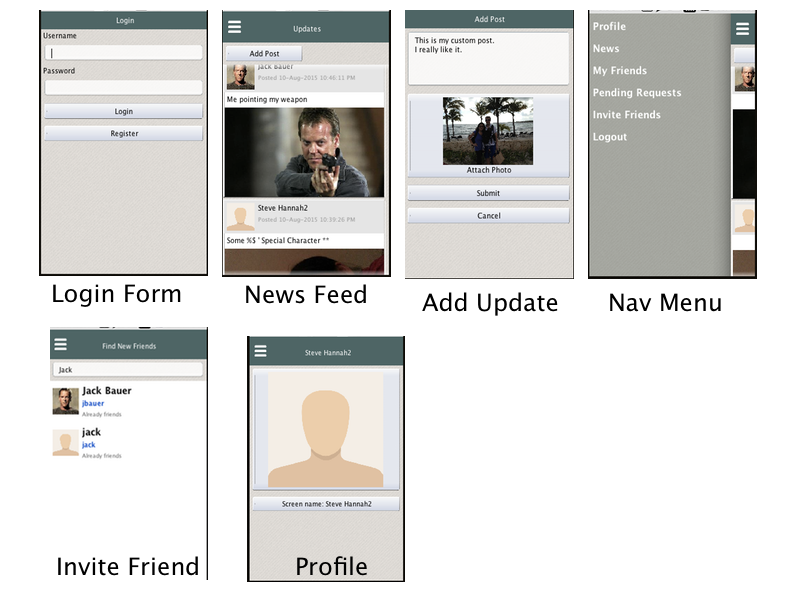
A couple of weeks ago I created a simple social network app as part of the Codename One webinar. This app provided functionality similar to the Facebook app.
- Send and Accept friend requests
- Post news
- View news items posted by you and your friends
For the server, I used a PHP/MySQL REST interface, and wrote a very thin client in Codename One. Both the server and client project are on GitHub so you can review it and install it yourself on your own server.
Some screenshots of the app running in the Codename One Simulator:
I decided to port this app to Parse.com as a proof-of-concept.
Here is a 3-minute screencast of the app powered by Parse.com:
What is Parse.com?
Parse.com is like a back-end in a box. You get a highly scalable REST server and NoSQL database without having to manage it yourself. This allows you to focus on your Codename one client app – making it slick and beautiful. No worries about scaling, server software patches, or any of that noise. Just the app.
I particularly like the fact that Parse.com is free for apps that get a small amount of traffic (up to 30 requests per second). As your app grows, you just pay for the added bandwidth.
A Birds-Eye View of the Porting Process
I started with a fully functional app. The only portion of the Codename One app that required changes was the SocialClient class, which is where all of the interaction with the server happened.
On the server side, the process was roughly:
- Sign up for an account on Parse.com
- Create a new App ID
- Set up my data model
- Implement a thin REST interface for my data using Parse’s cloud functions.
The Client API
The full API for this class is as follows:
// Registers new user
public void register(String username, String password) throws IOException;

// Logs in as user
public void login(String username, String password) throws IOException;

// Logs current user out
public void logout() throws IOException;

// Gets list of friends of current user
public List<Map> getFriends() throws IOException;

// Finds users with username matching query string
public List<Map> findUsers(String query) throws IOException;

// Finds pending friend requests for current user
public List<Map> getPendingFriendRequests() throws IOException;

// Sends a friend request to given user
public void sendFriendRequest(String username) throws IOException;

// Accepts a friend request from a given user
public void acceptFriendRequest(String username) throws IOException;

// Decline a friend request from a given user
public void declineFriendRequest(String username) throws IOException;

// Gets the profile of a given user
public Map getProfile(String username) throws IOException;

// Updates the profile of a given user with specified values
public void updateProfile(Map profile) throws IOException;

// Posts a news item
public long post(Map post) throws IOException;

// Gets the news feed for the given user
public List<Map> getFeed(Date olderThan) throws IOException;

// Gets the username of the current user
public String getUsername();
To interact with the PHP/MySQL back-end this API was implemented directly on top of ConnectionRequest and the NetworkManager to issue HTTP GET and POST requests directly to the server. JSON was used to transmit the response back from the server to the client, and this was converted into `Map`s and `List`s.
Note: You’ll notice that this API does not make use of Java’s strong typing… I’m just using lists and maps. This was for flexibility while I was fleshing out the API. At some point, in a real-world app, I would probably refactor to use some custom Java types.
For the Parse back-end we could also just write a thin REST client on top of ConnectionRequest, but there is an easier way, thanks to Chidiebere Okwudire’s parse4cn1 cn1lib, which wraps the Parse REST API providing a Java API that is very similar to the official Parse Java API.
Creating the Parse App
- Log into Parse.com
- Create a new App
Creating the Data Model
Once your app has been created you need to create your data model. In Parse.com this is done by defining a set of classes. This is analogous to creating tables in an SQL database. In order to motivate this exercise, let’s take a look at the schema for the MySQL database in the previous version. The following is the PHP (with embedded SQL code) that was used to generate the database:
<?php
class conf_Installer {
  function update_1() {
    $q[] = "create table users (
      username varchar(32) primary key not null,
      password varchar(64)
      )";
    $q[] = "create table sessions (
      username varchar(32),
      token_id varchar(64) primary key not null,
      expires INT(11)
      )";

    $q[] = "create table friends (
      user1 varchar(32),
      user2 varchar(32),
      primary key (user1, user2 )
      )";

    $q[] = "create table friend_requests (
      sender varchar(32),
      receiver varchar(32),
      primary key (sender, receiver)
      )";

    $q[] = "create table profiles (
      username varchar(32) primary key not null,
      screen_name varchar(100),
      avatar varchar(100),
      avatar_mimetype varchar(100)
      )";

    $q[] = "create table posts (
      post_id int(11) not null auto_increment primary key,
      username varchar(32),
      date_posted INT(11),
      photo varchar(255),
      photo_mimetype varchar(100),
      comment text
      )";

    df_q($q);
  }
}
?>
For the Parse data model, my first instinct was to just create a class for each table. However, I discovered that that a one-to-one mapping was not ideal. This is due, in part, to the fact that Parse already provides some of the functionality out of the box, and also that Parse’s database is not relational as MySQL is.
Note: Parse supports relations but they work a little bit different than they do in a relational database like MySQL. We’ll explore the differences in more detail later.
In the end, I settled on the following classes for my the app:
User– For user accounts. I folded theprofiletable data into this single class as well to simplify the model.Post– For news items posted by users.
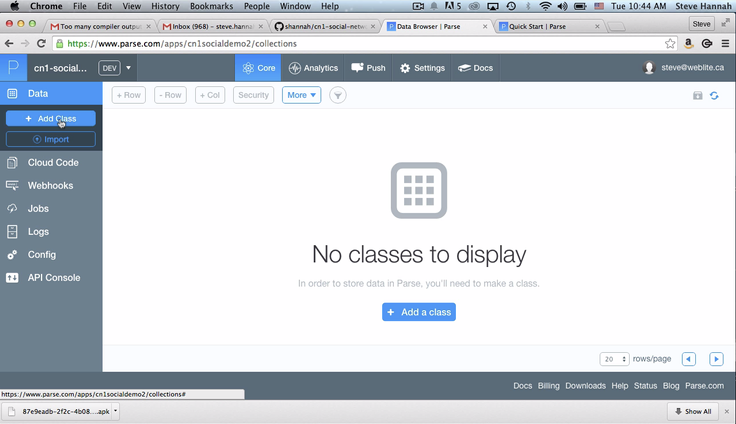
Step By Step : Creating the Data Model
- In the “Data” section of the “Core” tab, click on “Add Class”:

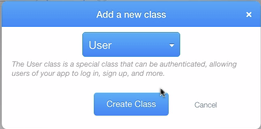
- Select “User” from the dialog, and click “Create Class”:

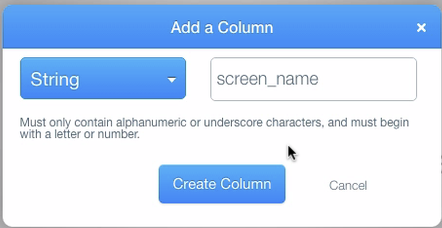
- Create screen_name column. Click the “+ Col” button on the top menu.

Then select type = “String” and name = “screen_name”:

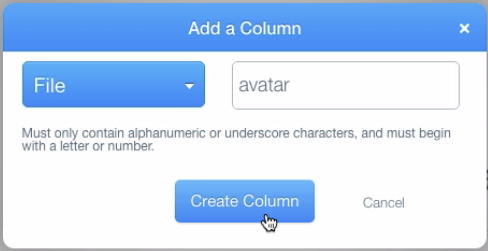
- Create avatar column of type “File”:

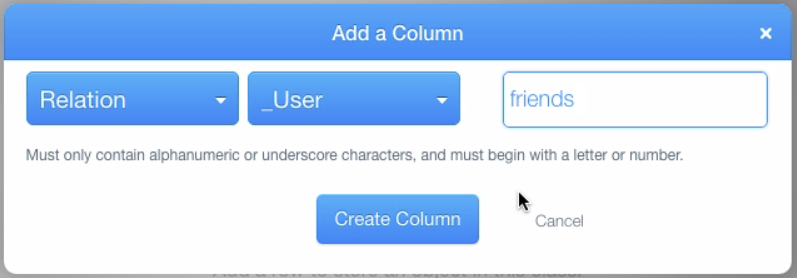
- Add “friends” and “pendingFriendRequests” relations.. Add them as columns of type “Relation”:


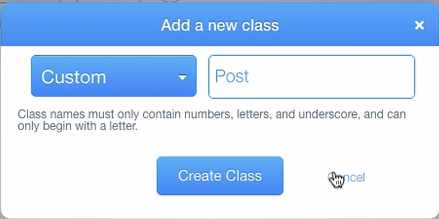
Creating the “Post” class
- Create a new class named “Post”:

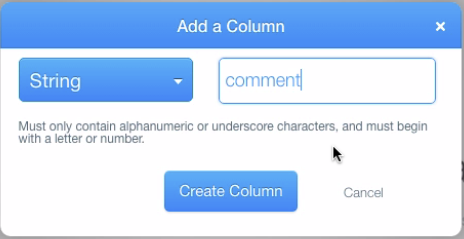
- Add “comment” column.

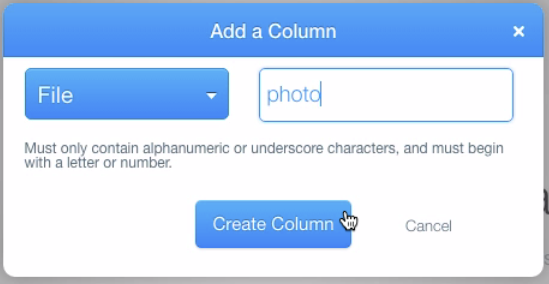
- Add “photo” column with type “File”:

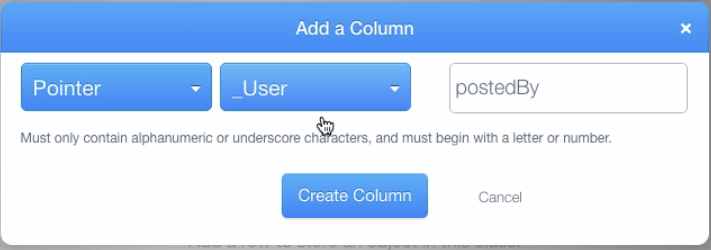
- Add “postedBy” column as type “Pointer” to the “_User” class:

Uploading Files
I also ended up creating an Upload class but this was purely to help with file uploads, and is not part of the conceptual design.
Aren’t we missing a lot of tables?!!
How did we reduce a database down from 6 tables to only 2 classes? Well:
- The
sessionstable is no longer necessary in Parse because Parse takes care of all aspects of user registration, login, and session management. - As mentioned before, I just folded the
profilesdata directly into theUserclass. This was for simplicity and to minimize the number of data requests to obtain profile data. - The
friendsandfriend_requeststables were join tables meant to relate users to each other. In Parse, we handle this by adding a column of typeRelationto our classes. E.g. TheUserclass has afriendsrelation and anpendingFriendRequestsrelation that provide equivalent functionality to thefriendsandfriend_requeststables.
Relations
As I mentioned above, relations are handled a little differently in Parse than in a relational database. Parse provides two column types for “pointing” to other records in the database:
- Pointer – A type you can use for adding a reference to a single record in that column. E.g. If you wanted to track if a User was the parent of another User, you might add a column named “parent” to the “User” class with type “Pointer”.
- Relation – A type used for storing references to multiple records in that column. E.g. If you wanted to track all of the children of a User, you might add a column to the “User” class named “children” with type “Relation”.
In our data model, we needed to track two relationships between user records:
- Whether they are friends
- Whether there is a pending friend request from one to the other.
So I added a columns named “friends” and “pendingFriendRequests” to the “User” class, both with type “Relation”.
Important: Relationships are one-way only. E.g. If you add “Steve” to the friends relation of “Doug”, then that does not automatically add “Doug” to “Steve”‘s friends relation. For the “pendingFriendRequests” relationship this is what we want anyways, but for the “friends” relationship we wanted it to be two-way, so we need to add Steve to Doug and Doug to Steve when making them friends.
Accessing the Database from Codename One
Now that we have our database set up, let’s try to connect to it from our Codename one app.
Installing parse4cn1 library
The first thing that we need to do is download and install the parse4cn1 library. You can download it from here.
Copy the parse4cn1.cn1lib file into your project’s lib directory, then select “Refresh” libs (i.e. right click on the project > “Codename One” > Refresh Libs).
You will also need to install the CN1JSON library which the parse4cn1 library depends on.
Initializing the Parse4CN1 API
Before we do anything else, we need to initialize the Parse API by calling Parse.initialize() method. I place this method inside the constructor for my client class:
public SocialClientParse() {
    Parse.initialize("<APP ID>", "<CLIENT KEY>");
}
The Application ID and client key can be found in the “Keys” tab when logged in to Parse.com.
Warning: Make sure to use the “Client Key” and not the “REST API Key” or “Master Key” when connecting to Parse from a client device, as is most likely the case with Codename One apps. The REST API key and Master Key provide full permissions to your database and should not be embedded anywhere in your app for security reasons. These keys are for use in secure settings like a server-side application that connects to your parse application.
Logging In
The implementation of the login method for our REST client is as follows.
    ParseUser user;
    String token;
    ...

    public void login(String username, String password) throws IOException {
        try {
            user = ParseUser.create(username, password);
            user.login();
            token = user.getSessionToken();
        } catch (ParseException ex) {
            Log.e(ex);
            throw new IOException(ex.getMessage());
        }

    }
and logging out:
    public void logout() throws IOException {
        try {
            user.logout();
            user = null;
            token = null;
        } catch (ParseException ex) {
            Log.e(ex);
            throw new IOException(ex.getMessage());
        }
    }
User Registration
User registration is very similar to logging in. It just uses the ParseUser.signUp() method instead of ParseUser.login().
    public void register(String username, String password) throws IOException {
        try {
            ParseUser user = ParseUser.create(username, password);
            user.put("screen_name", username);
            user.signUp();


        } catch (ParseException ex) {
            Log.e(ex);
            throw new IOException(ex.getMessage());
        }
    }
The rest of the REST API
The Parse API provides support for CRUD (Create-Read-Update-Delete) directly from the client to the data source. For security it supports ACLs at both the class-level and the object level. Therefore, if you set up your ACLs appropriately, you could interact with the database directly from your Codename one client app. You can see API examples on the parse4cn1 wiki.
Here are a few reasons why you should NOT do this
- Offering direct database access to the client makes the app very difficult to secure. Any server-side engineer worth a salt know that YOU CANNOT TRUST THE CLIENT. If you want actions to be available to some users but not others – and they are using the same client app, then you need to be very careful about the ACLs that you use in your database.
- Some operations may require multiple database requests which can slow the app down. Better to just send a single request to the parse server, and let server-side code handle the multiple queries.
Cloud Code
Parse allows you to implement server-side REST web services, known as “cloud code”. Because this code is running on the server side, you can allow them to run with the master key – so you don’t have to rely on ACLs to limit access to records and classes. You can use your own logic to decide who can do what. This model maps more closely to running your own server and provides more control. AND it allows you to lock down your database so you don’t need to provide direct access to clients.
Cloud code uses the Parse Javascript API – which is equivalent to the REST and Java APIs. In order to use them, you need to install the parse command-line tools.
Creating Local Cloud Code Project
It allows you to create a local version of the Parse app, in so much as developing cloud code is concerned. Here is the readout of parse new, the command for setting up the local development project:
Steves-iMac:social-network-parse shannah$ parse new
Please log in to Parse using your email and password.
Email: myemail@example.com
Password (will be hidden):
Would you like to create a new app, or add Cloud Code to an existing app?
Type "(n)ew" or "(e)xisting": e
1:	Social Demo
Select an App to add to config: 1
Awesome! Now it's time to setup some Cloud Code for the app: "Social Demo",
Next we will create a directory to hold your Cloud Code.
Please enter the name to use for this directory,
or hit ENTER to use "Social Demo" as the directory name.

Directory Name: social-demo-parse-2
Your Cloud Code has been created at /Users/shannah/cn1_files/incubator/social-network-parse/social-demo-parse-2.
Next, you might want to deploy this code with "parse deploy".
This includes a "Hello world" cloud function, so once you deploy
you can test that it works, with:

curl -X POST \
 -H "X-Parse-Application-Id: xxxxxxxxxxxxxxxxxx" \
 -H "X-Parse-REST-API-Key: xxxxxxxxxxxxxxxxxxxx \
 -H "Content-Type: application/json" \
 -d '{}' \
 https://api.parse.com/1/functions/hello
This creates a scaffold for my app project in the directory “social-demo-parse-2”. The directory structure is:
./cloud
./cloud/main.js
./config
./config/global.json
./public
./public/index.html
The only file that matters here is the ./cloud/main.js file, which will include all of the cloud code. It starts you off with a nice sample “hello” function that can be called via the REST API. Its contents are as follows:
// Use Parse.Cloud.define to define as many cloud functions as you want.
// For example:
Parse.Cloud.define("hello", function(request, response) {
  response.success("Hello world!");
});
This is a simple function that simply returns the string “Hello world!”. You can call this function directly from your Codename One app by simply calling:
String result = (String)ParseCloud.callFunction("hello", null);
System.out.println(result); // Hello world!
Writing End Points for the REST API
Now, we just need to create end points for all of our client’s pertinent functions. Let’s start by inserting placeholders for our API end points:
Parse.Cloud.define("send_friend_request", function(request, response) {
   ...
});

Parse.Cloud.define("accept_friend_request", function(request, response) {
    ...
});

Parse.Cloud.define("decline_friend_request", function(request, response) {

});

Parse.Cloud.define("get_pending_friend_requests", function(request, response) {

});

Parse.Cloud.define("get_friends", function(request, response) {

});

Parse.Cloud.define("post", function(request, response) {

});

Parse.Cloud.define("update_profile", function(request, response) {

});

Parse.Cloud.define("get_profile", function(request, response) {

});

Parse.Cloud.define("get_feed", function(request, response) {

});

Parse.Cloud.define("find_users", function(request, response) {

});
In order to remain consistent with the PHP/MySQL REST API in the previous version, we will have these end points always return a JSON object with the following form:
//For errors:
{code : 500, message : "Some error message", ...}

// For successes
{code : 200, ... }
That way the client can always check the “code” property to find out if the action was successful.
For successful operations, there may be three types of return values:
- No return value. E.g.
accept_friend_request,send_friend_request. - Returns a list of objects. E.g.
find_users,get_friends, etc.. - Returns a single object. E.g.
get_profile
Writing Codename One Web Service Client
So on the client side (in our Codename One app), I created 3 utility wrappers to handle these cases:
 /**
     * Calls cloud code function with void return type.
     * @param funcName The name of the function to call.
     * @param params Parameters passed to the function.  Accepts null.
     */
    private void callFunc(String funcName, Map params) throws IOException {
        try {
            JSONObject response = (JSONObject)ParseCloud.callFunction(funcName, params);
            int code = response.getInt("code");
            if (code != 200) {
                throw new IOException(response.getString("message"));
            }
        } catch (Throwable ex) {
            Log.e(ex);
            ex.printStackTrace();
            throw new IOException(ex.getMessage());
        }
    }

    /**
     * Calls a cloud code function whose result will be a list of objects.
     * @param funcName The name of the cloud code function to call.
     * @param params Parameters passed to the cloud code. Accepts null.
     * @param listKey The JSON key in the response object that contains the list of objects that
     *  were returned by the cloud code.
     */
    private List<Map> getList(String funcName, Map params, String listKey) throws IOException {
        try {
            JSONObject response = (JSONObject)ParseCloud.callFunction(funcName, params);
            System.out.println(response);
            int code = response.getInt("code");
            if (code != 200) {
                throw new IOException(response.getString("message"));
            } else {
                ArrayList<Map> out = new ArrayList<Map>();
                JSONArray posts = response.getJSONArray(listKey);
                int len = posts.length();
                for (int i=0; i<len; i++) {
                    JSONObject row = posts.getJSONObject(i);
                    out.add(toMap(row));
                }
                return out;
            }
        } catch (Throwable ex) {
            Log.e(ex);
            ex.printStackTrace();
            throw new IOException(ex.getMessage());
        }
    }


    /**
     * Calls cloud code function that returns a single object.
     * @param funcName The name of the cloud code function to call.
     * @param params Parameters passed to the cloud code function.  Accepts null.
     * @param mapKey The JSON key of the response object that contains the object that
     * was returned from the cloud code function.
     */
    private Map getMap(String funcName, Map params, String mapKey) throws IOException {
        try {
            JSONObject response = (JSONObject)ParseCloud.callFunction(funcName, params);
            int code = response.getInt("code");
            if (code != 200) {
                throw new IOException(response.getString("message"));
            } else {

                JSONObject row = response.getJSONObject(mapKey);
                return toMap(row);
            }
        } catch (Throwable ex) {
            Log.e(ex);
            ex.printStackTrace();
            throw new IOException(ex.getMessage());
        }
    }
For convenience I also created thin wrappers around these utility functions to be able to pass an array objects for the parameters instead of a Map.
Client & Server Code for get_feed
Now that we have the foundation in place for the server and client sides of the REST API, let’s flesh it out a little bit more to see exactly how the code will look on both the server-side and client-side. Take the getFeed() method, for example, that is meant to return a list of the posts that should appear in the current user’s news feed.
The server code will look like:
Parse.Cloud.define("get_feed", function(request, response) {
    // ... some logic to retrieve the posts from the database
    if (success) {
        response.success({code : 200, posts : [...]});
    } else {
        response.success({code : 500, message : 'Some error message'});
    }
});
This omits all of the logic and is massively simplified, but the key here is that it is returning a JSON object using the response.success() callback. If there were no errors, the posts are contained in an array under the posts key of the resulting JSON object. So the web service client will use our getList() utility method as follows:
public List<Map> getFeed(Date olderThan) throws IOException {
       return getList("get_feed", "posts");
    }
Sending, Getting, & Accepting Friend Requests
Recall from our database design that friends and friend requests are supported via the “friends” and “pendingFriendRequests” relations in the users table. Sending a friend request to a user involves, adding the current user to the “pendingFriendRequests” relation of that user. Accepting a friend request from a user involves adding the current user to that user’s “friends” relation, adding that user to the current user’s “friends” relation, and removing that user from the current user’s “pendingFriendRequests” relation. The code for send_friend_request is as follows:
Parse.Cloud.define("send_friend_request", function(request, response) {
    Parse.Cloud.useMasterKey();

    (new Parse.Query(Parse.User)).equalTo("username", request.params.username).each(function(friend) {
        friend.relation("pendingFriendRequests").add(Parse.User.current());
        friend.save().then(function(result) {
            response.success({code: 200, message: "Successfully sent friend request"});
        });
    });

});
Some things to note here:
Parse.Cloud.useMasterKey()gives us carte blanche on the parse API. We don’t have any security restrictions. Without this all access would be subject to security restrictions on the currently logged in user.(new Parse.Query(Parse.User)).equalTo("username", request.params.username).each(function(friend) {Creates a query on the User class for all users with “username” equal to the “username” parameter passed as part of the request. Theeach()method then iterates over the results with the provided callback.friend.relation("pendingFriendRequests").add(Parse.User.current());Adds the current user to the “pendingFriendRequests” relation of the found user.friend.save().then(function(result) {We save the user object.save()returns a promise so that callingthen()will result in us being able to defer what comes next until the save is complete. If you’re not familiar with promises, it’s really just cute syntax for a callback.response.success({code: 200, message: "Successfully sent friend request"});This finally returns the response to the client as a JSON object.
The code for getting a list of the pending friend requests is as follows:
Parse.Cloud.define("get_pending_friend_requests", function(request, response) {
    Parse.Cloud.useMasterKey();

    var out = [];
    var user = Parse.User.current();
    user.relation("pendingFriendRequests").query().each(function(friend) {
        out.push({
            sender : friend.get("username"),
            receiver : user.get("username"),
            avatar : friend.get("avatar") ? friend.get("avatar").url() : null,
            screen_name : friend.get("screen_name")

        });
    })
    .then(function(result) {
        response.success({code: 200, requests: out});
    });

});
And accepting pending friend requests:
Parse.Cloud.define("accept_friend_request", function(request, response) {
    Parse.Cloud.useMasterKey();

    var currentUser = Parse.User.current();
    var pendingRequests = currentUser.relation("pendingFriendRequests");

    pendingRequests.query().equalTo("username", request.params.username).each(function(friend) {
        currentUser.relation("friends").add(friend);
        pendingRequests.remove(friend);
        currentUser.save().then(function(result) {
            friend.relation("friends").add(currentUser);
            return friend.save();

        }, function(error) {
            response.success({code : 500, message : error});
        }).then(function(result) {
            response.success({code: 200, message: "Friend request accepted"});
        }, function(error) {
            response.success({code : 500, message : error});
        });
    });

});
The Full Cloud Code Source
You can view the full source for this cloud code here. Each method follows roughly the same pattern:
- Fetch some data from the database
- Iterate through the results to build a JSON response.
Some queries, especially queries involving complex relations like the one in get_feed were a little bit tricky to figure out, but in the end I was impressed by the Parse’s flexibility in being able to support quite complex queries. I won’t delve into the details here, but I will note that Parse’s documentation is exceptional and it seems to have quite a large user base, judging by the number of questions & answers related to parse that are already available online in their forums and elsewhere. I scarcely had to spend more than 5 minutes of googling to find the answer to my questions when I got stuck.
Build the App Yourself
The full project, both the Codename One client project and the parse cloud code are posted on Github to you can download and build the project yourself.
Install the App on Android
I have posted an Android build of this app so you can install it directly on your phone is you wish:
| Reference: | Building Cloud-powered Native Mobile Apps with Parse.com and Codename One from our JCG partner Steve Hannah at the Codename One blog. |
