While Eclipse ships with a comprehensive Git tool, it seems that for certain tasks many developers switch to the command line. This gave Rüdiger and me the idea, to start an open source project to provide a git console integration for the IDE. What happened so far during the gonsole weeks can be read in git init gonsole, eclipse egit integration and content assist for git commands.
Since our last update we have been busy replacing most of the explorative code passages with clean implementations based on unit tests. Additionally the architecture got a thorough overhaul which resulted into a split of reusable core functionality and the gonsole specific implementations. Though this wasn’t the main intent the rework led to an API that allows to implement other consoles with the same characteristics easily. In this post we will take an excursion to explain the few steps needed to write your own console.
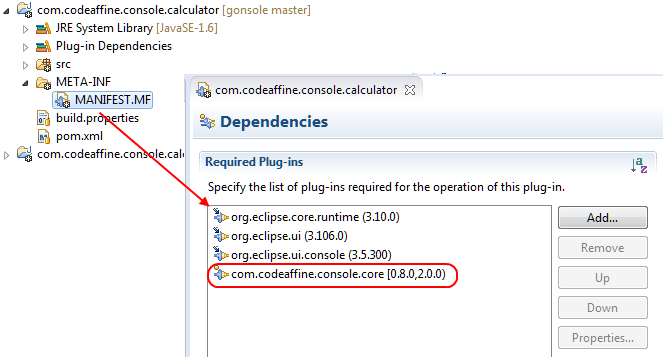
Assume that you want to create a command line based calculator that provides arithmetic operations like sum, sub etc. The basic set of features is provided by the com.codeaffine.console.core plug-in that supplies the API to contribute the calculator console.
First of all we need a plug-in project that declares the necessary imports:
In the gonsole project we got used to nested TDD. That’s why we want start by writing an acceptance test. Luckily com.codeaffine.console.core.pdetest exports a class called ConsoleBot that enables us to create such tests comfortably. Since these tests run in a plug-in environment we will place them in a fragment.
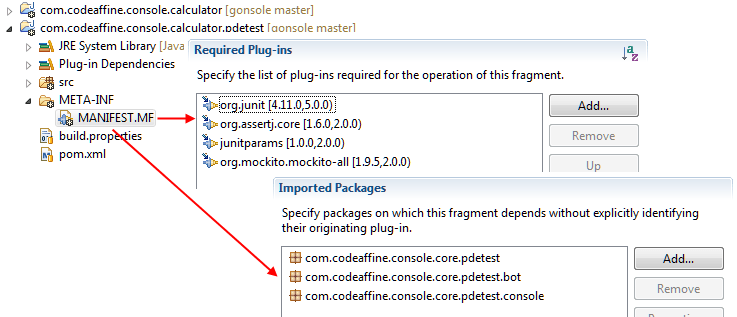
With these two projects in place we are ready to write our first happy path test:
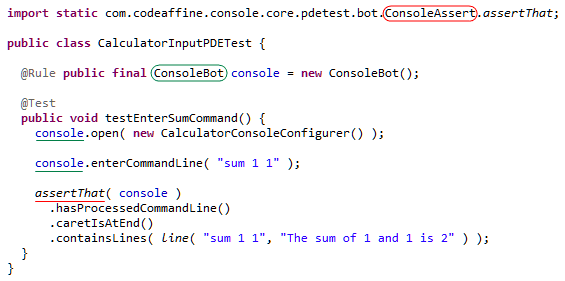
As you can see, the ConsoleBot is a JUnit Rule that hides the details of how to create a ready-to-test console. Furthermore it allows to simulate user interaction like typing commands and opening content assist. To check the expected outcome conveniently, there is a custom AssertJ assertion.
ConsoleBot#open() expects an implementation of ConsoleConfigurer as its first parameter. Simply to get our test compiling, the next step is to provide a skeleton implementation thereof. Such configurations contribute the pluggable parts that make up a particular console implementation. But before we can launch our console for the first time there is one last thing to do:
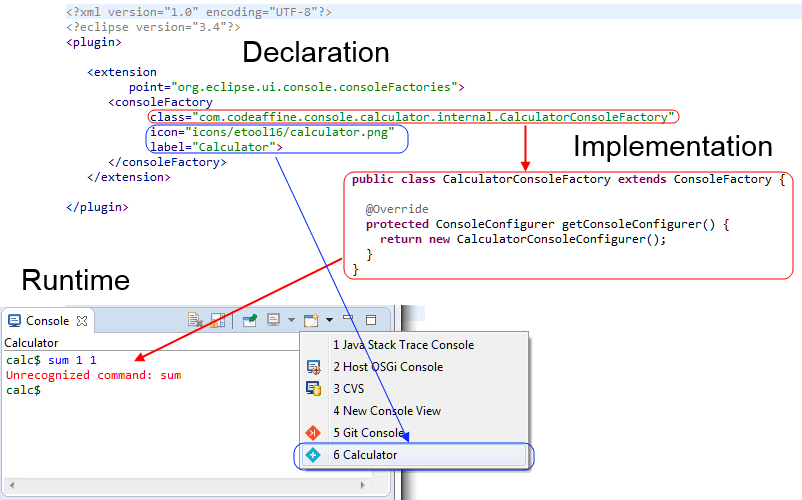
To hook the console into the Eclipse console view our plug-in has to provide an extension to the org.eclipse.ui.console.consoleFactories extension-point. The latter expects an implementation of IConsoleFactory which is provided by our console API type ConsoleFactory. The sole coding needed is to override ConsoleFactory#getConsoleConfigurer() as shown above.
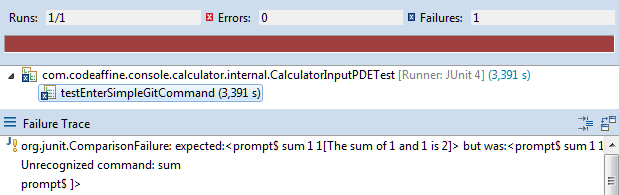
Of course having only a scaffold, the runtime console does nothing useful yet and running our PDETest leads to a red bar:
Now we are ready to develop the interpreter, content-assist and input prompt components in the usual TTD manner. We proceed doing this until our end-to-end test turns up green. We even have encountered that this can be a good starting point for an explorative break-out in case we are not sure which way to go. Once the end-to-end tests are green and we have gained enough confidence in our solution, we start to replace the hacked passages step by step with test driven solutions.
For the example we took the hacking approach:
class CalculatorConsoleCommandInterpreter
implements ConsoleCommandInterpreter
{
static final String SUM = "sum";
private static final String SUM_RESULT
= "The sum of %s and %s is %s" + LINE_DELIMITER;
private final ConsoleOutput consoleOutput;
CalculatorConsoleCommandInterpreter( ConsoleOutput consoleOutput ) {
this.consoleOutput = consoleOutput;
}
@Override
public boolean isRecognized( String... commandLine ) {
return commandLine.length > 0 && SUM.equals( commandLine[ 0 ] );
}
@Override
public String execute( String... commandLine ) {
int sum = parseInt( commandLine[ 1 ] )
+ parseInt( commandLine[ 2 ] );
consoleOutput.write( format( SUM_RESULT,
commandLine[ 1 ],
commandLine[ 2 ],
valueOf( sum ) ) );
return null;
}
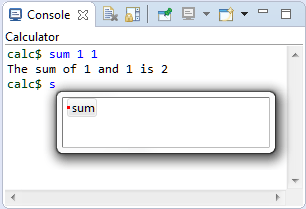
}The snippet makes our test happy by providing a simplistic ConsoleCommandInterpreter that supports the sum command. Supplemented with a similarly elaborated ContentProposalProvider our calculator in action now looks like this:
Although there could be said much more about custom console implementations it is time to bring this excursion to an end. Please note that the console core API is still under development and might undergo substancial changes. For those interested we have added the calculator projects to the gonsole git repository and its build:
Repository: https://github.com/rherrmann/gonsole
Build: https://travis-ci.org/rherrmann/gonsole
This ensures that the example will be kept up to date. And of course for a more grown-up solution you might always have a look at the gonsole implementations.
That’s it for today folks, let’s get back to work. And maybe the next time we are indeed able to show you more content assist features…
| Reference: | gonsole weeks: oops – it’s a framework from our JCG partner Frank Appel at the Code Affine blog. |
