In the previous article we explored static analysis as one of the first steps in Continuous Delivery. Our journey will continue with unit tests.
Unit Tests
 Unit tests are probably the most important part of Continuous Delivery. While unit tests cannot substitute integration and functional tests, they are very easy to write and should be very fast to execute. As any other type of tests, each unit test should be independent of each other. What differentiates unit from other types of tests (integration, functional) is the scope. Each unit test should verify only a single unit of code (method, class, etc). Main benefit of unit tests are that they can find problems early due to their speed of execution. When ease of writing is combined with very short execution time it is no wonder that unit test often represent biggest part of automated tests.
We won’t go deeper into unit tests. It is a huge subject that requires its own article.
Test-Driven Development (TDD)
For the successful implementation of continuous delivery, tests must be pushed to the repository at least at the same time as the implementation code. Otherwise, code will not be tested (at least not in the same build that delivered it to production). Without the code being tested, we’re running the risk of delivering to production the code that does not meet quality requirements. Remember, the final goal is to deliver to production the code after every push unless one of the steps in the pipeline failed. Even if you opt for slightly easier forms like continuous deployment or integration, unit tests pushed at the same time as the implementation code are a must. For this, and many other reasons, test-driven development is one of the crucial elements in the continuous delivery. While the minimum requirement is to push tests no later than the implementation code, with test-driven development we’re getting additional benefits like improved design, reliable documentation, etc.
So, what is TDD? Test-driven development (TDD) is a software development process that relies on the repetition of a very short development cycle: first the developer writes an (initially failing) automated test case that defines a desired improvement or new function, then produces the minimum amount of code to pass that test, and finally refactors the new code to acceptable standards. Kent Beck, who is credited with having developed or ‘rediscovered’ the technique, stated in 2003 that TDD encourages simple designs and inspires confidence.
Please consult the example walk-through and Java best practices for more info.
Jenkins
![]() For those of you who did not follow the previous articles in detail or those who failed to reproduce all exercises, please install Vagrant and clone the code from the repository TechnologyConversationsCD. To create a virtual machine with Jenkins and myFirstJob job that performs static analysis, please go to the directory servers/jenkinsWithAnalysis inside the cloned repository and execute the following:
For those of you who did not follow the previous articles in detail or those who failed to reproduce all exercises, please install Vagrant and clone the code from the repository TechnologyConversationsCD. To create a virtual machine with Jenkins and myFirstJob job that performs static analysis, please go to the directory servers/jenkinsWithAnalysis inside the cloned repository and execute the following:
vagrant up
If this is not the first time you’re starting this vagrant VM (“vagrant up” is configured to run the Docker container only the first time) or for some reason Docker container is not running, it can run with the following shortcut script.
/opt/start_docker_with_jenkins.sh
We can check which containers are running by executing:
docker ps
When finished, virtual machine with Jenkins and myFirstJob job will be up and running. Results can be seen by opening http://localhost:8080 in browser.
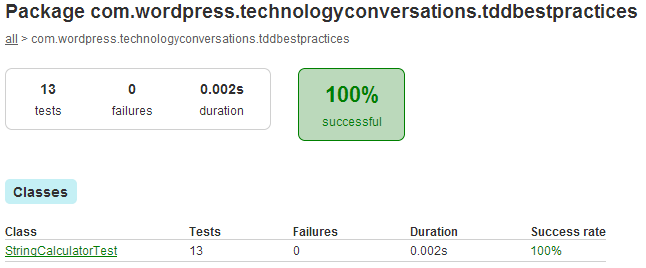
We’ll continue using Gradle as our build tool. In the last article we were executing the Gradle task check to run static analysis (CheckStyle, FindBugs and PMD). Good thing about the check task is that it runs “all verification tasks in the project, including test.” So, there’s nothing for us to do to run the tests. They are already running. We should, however, put a bit of effort to display test results in a bit nicer way. Currently, they are only visible as the build status (red if tests failed) and through the logs.
To publish the test results, we should add the post-build action called “Publish JUnit test results report”. As “Test report XMLs” we should put the path “build/test-results/**/*.xml”.
Jenkins JUnit reports have few things left to be desired. For that reason, in case of Gradle, I prefer using “HTML Publisher Plugin”. Please install it in the same way as other plugins (Manage Jenkins > Manage Plugins > Available). It can be added to the job in the similar manner as the previous plugin. Select “Publish HTML Reports” from the “Add post-build action” list. Click the “Add” button and as the directory set “build/reports/tests/”. “Keep past HTML reports” is useful if historical data is required.
 To see the reports we just made we need to execute a build either by pushing something to the repository and waiting until Jenkins picks it up or by running it manually using the “Build Now” button1. If you’re using the same repository as the one used by this article, manual build is the way to go.
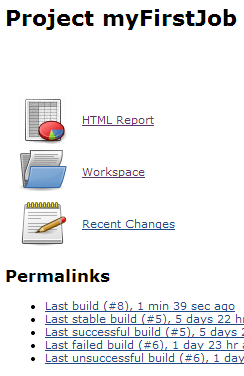
Reports are located in the job itself (“HTML Report” and “Latest Test Result” links). There is also a graph located on the right side below static analysis. Moreover, the same links appear inside each build only this time located on the left-hand side of the screen.
Big question is whether we need reports at all. In case of true continuous integration, most of the time there should be no errors at all (developers should be running unit tests locally before pushing the code). When errors do occur, they should be limited in number (usually only one) and of short duration (priority should be to fix failures as soon as possible). Those characteristics mean that we often need only logs (to see details of some error) and reports are most of the time the same (everything is green).
However, many organizations cannot get to this point easily. There will be more than few errors, it will take hours or days instead of minutes to fix them and management will require reports no matter the results. If that’s the case, Jenkins reporting plugins come in handy. That does not mean that the suggestion is to go down this route (a lot of errors and a lot of time until they’re fixed) but that the reality is often different and that it can take considerable time to reach the end goal: true continuous integration, deployment or delivery.
Travis
There is nothing we should do in Travis. Travis is already running the Gradle “check” task that, among other things, executes tests. Unlike Jenkins’ plugins that allow nice visualization of test reports, Travis has only logs and successful or failed statuses. We already discussed pros and cons of not having reports.
Circle
 As with Travis, Circle does not require anything special to be done to run tests. It already knows that Gradle has the test task and executes it.
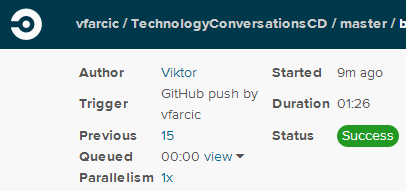
We already saw in the previous article that Circle is very similar to Travis in its approach to CI. Major difference was in the stability and speed (it is several times faster than Travis). With tests we can explore another difference. Circle has the option to store build artifacts. With this option we can accomplish the similar effect as what we did with Jenkins. We’ll allow users to see the Gradle tests reports. All we need to do is to modify our circle.yml file.
[circle.yml]
test:
  post:
    - cp -R build/reports/tests/* $CIRCLE_ARTIFACTS
Full source code can be found in the circle.yml.
Once this change is pushed to the repository Circle will store all our reports and make them available through the “Build Artifacts” option available in each build. By opening index.html we can see the nice report Gradle generated for us.
Summary
It was fairly easy to set up the execution of tests in all three tools (Jenkins, Travis and Circle). Actually, the execution was already done for us by the Gradle “check” task we were using for the static analysis. The only thing we had to do was to tell Jenkins and Circle where our reports are (Travis does not have that luxury).
Jenkins continues to shine with its plugin system. Circle’s “Build Artifacts” was a pleasant surprise and another handy addition to its speed. The more I’m using it, the more I can see the advantages when compared to Travis. On the other hand, Travis’ price is unbeatable (public repositories are free).
In the next article we’ll explore code coverage. It will help us determine how much of our code is actually tested. Stay tuned.
- Word of caution: make sure to wipe the workspace ([JOB] > Workspace > Wipe Out Current Workspace) if running the same build multiple times without actually making any changes to the code. Gradle will detect that there are no changes and do nothing. This is a good thing since that way a lot of time can be saved but it can cause a bit of confusion when testing Jenkins job configuration.
| Reference: | Continuous Delivery: Unit Tests from our JCG partner Viktor Farcic at the Technology conversations blog. |
