Hi all. Today I’m going to show you how to configure MySQL database for Oracle ADF development.
IMHO when you are using ADF with other databases rather than Oracle DB you won’t be able to use the full power of Oracle ADF and sometimes you’ll find yourself looking for workarounds in order to achieve some behavior that with Oracle DB you get out-of-the-box. However, if your requirement is to use MySQL then you should make some configurations in order to use it with this framework. Also, you should check the JDeveloper and ADF certification matrix in order to be sure that the version of your MySQL server is certified. Following is the certification matrix for JDeveloper 12c and ADF: http://www.oracle.com/technetwork/developer-tools/jdev/documentation/1212-cert-1964670.html
What you need
- MySQL 5.5+
- JDeveloper 12c
I’m running MySQL server on Ubuntu server 12.04 64bits, but I suppose that if you are running a windows system the configuration files should be similar. Refer to the Ubuntu official documentation on how to install MySQL on Ubuntu: https://help.ubuntu.com/12.04/serverguide/mysql.html
- Make sure you define a password for the MySQL root user, otherwise you may experience some errors when using MySQL and JDeveloper. You can define the root password during installation, but in case that you forgot to do so, try the following from MySQL manual: http://dev.mysql.com/doc/refman/5.5/en/resetting-permissions.html
- Since we want to work with Oracle ADF, we can configure MySQL database so it behaves similar to Oracle database. We can achieve that by using the sql-mode option. From MySQL manual:
Server SQL modes define what SQL syntax MySQL should support and what kind of data validation checks it should perform. This makes it easier to use MySQL in different environments and to use MySQL together with other database servers.
That said, we need to edit the my.cnf file, which in ubuntu is located at:
/etc/mysql/my.cnf
In a Windows system, you can find the file as my.ini at {INSTALL_DIR}/MySQL/data
Open the file and change the line that starts with sql-mode= If there is not such line, you can add it under the [mysqld] section. Either case, make sure that the line is similar to:sql-mode="ORACLE"
Then, you need to restart MySQL server. In order to do that, run the following commands in a terminal (in Windows, you should use the Windows service that was created when installing MySQL):
sudo service mysql stop
sudo service mysql start
If you want to know what configurations are done when using the value ORACLE, visit the MySQL manual: http://dev.mysql.com/doc/refman/5.5/en/server-sql-mode.html#sqlmode_oracle
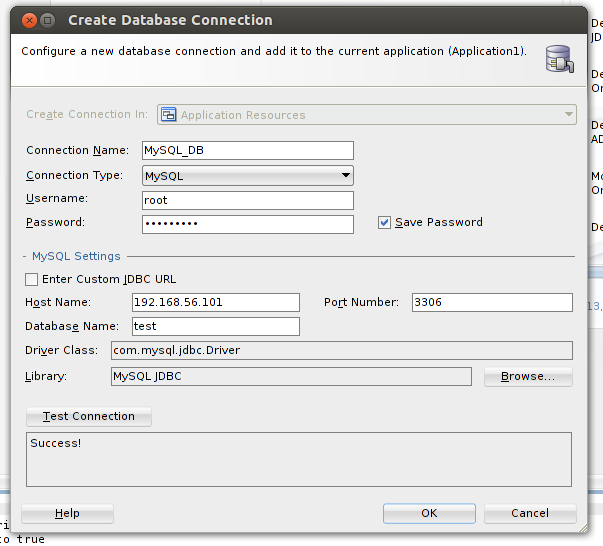
- When creating the database connection in JDeveloper, use the MySQL driver. Notice that once you select the driver, MySQL settings panel appears asking you for information regarding to your MySQL server:

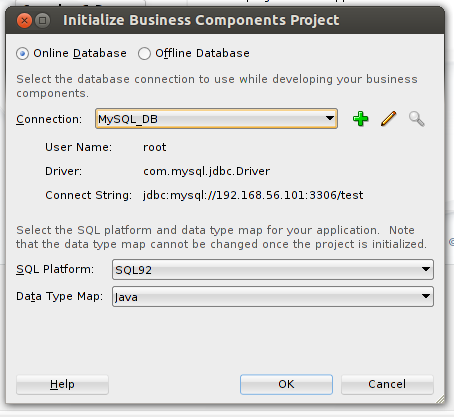
- Last but not least, make sure that you use the proper SQL Platform and Data Type Map. For MySQL use SQL92 as the platform and Java for the Data Type Map. You have to do this configuration for every project that will start using Business Components:

That’s it for today, with these configurations your MySQL will be ready for ADF. On next posts I’ll be sharing workarounds that will help you take advantage of some ADF features on MySQL. See ya!
Resources:
- Vesterli E., Sten (2013). Developing Web Applications with Oracle ADF Essentials. United Kingdom: Packt Publishing Ltd.
- MySQL 5.5 Reference Manual :: C.5.4.1 How to Reset the Root Password. MySQL [online]. Available on Internet: http://dev.mysql.com/doc/refman/5.5/en/resetting-permissions.html [accessed on November 14 2013].
- MySQL 5.5 Reference Manual :: 5.1.7 Server SQL Modes. MySQL [online]. Available on Internet: http://dev.mysql.com/doc/refman/5.5/en/server-sql-mode.html [accessed on November 13 2013].
